
Purchases made through my links help support this website, at no additional cost to you. Details.
My instructions for making this card are for Adobe Photoshop, but you can use almost any graphics program and create the same effects.
It’s not easy to explain this sort of process. It’s vastly easier for me to show you, in person.
If you print out this page and follow it step-by-step, you’ll probably figure out how to create some very cool effects with your computer.

(click on the card for a full-size printable copy)
The figure of the woman is from my Shameless Hussies image CD. (If you already own it, she’s the “clothed-dancer” image in the Performers folder on that CD.)
To isolate her figure for the card, I digitally pasted the image onto my ATC background.
In Adobe Photoshop, I then used Select–>Color Range, and put the dropper over the background color. With that selected, I deleted everything that was that approximate color. I repeated this until the figure was isolated enough.
Then, I used the Eraser Tool in Photoshop–with the soft edges, at 100 pixels–to remove remaining bits that didn’t suit the design.
I added a transparent layer underneath the figure, and use the Airbrush tool (soft edges again) to create a yellow “halo” effect in back of the figure’s head. I really wanted her to glow.
When I add a figure to an ATC, I often have a story in my mind. In this case, I wanted her to be slipping into a fabulous fantasy world from reality, so I wanted a reference to the “tick-tock” everyday world.
But, I didn’t want anything too glaringly modern. So, I used a slim slice of a dated almanac page from my image CD, the 1819 Farmer’s Almanac. I pasted that onto its own layer, and made that layer about a 30% transparency.
Finally, I used the Eraser tool to remove a little of the greenery of the daisies, and reveal the golden straw from an otherwise-hidden layer. The straw restores a sense of proportion to the scene, and it’s also a reference to the gold (another visual pun) in the Rumplestiltskin story.
QUICK HOW-TO TIP: CREATING TRANSPARENT LAYERS
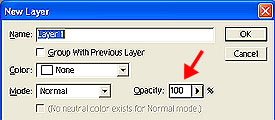
You can make any layer transparent in the Layers menu. Here’s a picture of what it looks like when you create the layer. The red arrow points to the Opacity setting; adjust that to get the level that you want.
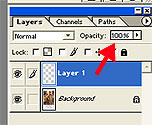
Or, you can adjust the transparency level on the right side of your screen, in the Layers tab. The red arrow indicates where you will adjust the transparency.
If you play with the layers, tweaking them a little here, a little there, you’ll soon get the effect that you want.
That’s really all there is to creating a graphic like this.
For the story behind the card–why I chose the elements that I did–see my page, Gold Leaf – a free, printable ATC.