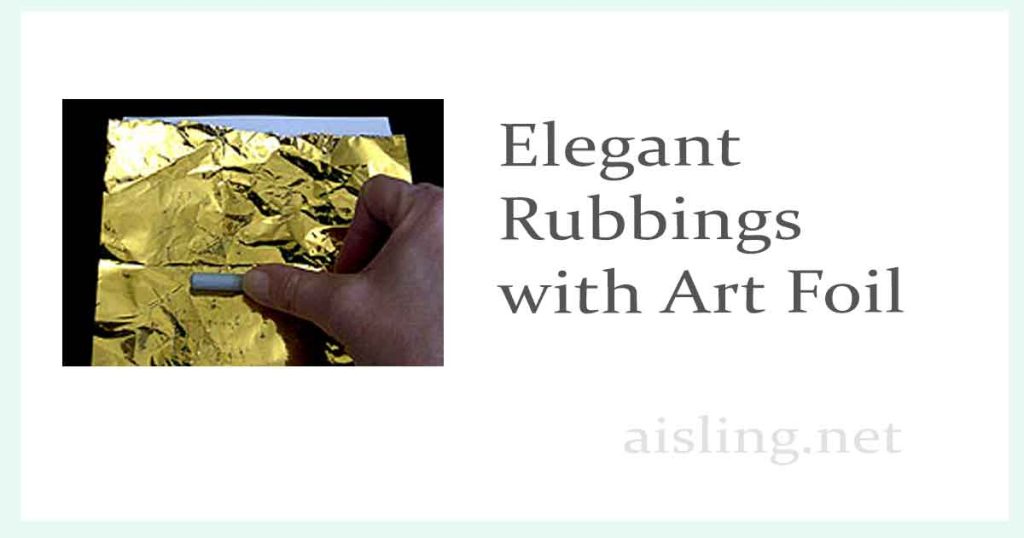
You can create elegant rubbings for your art journaling, mixed media art, or decor.
You can use rubbings from almost any textured surface, and featuring almost any theme. However, the textured item should be made of metal or a material that can withstand pressure without damaging it.
For example, you might do rubbings using metal coins, or keys. You could use automobile emblems, carved elements on furnishings, street signs, survey markers, jewelry, awards, trophies, or… well, almost anything with an interesting texture.
The following examples include rubbings from my “Art Shrines from Dark to Light” workshops, especially the Halloween-themed one I taught in Houston, Texas in 2005.
NOTE: My students did NOT do rubbings on actual gravestones. (In many communities, it’s illegal to use gravestones for rubbings. Too much abrasion could damage the stones.)
I had – with permission – created modeling clay impressions from very old headstones (1700s and early 1800s), using a technique that did not involve direct contact between the clay and the headstones, and did not risk damage to the stones.
That’s what my students used, for their Halloween-themed collages and assemblages.
You’ll start with metallic foil transfer paper, intended to look like gold leaf (or copper leaf, silver leaf, etc.).
Foil transfer papers are used for interior decorating. They’re sold in small amounts as “Renaissance Foil,” which is sold at Amazon, Michael’s, etc. (You can also use Speedball foil, which is nearly as good.)
The following tips should help you use the foil papers effectively. (These photos are from around 2005, when Internet connections were slow, and images had to be small. I’ll try to make time to enlarge them digitally, in the future.)
Above: Rubbings on lightly-gesso’d black tissue paper. Left to right: a religious medal, a casting from an early 19th-century grave marker, and an MBTA subway token.
Supplies
You will need paper or fabric for your rubbings.
- If you’re using fabric, it should be very thin such as a lightweight muslin.
- If you’re using paper, it should not be stiff. Regular printer paper is fine, and tissue paper works well, too, if you handle it carefully.
- You’ll need gesso, painting medium (gel or liquid), or acrylic paint and water. (I prefer gesso for a less-smooth surface.
- You’ll need a brush to apply the gesso, medium, or paint. An inexpensive sponge brush is fine.
- You’ll also need a textured surface as the subject of your rubbing, and a hard rubbing tool, such as the side of a pencil or a stylus.
- And – of course – you’ll need a gold foil product, as mentioned above.
Step-by-Step
1. Paint your paper or fabric surface with gesso, painting medium, or acrylic paint. A thin coat is enough, as long as the surface – where you’ll be rubbing – is fully and evenly covered.
At right, I was using regular white printer paper, treated with black gesso.
If you use acrylic paint, thin it with water or painting medium. Paint can thicken the paper and prevent you from being able to highlight as many details.
2. When the prepared surface is fully dry, layer your supplies:
First, place the subject of the rubbing on the bottom.
Then, place your prepared paper or fabric over it. On top, place a piece of transfer foil, shiny side up.
(In the illustration, they’re angled to show the layers. During the actual rubbing process, each layer is centered over the one below it.)
3. With the rubbing tool (I’m using the side of a pencil in the photo), rub firmly all over the area where you expect a design to appear. You’ll probably need to rub more than you expect to.
If you lift the foil to see how it’s working, be very certain not to move the paper from its position atop the subject/rubbing surface.
You can move the foil, but if you move the paper your image can be distorted or blurred.
Continue rubbing until the image has transferred to the paper or fabric.
Save the foil. You can use it several times before all of the gold has worn off.
That’s all! Now, you have a rubbing to use as your art.