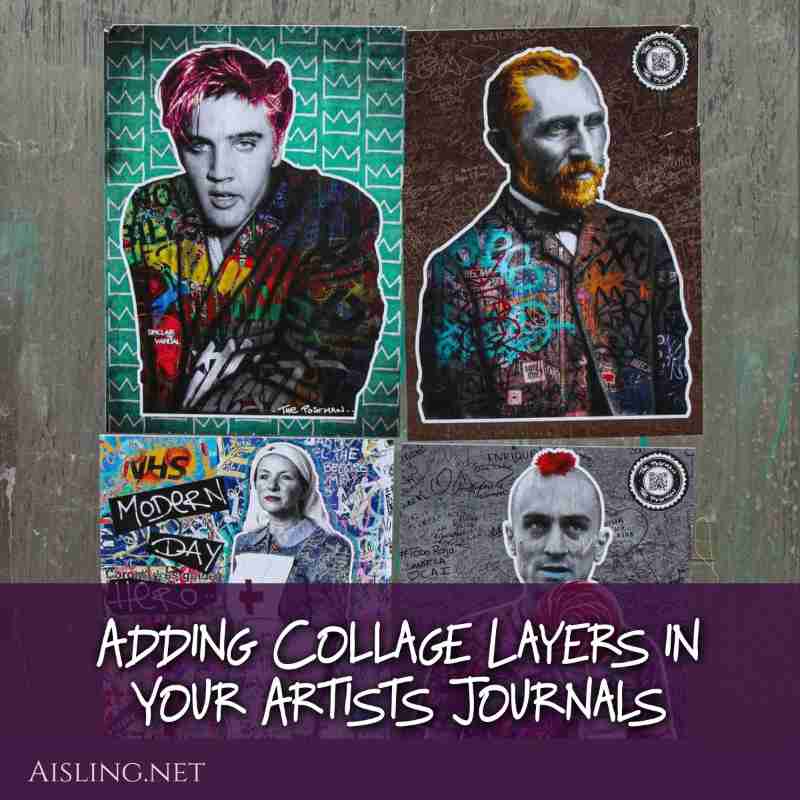
Adding Collage Layers in Your Artists Journals

Collage… it’s about layers, right…? Sometimes just a few. Sometimes a lot.

They can be layers of paint, crayon, colored pencil, stickers, paper, fabric, glitter, and…

Well, you get the idea.

Some artists – including me – use lots & lots of layers in our art journals and other mixed media art.

Here’s some inspiration that may spark fresh ideas.

This first video is by Samie Harding.

rainbow stripe divider


In the next video, artist Robert Burridge – in a “BobBlast” – shares how he layers his collages. His video is three minutes long and filled with ideas for using paper elements, gel medium*, paint, and stencils.

Video URL: https://youtu.be/FA3revJTO6A

rainbow stripe divider

Anne Bagby created some amazing mixed media work, including art journals. Her layered collages and journals have an extraordinary depth. In many of them, her use of cut paper unifies her designs. This five-minute video shows how she used quilting supplies to cut paper strips for a crisp, even effect.

Video URL: https://youtu.be/SICVXhn0V-A

rainbow stripe divider


To learn more about Anne’s techniques – with lots of photos from her gallery work – this 17-minute video is inspiring. It’s sort-of an illustrated podcast. (Don’t be put off by the opening. The video is filled with photos of her mixed media art. Absolutely astonishing. I kind of drooled over my keyboard, watching it.)

Video URL: https://youtu.be/SRk2cn5rTJA

rainbow stripe divider

And, finally, here is an intriguing video by collage artist Michael Madzo. He’s working with his own paintings, paper elements, and gel medium, he’s also using sewing to bring added depth and meaning to his work. Though many artists don’t work with their own fine art paintings, Madzo’s techniques and concepts might spark some of your own collage ideas. The video is about five minutes long.

Video URL https://youtu.be/bR0abMN3T0I

rainbow stripe divider
Finding and curating these videos, I found myself being tremendously inspired to revisit some of my own past paintings (ones that I wasn’t happy with) and see if some of these materials & techniques might bring new life and fresh energy to them.

Also, I’ll admit that I’m looking at some framed canvas images – posters, sort of – that we’d bought at IKEA, just to decorate the walls, short term.  They might make wonderful starting points for mixed media embellishments.

rainbow stripe divider

* I used to use gel medium throughout my art journals, too. Now, I use it to seal my art journaling pages, before painting them.

Otherwise, I’m using Yes!Paste since it’s less likely to bubble and warp the layers I add. It’s also repositionable, far better than gel medium.

Gel medium still has a use in art journaling, for sealing pages and canvases. This can be useful before painting or stamping over them. Otherwise, I rely on Yes!Paste. (If you’ve found a better product, let me know in comments, below.)

Art Journaling? Travel Journal Inspiration!

Ready to travel… or just dreaming of it? A travel journal can be an adventure, even when you’re at home. Get inspired, here…

I fell in love with these videos, talking about travel journaling ideas. I think you will, too. The first one is 10 minutes – longer than I usually feature, here – but it’s loaded with fresh ideas.

Video URL: https://youtu.be/oAxVp25pMHs

rainbow stripe divider

Here’s another short (five minute) video about assembling a travel diary or journal. It’s clean, simple, and something you can create on-the-road, or after you get home.

Video URL: https://youtu.be/GrALoOPk0lw

This next video – also about five minutes long – shows how to create a travel journal before your trip. As she works, she talks about her plans to tour London. As you’ll see, she’s very organized, and leaves space to expand her journaling as she travels. I’m impressed.

Video URL: https://youtu.be/goxu7m--w0Y

rainbow stripe divider
This is another travel journal flip-through. It’s a basic design, but may give you ideas of things to save (and add) as you travel. I’m not sure you need to watch all five minutes of it, because you’ll get the idea fairly quickly. But, I like this because it’s a realistic travel journal… the kind that anyone can create and enjoy.

Video URL: https://youtu.be/tsX4aDMkJrw

Art Journaling Backgrounds – The Excitement Starts Here!

Does your art journal begin with a background? Do those colors and mood spark your creativity? Ooh, take a look at what others are doing…

For many of us, background colors and textures inform everything else we do with the page.

These artists videos are short and fun and… wow!

The first is by Purdy Creative Things. I love the variety she achieves, so quickly and with such simple techniques.

Next, this 8-minute video by Mercurial Milk presents some juicy colors and varied ideas, with useful tips for five different art journaling backgrounds.

The next video is by Maremi’s Small Art, and she shows how to create a textured, magical art background.  This video is nearly 10 minutes long, but worth watching, even if you skip ahead as you understand each step.

The next video is by that same artist. It includes several one-minute background techniques. All of them are simple and use just a few colors and tools.

The video is about 7 1/2 minutes long, if you watch it all the way through. The techniques are repetitive, but each background is unique. I think the variety will inspire you to try some of her ideas, yourself.

And, in Mark Montano‘s video – about 4 1/2 minutes long – he assembles completed artist’s journals pages.

I’m including this video because many of his techniques are fast and easy ways to create vivid, unique journal page background, too.

After watching these, I’m ready to work on my journal. I hope you’re excited about these materials and techniques, too.

Art Journaling with Magazines – Part 1

Art journaling with magazine images can be relaxing and fun, and make a statement at the same time.

It’s something anyone can do, with no art training at all.

Since the 1990s, that was one of my missions: To show people – especially women – that they could express themselves in art, no matter what.

Initially, I focused on torn-paper collages, because they were easy and were supposed to look a little “messy.”

Also, some of the words & slogans in magazine advertisements… wow! They can be great lines to include in your artist’s journal.

If you’re art journaling with magazine photos and text here are some videos that may inspire you.

How to use magazines for art journaling – with mixed media additions

Here’s a short video of Kelly Kilmer flipping through some of her artist’s journals. She uses lots of magazine images in her work, but also pens, paint and other fine art supplies.

Not seeing that video? It's at https://youtu.be/gVfe1wlwbd0 where you can find more of Kelly's art journaling videos, too.

One way to layer magazine layers in your art journal

In the next video, you’ll see how pitje4life adds magazine images – one over another – in her journal. (This starts part-way through the video, where she’s actually putting the images on the page.)

NOTE: I don’t recommend using white glue to attach paper, because you risk it bubbling the paper, even after it’s dry. But… I’ll talk about that, later. First, the video:

Link: https://youtu.be/uo0Wsf2kaqc

Instead of white glue, I recommend Yes!Paste. I apply it gently with a sponge brush. Then I place the paper where I want it to stay.  (However, Yes!Paste is repositionable for several minutes. I’ve successfully moved magazine images as much as 10 minutes after first placing them.)

If you use gel medium as the adhesive, do not smooth it, or you’ll stretch the damp paper and it will stay bubbled after it dries.

(I learned that technique from collage artist Claudine Hellmuth, when we both taught at Artfest.)

Also – from my experience – I have better luck letting the gel medius air-dry, instead of applying heat to rush it. (Your mileage may vary.)

And then there’s a gluestick approach to art journaling with magazines

Some artists use gluesticks, as Jenn does in the following video. It’s about 10 minutes long, and she shows you exactly how her two-page collage came together. It’s from the “One Magazine Challenge.”

Her YouTube channel is Art Therapy with Jenn. Video link: https://youtu.be/H6FFrTRLf84

Where to find magazine images (and more) for art journaling

If you’re wondering where artists find delightful and deliciously quirky images for these kinds of collages, here’s Colleen McCulla‘s seven-minute video explaining her resources.

Link: https://youtu.be/EfliO_D78QE

I hope those videos inspired you to create some magazine collages in your artist’s journals. (I can hardly wait to start a new journal, after seeing these.)

If you have any questions or tips, I hope you’ll leave a comment, below. Thanks!

Folded Paper Art Journals

Artists’ journals can be as big – or small – as you like, especially if you make them by hand.

You can even start with a single sheet of paper and – in just a minute or two – fold it into a simple journal.

Here are some videos to inspire you.

Folded Journal One

First, here’s a video by Cathy Johnson. She’s probably best known for her watercolors and mixed media art. Here’s part of her longer video about folded-page journals.

To see the entire video from the beginning, visit https://youtu.be/CffQyRdTDUc

And, you can subscribe to Cathy’s YouTube channel … she’s posted many videos to inspire you!

Folded Journal Two

Of course, you don’t have to stop with a single sheet of paper. For a larger journal – or a journal-inside-a-journal – you could add more (and larger) sheets of paper.

LK Ludwig – part of the original artists’ journals movement – filmed this several years ago. In less than a minute, you can see various ways she uses fold-out pages in one of her handmade journals.

I think those are brilliant folding ideas, to get the most from any artist’s journal.

Here’s the link to her YouTube channel: Lk Ludwig

But maybe you want something small, different, and a little quirky. The next couple of videos may inspire you.

Folded Journal Three

This one is a journal-in-a-journal, best if you want to expand an existing journal. It’s from Paper Pixie, and it’s a fun idea.

You can watch this video and others at Paper Pixie's YouTube channel: https://www.youtube.com/channel/UCrE5BOtFFlaurAulAU3C0Ig

Folded Journal Four

This video is longer than the others – a little over six minutes – and filled with ideas. In some ways, it’s similar to Cathy’s video… but this is simpler. Also, unless you attach a couple of these – back to back – it produces an art journal with fewer pages.

I love this concept if you’re starting with scrapbooking paper, or sheets of paper ephemera.

It’s one of many projects Maremi features at her YouTube channel.

What are your favorite folded journal ideas? I hope you’ll share your thoughts in comments, below.

Altered Book Art Journaling – How-To

Altered books are a great way to create an art journal. It’s recycling, in a way, but with lots of added benefits.

Drink up these videos for ideas!

The next one is a lovely demonstration by Art by Silas. It shows how to create a mixed media artist’s journal. It includes torn paper collage – one of my favorite techniques. And it’s a good way for a beginner to get art journaling ideas. (The video is about five and a half minutes long.)

Here’s the video:

If you like this video, be sure to see Silas’ other videos at YouTube. She has a delightful sense of style.

The next video features a style almost 180-degree different from Silas’ style. Dana S’s altered book is somewhat dark, Steampunk-ish, and a bit Goth. I love the variety in it!

And here’s Karen Gaunt’s “lazy” tips to altered book art journaling. If you want to cover pages quickly, her tips can be very useful.

And finally, if you want to go extreme with your altered books, check this next clever concept… a book with added drawers!

Good Vibes 1 – A Coloring Demo

Good Vibes - Aisling's coloring demonstration.One reason I create coloring books is so I can color in them myself.

Also – as a coloring book artist – I think it’s important to color your own drawings.

Then, you understand the experience.

Some people want big, bold areas to color. They want to complete them in one sitting.

Others want tiny, detailed areas, and pages that take a long time to complete.

And some want a mix of both in every coloring book.

It’s why I create lots of different kinds of coloring books.

My “Good Vibes” coloring book is a mix. This video shows one of my more detailed designs, and how I colored it. (It was a stressful, not-enough-sleep week, and coloring was a way for me to get the tension out. I think a lot of us use coloring to help us deal with life’s little – and big – stresses.)

I’ll post more videos like this, as I color my own pages. They may give you some ideas for how you’d color them… or, hey, maybe how you wouldn’t! LOL

Also, I was using three brands of coloring pencils: Pluqis, Prismacolor, and Staedtler.

I was impressed with Pluqis. For the low price, I expected very hard leads that wouldn’t blend well.

Instead, I love them. They’re not as brilliant as Prismacolor colors, but I often use Pluqis first. Then, I add dazzle with Prismacolor coloring (lightly) over the Pluqis areas, or using Prismacolor for highlights & shadows.

Tip: Prismacolor leads can be just slippery/oily enough that it’s difficult to color over them… unless you’re using another Prismacolor pencil, that is.

So, I usually sketch in my color ideas with Pluqis, first. If I don’t bear down too heavily on the paper, I can usually color over Pluqis with Prismacolor… but not always vice versa.

Prismacolor Manga pencilsPrismacolor pencils are pretty much the top of the line for most coloring book enthusiasts. They’re soft, they blend well, and… yes, the price can be daunting. I bought their Manga set, which is priced fairly low at Amazon.com, and it includes some good, juicy brights and subtle darks.

I also use Staedtler’s bright colors (with soft leads), but – to be honest – they’re in third place. Where I used to use Staedtler, I now use Pluqis when I can.

However, I know people who consider Staedtler the absolute best among colored pencils. So, it’s probably a matter of taste. And, sometimes Staedtler is the only line with the exact color that I need.

I hope those tips help. I’ll share more creative ideas – and coloring videos – soon.

Meanwhile, I hope you’ll try my Good Vibes coloring book, and let me know what you’d like more of, in the future.

Easy Kitchen Gardens – Green Onions & Mint Cuttings

This Christmas – like last year – we started kitchen gardens for friends & family.

They’ve been a great success. (My own green onions have been thriving for over a year now. I just keep cutting them back – to use in recipes – and the plants regrow bigger & more flavorful every time.)

Today, we delivered four green onion plants (already started) as Boxing Day gifts to the four managers of the apartments where we live.

Would you like to grow a mini-garden in your kitchen? It’s easy!

Here are links to the instruction sheets (PDFs) I created. They explain how to start your own kitchen garden, using items from the produce department at your grocery store.

Planting a kitchen garden from cuttings: Green onions

Planting a kitchen garden from cuttings: Mint

Notes on Tidying Up – A First Pass with KonMari

Life-changing magic of tidying up - KonMariLike many people, I’m working my way through “The Life-Changing Magic of Tidying Up…” by Marie Kondo, also called the “KonMari” process. It’s about decluttering, and surrounding yourself only with things that bring you joy.

The process has been astonishing, and I’m still early in the process.

The following is this morning’s observation, which I shared elsewhere (in social media), but… well, you may enjoy this, too.

Clearing out, I keep stumbling onto things I’ll like but I know I’ll never use.

Or, an item that’s long past its “use by” date in the real world, but I’ve had the idea that “I might need this someday.”

Or, the reason I bought it…? Now, it’s LIGHT YEARS off my current and projected creative trajectory.

But, I’ll be honest. Letting go of the item is, on a small scale, kinda-sorta like a divorce.

The breakup itself can be difficult (or not), but the REALLY excruciating part is: letting go of the original dream.

You know… that “ooh, shiny” moment when I acquired whatever-it-is. The idea that it would be the coolest thing EVER, when I used it for… something. Often, that was some specific event or project that was part of an even larger, future vision.

And then, my life swerved in a different direction.

A direction that made more sense and turned out pretty darned cool, and I do NOT regret it.

But each new adventure on that path took me even further from the earlier vision.

So, a lot of the stuff I’m letting go of now… it was part of a rosy, “what if..?” dream. But that’s in the past.

Often, the swerve in my life happened for an external reason.

It’s WAY too easy to blame it on someone who really DID stand as an obstacle in my path, at that point. And he or she really WAS a jerk.

But, jerk or not, my life went in a different direction. And I had fun anyway.

Probably a LOT more fun than I might have had, on the previous path.

Still, some of this process is like a divorce. And it’s FAR to easy to want to hold onto that old dream (and that related, old grudge)… IF I let myself do that.

The process isn’t easy, but it’s healthy. And, by releasing those mini-anchors to the past, I’m allowing myself to move forward with less holding me back.

For me, THAT’s what this is about.

Fore-Edge Book Art – Historical Examples

When I first saw this concept in the movie, Crimson Peak, I didn’t think fore-edge book art was anything mainstream… ever.

Now, I’ve learned that it’s a legitimate book art. (How did I never hear of this, before?)

It’s something I’m considering including in my altered books art, and perhaps other projects.

Another example, from 1801:

Here’s a modern artist working with this concept:

For more historical insights, this 28-minute discussion explains the fore-edge tradition and practice in more detail: