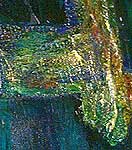
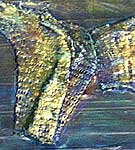
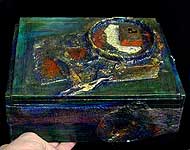
After draping your art shrine or assemblage with plaster and gauze, you can achieve astonishing results by layering paint and polyurethane.
These photos show just a few of my experiments with this technique.
 |
 |
 |
It’s best to read this entire page before shopping for paint, polyurethane, and related supplies. You may get some great, unique ideas as you read…
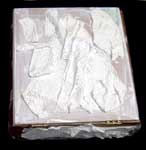 |
Start with a surface that you’ve prepared by adding texture with plaster and gauze.The surface should be painted with at least one coat of gesso so that it doesn’t absorb so much paint.
You’ll also need a paintbrush of some kind (foam is okay) and paint. I’m using mostly Brera acrylic paints, an Italian line from Maimeri (pronounced “my-MERR-y”), in my art. You’ll also need polyurethane with a glossy finish. |
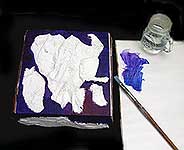 |
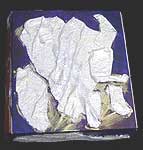
1. If you need to paint a dark background, do that first, avoiding the raised areas that will be covered with gold. You can mask the areas that will remain unpainted, by covering them with easily-removed masking tape, if you like. I rarely use this, and prefer to apply the background paint carefully.Generally, I mix two or three colors on the brush as I paint, to give the surface a greater sense of depth. If I want the shrine to be very dark and mysterious looking, as in the three illustrations above, I’ll paint the raised areas as well as the background.
In this demo, I’m using Brera Violet #443, Brera Phthalo Blue #378, and Winsor & Newton Finity in Permanent Rose. I’m leaving the raised areas white, so the gold will be especially light, too. |
 |
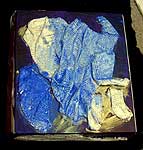
2. When the background is fully dry, paint gold onto the raised areas. It’s okay to be a little sloppy. You can use one regular layer or a couple of thin layers of paint, depending upon what works best for you. In humid climates, two thin layers are usually best, allowing them to dry fully between coats.In this demonstration, I’m painting with Brera #142, Luster Gold acrylic paint. You can use any brand of interference-type gold for this, or even gold ink or a gold leaf type of paint.
When wet, the paint will look whitish and opaque. The white vanishes as it dries, leaving the surface translucent gold. If you painted the raised areas with a dark color first, you will definitely need two coats of the gold paint over it, to get a “real” gold look. |
 |
3. When the gold has dried, apply a very moist layer of paint in the color of your choice. Generally, you’ll use the same colors as your background. Press the paint into the holes in the gauze and the depressed areas in the texturing.If you’re covering a large area, paint some of it and wipe off the paint (see step 4), then paint another area of the surface, and wipe the paint off, and so on. In the photo, the lower left corner has been painted, the upper right has been painted & wiped, the and rest is still gold, waiting for paint.
If you were sloppy with your gold, also paint over the areas that were highlighted. Let the paint dry for just a minute or two. (I used Cobalt Blue for this layer.) |
 |
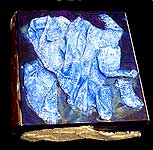
4. Using a paper towel or soft rag, gently wipe some of the fresh paint off, leaving some of it behind, especially in the depressed areas. Then, let the paint dry fully.In this photo, you can see how the paint remains in the tiny holes of the gauze, and in the depressed areas of the shrine. |
 |
5. Paint with a high-gloss polyurethane. Acrylic polyurethane is not as shiny, but it dries faster and without toxic fumes. Regular polyurethane must be used with good ventilation, takes at least four hours to dry, requires turpentine or paint thinner for cleanup, and can yellow slightly with time.I use the paint-on kind of polyurethane, with a foam brush. However, you can use spray polyurethane in a well-ventilated area. Several light layers are better than one thicker layer.
Important: Let each side dry flat before turning the shrine to polyurethane another side of it. |
 |
6. When the polyurethane has dried, repeat steps 3 and 4, using another color of paint in the same and/or different areas on the surface.(Don’t cover the whole thing again. I like to paint areas no larger than one inch squares, and sometimes just 1/2 inch streaks.)
Add up to four layers of paint (use polyurethane after adding two colors, for maximum depth). If you add more than four layers of additional colors, it can look gaudy or muddy. (But, if you make a mistake, you can generally scrub down to the last polyurethane layer, and try again.) If you want a “golder” look–and I usually do–highlight just the peaks of the texturing with gold. Press small pieces of gold or other leafing into the almost-dry paint, if you like. Add one or two coats of polyurethane after the final layer of paint. Additional layers can add to the ‘dichroic glass’ illusion. |
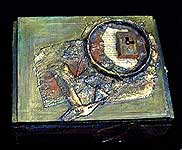
Optional: When you paint the raised areas with gold, you might try painting the entire surface of the piece with a thin coat of Luster Gold or an interference gold. This paint is generally translucent.
In the photo on the left, the light is shining directly on the box. To the right, I’ve tilted the box slightly so that light penetrates the gold paint, and you can see the color beneath it.
 |
 |
Remember that, although these effects look like metal, they’re still based on plaster and gauze. So, the surface can be brittle if dropped or chipped.
The more you coat it with polyurethane, the better your protection.
However, it’s best to treat these objects as fragile.
They’re lovely to look at!
Amazon and the Amazon logo are trademarks of Amazon.com, Inc, or its affiliates. As an Amazon Associate, I earn from qualifying purchases.
