
This is page two of the instructions that started at Art Shrines – Add Texture with Plaster Gauze.
Plaster and gauze – the same materials used in medical settings for traditional plaster casts – can add excitement and dimension to your art shrines and assemblages.
5. Dip gauze all the way into the water, and remove it quickly.
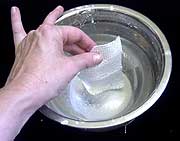
The longer it sits in the water, the more plaster washes off the gauze, and the less rigid the final results.
Also, it’s not necessary to squeeze water out of the gauze. In fact, if you squeeze the water out, you may also lose some of the plaster.
6. Drape the wet gauze directly onto the surface that you’re embellishing.
Once it is in place, you can flatten it if you want less texture; otherwise, just leave it where it is.
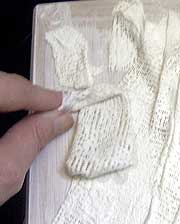
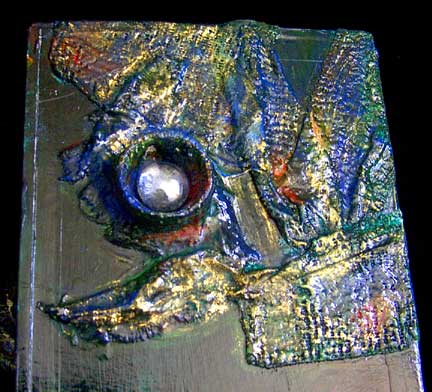
In this photo, the cigar box had been gessoed before embellishing. You can gesso afterward if you prefer. It doesn’t make much difference in most cases.
This gauze will stick to untreated Altoid tins, without gesso and without removing the paint first.
If it starts to lift up after the gauze dries, the paint and sealer usually act as glue to reattach the gauze.
7. To vary the texture of the gauze…
You can smooth parts of it with your fingers, gently spreading the plaster so that it fills some of the holes in the gauze.
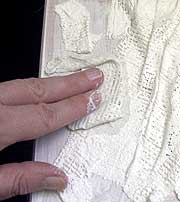
I like to smooth no more than 50% of the gauze in my art.
The holes will catch the paint later, making your finished piece look even more ancient and mysterious.
8. As soon as that piece looks good, leave it alone.
Repeat with another piece of gauze, adding more layers or areas of texture to your surface.
The gauze sticks to itself best when wet. Try to apply all of the gauze in one sitting.
9. Impatient? Speed the drying time by heating the gauze.
You can speed drying time with heat from a tool like an embossing gun. However, be sure not to scorch it.
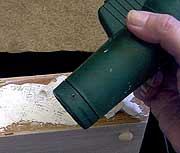
In some cases, the painted surface of the object may bubble or melt under the extreme heat of the embossing gun. Use it cautiously, if you use it at all.
Heating is not necessary.
Even if with extensive use of the embossing gun, you should still wait at least an hour or two before painting the gauze.
In general, it’s good to let the gauze dry overnight rather than rush it with heat.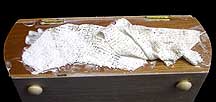
It’s not necessary to cover the entire surface with gauze. In fact, I recommend leaving part of it untreated.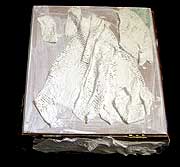
Let each surface dry to the touch before moving the box to embellish another side.
Wet gauze can slide off the box if it is tilted too soon.
A mix of smooth and rough areas on the gauze will result in a more interesting and varied painted surface when the embellishment is complete.
10. Seal the gauze with gesso.
For best results, cover the gauze with at least one coat of gesso before painting it.
Be sure that the gauze is fully dry before applying the gesso, or the gesso can seal the moisture inside the fabric.
11. When the gesso is dry, apply paint and other embellishments.
Plan to paint your art shrine – or other mixed-media piece – in layers. Let each early layer dry fully. Those layers will form a further seal that prevents the gauze from absorbing moisture.
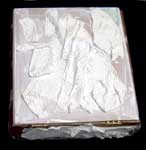
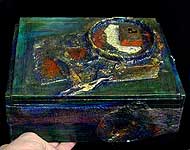
Here’s what one of my cigar boxes looked like, ready to paint.
Here’s what it looked like with two layers of paint. First, I applied gold paint and let it dry thoroughly. Then, I added a light coat of blue in some areas, and a heavier layer of blue on one side.

Then, when those layers had fully dried, I started getting wild with color. Generally, I’d paint some color on, and then wipe some (or most) of it off.
This shrine had about five or six layers of paint, each a different color.
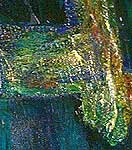
Sometimes I’d wait for the color to dry. At other times, I’d work a new color into the still-wet pigment. Then, I’d add another color, doing the same thing.
At the conclusion, I added some further embellishments. They included a deep bottle cap. I think it was from laundry detergent, and I covered it with plaster gauze, too. The final touch was a smooth glass gem, which I think had been a playing piece from a board game.
And here’s another cigar box art shrine, treated similarly. The round shape was a plastic lid* from a Pringles potato chip container.
I hope those give you some ideas for your own mixed media artwork using plaster gauze.
![]()
*Trivia: Those snap-on lids – like the ones on Pringles chips – were originally created to seal cans of house paint.
However, house painters didn’t warm to that idea, so the patent was sold… I think it went to a coffee company, next.
(The original idea was my grandfather’s. He was the founder of the California Paints, which later expanded to include California Products.)
Amazon and the Amazon logo are trademarks of Amazon.com, Inc, or its affiliates. As an Amazon Associate, I earn from qualifying purchases.
Sei stata molto chiara nella tua spiegazione. E’ da tempo che vorrei realizzare con questa tecnica un quadro da regalare a mio figlio e alla sua compagna, da mettere sul letto come capezzale. Magari inserendo l’immagine che si intravede di una Madonna.
Sto cercando ispirazione, hai da suggerirmi qualche idea o consiglio. Ti ringrazio
Graziella, for an image of the Madonna, I recommend starting with a face of a doll… perhaps a rubber one from a thrift shop. With that as your base, you can build up the art with draped plaster gauze representing the fabric over her hair. For the body, you might also modify the body of a rubber doll, using heavy tape to position the arms and hands where you’d like them. Then use that as the base, as well. When the plaster is dry, it should lift off easily… IF the surface is rubber, or you’ve wrapped it with plastic wrap of some kind, that will lift off easily.
I hope that helps!