Product links support this website. Details.
Homemade dolls’ faces are easy to make, even with little or no sculpting skills. Whether you want to make a doll’s face, a doll’s head, or a mask for a doll, you can make it yourself in under an hour.
Sculpting skills are not necessary. Here’s what you need:
- An existing doll that’s the right size, in any condition.
- Fimo, Sculpey, or a similar clay that you can dry or bake at home.
- Optional : Tools for carving the clay. (They can be anything from kitchen utensils, manicure tools, or plastic or wooden tools for working with plasticene or other clay.)
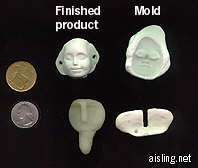
 In the photo above, you’ll see the molds I’ve made. They’re on the right.
In the center column, you’ll see the results, after using those molds.
On the far left, to show size, I have an American quarter (25-cent coin) and 20p from Ireland. (I wrote this article before Ireland joined the EU.)
You can make your own molds in any size.
Here’s how I used one doll’s face from this experiment.

Let’s talk about the two molds that I created, and how you can make them yourself.
The doll mask
In the top row, the mold was made from a vintage international doll. That doll is made of cheap plastic and her face has a nice expression.
To make the mold
- First, I dusted the doll’s face with cornstarch.
- Then, I kneaded a lump of Fimo to soften it, and then flattened it slightly so it was bigger than the face of the doll.
- To create the mold, I gently (but firmly) pressed the Fimo onto the doll’s face.
- Starting at the top, I carefully peeled the Fimo off the face of the doll.
- I gently pressed the mold back into shape.
- Following the directions on the Fimo package, I baked the mold and then let it cool.
To make the doll mask
- Dust the mold very lightly with cornstarch or talcum powder.
- Press kneaded, prepared Fimo (or any clay that you can bake at home or air dry) into the mold.
- Carefully remove the Fimo from the mold.
- If the Fimo changed shape as you lifted it out of the mold, gently bend it back to the shape you want.
- In the edges (flaps) on either side of the face, create holes for the ribbon. (I used the point of a mechanical pencil.)
- Bake Fimo (or any clay) according to package directions.
The result is a mask that you can paint, add ribbons to, and tie onto a cloth doll as a mask or an alternative face.
By studying full-size masks — including Native American designs and Italian masks — you may think of more elaborate designs to modify your doll masks.
Stylized, modern doll head
In the lower row in the photo above, you’ll see a mold that creates a very simple face for a doll. This is a very stylized doll’s face, with a brow, a nose, optional area for eyes, and you can add a mouth if you want… or leave it blank.
It’s a little like faces in artwork by Paul Klee, and inspired by the figures on Easter Island.
To make the mold
I started with a small ball of kneaded Fimo. I smooshed it flat — about 1/4 inch thick — and smoothed the edges.
Then I cut out a three-sided notch with a paring knife. That notch is the size and shape of the figure’s nose.
After cutting the notch, I smoothed its edges.
Next, I curved up the lower edge of the clay mold. That created a handle that makes it easier to use the mold.
Then, I punched a small hole in the handle — with the tip of a mechanical pencil — so I can put a string through the mold, to hang it with others on my studio wall. (I wish I’d done this with all of my molds. It makes storage much easier.)
I baked the mold, following the directions on the Fimo package.
To use this mold
- Roll a ball of Fimo (or any clay you can bake at home, or air dry). Prepare to experiment with various sizes of lumps of clay, to get the proportions you want for your doll’s head.
- Place the ball of clay on a smooth surface.
- Press the mold into it
- Carefully lift the mold from the clay.
- Add as many details as you want*, or leave the face that simple.
- Add a neck to your doll. (Generally, I roll a piece of clay and smoosh it onto the base of the head.)
- Push something round-ish through the neck sideways, to create a hole big enough for a piece of wire. (I’ve used round toothpicks to make this opening, or a piece of spaghetti, or an orange stick, or a big yarn needle.) That hole will enable you to attach the head to a wire armature/body, or sew the doll’s head into a stuffed cloth body.
- Bake the head according to Fimo (or other clay) directions.
*If you’re going to add beads or jewels or something else as eyes or other decoration, create a gentle indentation for each of them, but don’t add them until after you bake the head. Otherwise, the beads might melt, crack or even explode.
Summary
With an existing doll** or a simple design concept, and some use-at-home clay such as Sculpey or Fimo, you can make molds for doll’s heads and faces.
Then, you can use those molds to make doll heads or doll masks, also from home-baked (or air dried) clay.
**WARNING: Do not use a modern, copyrighted doll, particularly if you’re planning to sell or even give away the dolls you create. Though I can’t advise you about copying the doll’s face for your personal use, it absolutely cannot be copied to make dolls you’ll sell.
Amazon and the Amazon logo are trademarks of Amazon.com, Inc, or its affiliates. As an author and affiliate, I may earn a small commission if you purchase anything through my links. That does not affect the item's price, and I only link to products that I use and like, myself.

HOw can I make a doll mold that would be the entire head. Would like to then reuse mold by pouring plaster into it
Joanne, the concept would be the same, except that you’d make the mold in two parts, one for the front and one for the back. If the doll you’re casting from has hair, you’ll need to cover that with something protective. I’d try plastic wrap (cling film).
That’s an entirely different topic, and one you’ll find on websites related to ceramic dollmaking, etc.
Cheerfully,
Ais
Are there any copywrite issues to using the faces of existing dolls? I want to make and market my own doll. Do you have any suggestions/
Michael, there are copyright issues with any existing creations. See the chart at http://copyright.cornell.edu/resources/publicdomain.cfm
“Works” include artwork as well as writing.
Sincerely, Ais