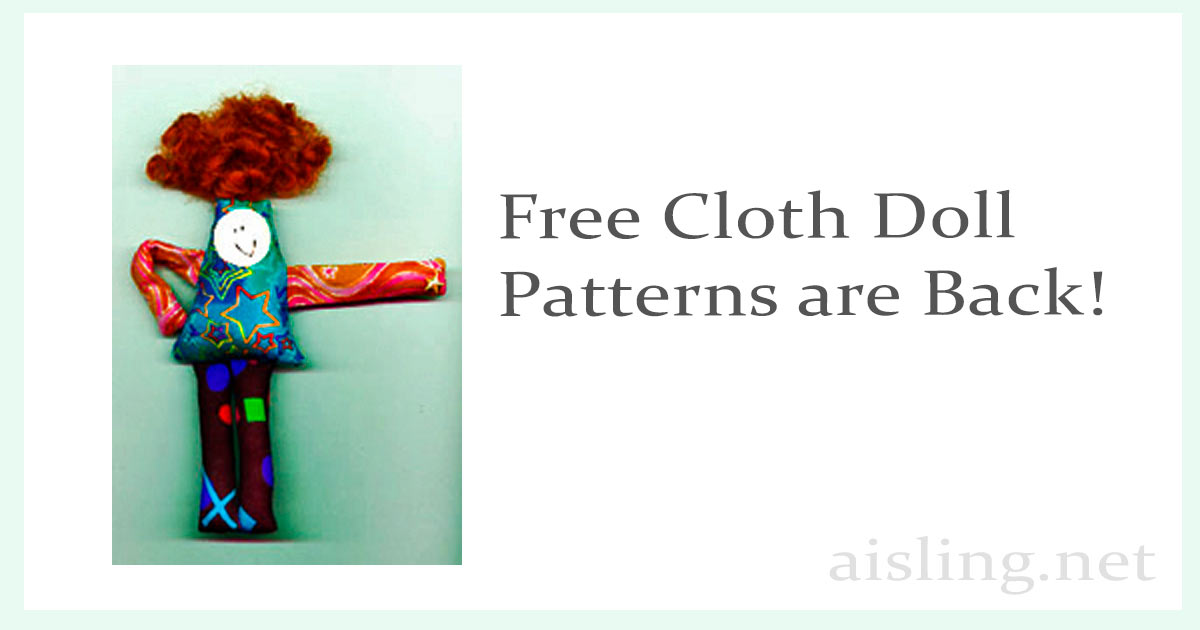
Free Cloth Doll Patterns Are Back!

Updating this website, I stumbled upon these doll patterns, and decided to make them available again.

FREE items for artists and creative people

All of these patterns are free to print and use.

But… these are OLD patterns from ~15 or more years ago, designed to print on 8.5″ x 11″ paper, but at a very low resolution. (I’m working on improving them, right now.)

As usual, these are free patterns for personal use. (You CAN make dolls from them, and then sell those dolls. It’s just the patterns that are for personal use, meaning that you can’t put your name on the patterns and sell them.)

If you would like to feature these patterns on your own website, you MUST include my copyright with the patterns. (In other words, be considerate. Please don’t remove my copyright and claim you created the patterns, yourself.)

If you’d like to reproduce these patterns for a class or workshop, that’s fine as long as the copyright remains on them, and you don’t charge anything extra for the patterns.

These patterns moved here from my (former) Wild Art Dolls website. If any links don’t seem to work, let me know in a comment, below. Thanks!

Here are the patterns & links. If any of the links don’t work for you, leave a comment and let me know.

belle de lautrec and tallulah - Two free cloth doll, art doll patternsBelle de Lautrec and her zany sister, Tallulah Lautrec were created for a swap/round robin at the Yahoo group, Doll Journals.

The patterns and instructions are in PDF format.

You will need: Belle pattern pieces or the pattern for her sister, Tallulah.

Instructions for creating Belle and her clothing (5 pages).

Please read Belle de Lautrec and Tallulah – important reading, before you begin.

More free doll patterns

Each of the next two patterns open in a new window.

Neither of them have sewing instructions, yet.

Right-click on the link to save the pattern to your hard drive, for use later, or click the link and print from the screen.

Image of a free cloth doll - art doll - pattern
Dangerous Women – a free, online doll pattern Print it from your screen, and/or enlarge the pattern so the “one inch” line really is one inch. The doll shown in this post’s header (above) is made from this pattern. (I later added optional wings.)

image of a cloth doll - art doll pattern - that is a free downloadMargaret Mary Fitzcalory-Smythe – a free, online doll pattern with no directions yet.

MAJOR WARNING: She is a VERY skinny doll. (Yes, that was a BIG “oops” on my part…)  I recommend enlarging each pattern piece by 1/4″ to 1/2″ on ALL sides.

RELATED FREEBIES

Paper doll faces, from my zany dolls in Art Doll Quarterly.
(You can adapt these as iron-on faces for cloth dolls, too.)

Teal Magic Art Doll – From a 2000 Art Swap

In 2000, I met other dollmakers online, and participated in art doll swaps.

What is an art swap?

A “art swap” is when artists make several pieces of art – usually identical or nearly alike, though each design is unique, and individually crafted with love.

Then, each artist sends the required number of items (the pieces of art) to the swap’s host.

The host then sends one of each to other participants. (The host keeps one for themselves, as a “thank you” for the work involved in hosting.)

Each participant receives one item of art less than they sent to the swap. (That’s how the host gets to keep one of each.)

“Teal Magic” was the name of the first series of art/assemblage dolls I made for an art doll swap. That’s her, in the small photo below.

an artdoll from 2000 - art that's a doll... or a doll that is art!

What is an art doll?

An “art doll” (or “artdoll”) is a handmade figure – like a doll – that’s created as art.

It’s like sculpture, but designed as a doll. Not necessarily one you’d play with, but certainly one to display.

Each one is made by hand, though they may be part of a series of art dolls that look alike.

That’s one of my art dolls, at right. She’s called “Teal Magic” because her predominant color is a teal blue, and I like to pretend she’s magical, like a fairy. (And yes, she has wings!)

How I Made Her

  • Her body is a simple wooden block, painted with copper-colored paint.
  • I photocopied a corset and hand colored it, and then glued that image onto the block, to represent her torso.
  • I added small, wired wings at her back. They’re colored turquoise, and rubber-stamped with a wing design on rice paper.
  • Her head is a translucent white 35mm film canister. Her face is paper, printed and hand-colored.
  • Her hair springs out of the film canister.   The hair is yarn, embroidery floss, and some wires with beads attached.
  • The arms are sparkly ribbon with glass beads for hands.
  • The legs are made from vintage, plastic “crystals” (probably from a lamp or chandelier) and antique buttons covered where they were attached to the body.

I made six of these art dolls, kept one (that I still have in 2024), and sent the rest to the swap.

Trivia: At the time, Geoff, one of my SoHo chatroom friends (from GeoCities, an early blogging platform) joked that I’d named the dolls after him.  His surname (in real life) is Teale.

I’m still very proud of those art dolls.  At the time, no one else was making anything like them.

Here’s my original post about this art doll

This is exactly what I posted at my GeoCities (Soho/6708) website, way back when (meaning: at or before 2000)…

The theme of this exchange was simply “Art Fetish Doll,” and the only guideline was for the doll to be less than six inches tall (to make shipping easier).

We could send up to six dolls, and receive different ones in return, one less than we sent. (I sent five, so I’ll receive four back.)

I started with an empty plastic film canister, and a bagful of old plastic Christmas ornaments that look like cut glass from a chandelier.

My first step was to find a Victorian face image, to tweak and then reduce to collage onto the film canister. I used a Dover clipart book for this.

Next, I decided to make her body from the wooden blocks I’d recently purchased at eBay, for my unmounted rubber stamps.

Big mistake. The hardwood of the blocks was nearly impenetrable, and I had to insert four small screw eyes, two for her arms and two for her legs. It took forever! *grin and shrug*

My next step was to drive to Harvard Square (Cambridge, Massachusetts) to find the perfect beads for her hands. I already had the pink-and-green sheer & iridescent silk ribbon for her arms.

I bought heavy blue glass beads, which look like beach glass from old Coke bottles.

Then I shopped at a seedy local flea market for o-l-d magazines, to find the perfect corset image, to tweak, print, accent by hand, and then glue to each copper-painted wood block. This represented her torso.

Her hair — which is NOT accurately represented in the photo — is actually a deep, juicy teal color. Think of the most remarkable teal you’ve ever seen on a duck. That’s the color of the chenille yarn I used for her hair.

I separated the strands of some copper-colored (metallic) embroidery floss, and wove some of them through the teal yarn/hair, too.

Finally, in her hair, I have copper wires, intricately twisted and looped, with pearls strung on them. There are three of these wires in the hair of each doll.

The hair has been packed into the film canister and held in place with hot glue, so the hair seems to spill out, dreadlock-style.

Her legs are the plastic “crystal” chandelier-style pieces, with holes drilled in them. I used the hole in each leg to attach an antique mother-of-pearl button to the front of the leg, and tie light teal-colored embroidery floss through the button and the crystal. Each leg was then loosely attached at a screw eye on the front of the block.

When she sits on the edge of a desk or table, her legs swing down in front of her.

On her back, I placed wings. I stamped a dragonfly-style wing design with turquoise ink, on rice paper. I cut out two of these pieces for each doll: a front and back of the wings. Inside, like a sandwich, I inserted a very thin brass wire, and glued the layers together.

I attached the wings to the back of the copper-painted block, using a small carpet tack. Finally, I painted the carpet tack white (to match the white, rice paper edges of the wings) and bent the wings a bit, so they look realistic.

Five of these dolls were sent to this exchange, early in July.

How to Make Sock Dolls – Step-by-Step

Sock dolly reads vintage newspapers.

Last year, I began making sock dolls. I was inspired by the book Stray Sock Sewing.

Here’s how I made my sock dolls for the Wild Art Dolls swap in July 2010.

Sock Doll Supplies

You will need one sock, some batting or stuffing, Fray-Check, and your basic sewing supplies. (Needle, thread, scissors, and a thimble if you use one.) You’ll also want something for eyes, nose, and other embellishments. At the very least, that will be embroidery thread, yarn, or a contrasting color of regular thread.

Sock Doll Directions

Start with a large, children's sock.
This is the sock I started with.

First, I started with a large, children’s sock. I’d already washed it in the laundry so, if it was going to shrink, it had already done so. (If the sock dolly needs a bath later, we don’t have to worry about him or her shrinking, puckering, or losing color.)

You should do the same.

Then, stretch it out so the heel is exactly centered, horizontally. Then, the finished doll won’t look too off-center.

Prepare the sock to become a sockdoll.
Arrange the sock so the heel is centered.

Next, you’ll cut off the toe part of the sock. You’ll be removing somewhere between 1/2 and 1/3 of the sock above the heel. That will vary with the size of the sock and your plans for the doll.

Remove the toe part of the sock.
Remove the toe part of the sock, and a little extra.

If you remove a smaller amount, the doll will have longer ears and shorter arms. If you remove more, there will be shorter ears and longer arms.

Remember: If something goes terribly wrong, you still have another sock. You can use that to supplement the pieces you cut from this sock, or you can start all over again.

The next step is to cut the cuff of the sock, perpendicular to the cuff. What you’re doing is cutting the seam area for the legs. For shorter legs, leave more uncut. For long legs, cut closer to the heel.

Above all — unless you have an octopus kind of doll in mind — don’t cut all the way up to the heel.

Cut the legs by starting at the sock cuff.
Starting at the cuff of the sock, cut both layers up the middle.

The next step is to cut a notch where the ears will extend. Once again, the deeper the cut, the longer the ears. Avoid cutting all the way down to the heel, unless you want a really deranged-looking doll with a strange, short face.

Sock doll directions - cut a notch for the ears.
Cut a rectangle or square out of the remaining area where the toe was.

Finally, you’re going to use the toe part that you cut off at the beginning. Lay it flat and snip in into two equal parts. These will be the arms.

Sock doll arms.
Cut the toe part in half – just one snip – to make the arms.

Now, it’s time to seal the edges of the sock so they don’t unravel as you’re working. You’ll use a product called Fray-Check for that. You can find it in many sewing supply stores, crafts stores like Michael’s, or order it from Amazon.com.

If you’re making a lot of sock dolls (like for holiday gifts), pick up a couple of bottles of Fray-Check. You will go through it pretty quickly. (Plus that, it can dry out in the bottle, after a few months.)

Fray-check by Dritz
You’ll need Fray-Check, a product by Dritz.

Apply a moderate amount of Fray Check to every raw edge on the doll. Be especially generous where there are angles, indicated by the blue arrows. Those points will get the most stress as the doll is being finished.

Apply Fray-Check to the raw edges.
Apply Fray-Check to all raw edges. (Remember the arm pieces, too.)

Let the Fray-Check dry completely. This can take an hour or two. Don’t sew while the fabric is damp, or it can stretch and bubble.

Next, sew the top of the head. That’s where you cut the rectangle out, and it’s on the right side of the sock in the photo above.

Sock doll ears, ready to sew.
Sew the ears and the top of the head.

Sometimes I sew along the wrong side of the fabric, and then turn the doll right-side out. At other times, I sew the whole thing from the outside, using an overcast-type stitch.

Then, turn the doll right-side out, so you can start stuffing it.

Next, Add Stuffing to Your Sock Dolls

When adding stuffing to your cloth doll, it should be packed firm.

Don’t over-stretch the sewn edges as you do this, but make sure your cloth doll won’t look all saggy after its been hugged a lot.

For sock dolls, you’ll probably start from the bottom, or wherever the open seams are.

Stuff the doll from the bottom.

When you’re stuffing the ears, it’s a good idea to make them fairly solid. I use a chopstick or a stuffing tool for this purpose.

If the ears are really long, you may want to insert a wire after the ears are stuffed. You can use a pipe cleaner or any firm but flexible wire for this. Then, you can bend the ears in zany angles.

Sewing the Legs

Now, you’re ready to sew the legs, stuff them, and then sew the edges of the feet.

When your doll looks like this, you're ready to work on the legs.
When your doll looks like this, you’re ready to work on the legs.

Sew the leg seams, but not the feet. Stuff the legs. (A chopstick, smooth end of a pencil, or stuffing tool is ideal.)

Finally, when the doll is how you want it to look, stitch along the bottom edges of the feet.

Add Embellishments to Your Sock Doll

At this point, I like to add the beads or buttons for eyes, and a nose. I usually use embroidery floss for the nose.

The doll is beginning to have character. I think that’s important, before attaching the arms. Arms can make a remarkable difference in the attitude of the doll.

Ready for the arms.
Ready for the arms!

Add the Arms

For the arms, you’ll sew the seams on the toe pieces you cut at the beginning.

Sock doll arms.Sew just the longest side of each one and stuff it. Depending on how hard it is to hold the shoulder part together, you may want to baste it closed after the arms are fully stuffed.

If they’re only loosely stuffed, you can skip the basting step and attach the arms directly to the doll.

Add More Embellishments, Maybe

After that, you can add wings, hair, a pom-pom tail, or any other embellishments you like.

Completed doll.
The completed doll!

More Examples

Here are a couple of other sock dolls I’ve made. They were propped up in Rubbermaid sandwich containers, so you can see them better. That also gives you an idea of the scale of them.

Black-and-white sock doll. Bead & button embellishments.

Here’s the same doll in profile. He has a yarn pom-pom tail.

Another doll, shown below, is made from an adult’s pink sock. The top of the head looks like the doll is wearing a cap. I made the cap from a second, different pink sock. I let the lower edges roll up, like the brim of a knit cap.

I also embroidered a heart on her, and gave her faerie wings.

Doll in profile.

Once you get used to making these dolls, you’ll find ways to mix n’ match pieces from different socks for different effects.

I can usually make one doll in an evening (about three or four hours), while I’m watching TV or talking with my family.

Sock Doll Tips

  1. Sock dolly helps in the kitchen!

    Use children’s socks for the best colors and patterns. For larger, colorful socks, I find good patterns & prices at places like TJ Maxx, especially in their sale sections. Want tiny socks for the dolls or for ears, arms, or a tail? Check the discount section of Michael’s Arts & Crafts. Some of their Mary Engelbreit-type socks can be wonderful for sock dolls!

  2.  Use Fray-Check by Dritz. Amazon carries it, or find it at Michael’s, JoAnn Fabric, etc. I seal all edges before I sew them. (Usually, it takes a couple of hours for the Fray-Check to dry thoroughly. If you sew the edges while the Fray-Check is damp, the fabric can stretch too much.)
  3. Always use good batting or stuffing. Even more than other cloth dolls, the squishy nature of sock dolls means you can’t afford lumps or flat spots. (Among my favorites: Soft-Touch by Fairfield.)
  4. If your doll might get soiled easily, use any waterproofing spray on stain-resisting spray, after you complete the sewing but before you add any beads or buttons.
  5. If you’re making a doll that you’ll turn inside-out, after sewing, always try to make the final seam (the one you’ll sew on the outside) where the doll sits down. That way, the seam isn’t so noticeable.
  6. If your doll should sit and not fall over easily, make a small bean bag that will fit inside the “rear end” of the doll. Fill that bean bag with something heavy. I use anything like poly-pellets, or well-rinsed gravel intended for fish tanks, or even unscented kitty litter. (The latter, being clay, can deteriorate and turn to messy dust if handled too often.)
  7. If your dolls are small enough, check the dollhouse furnishings aisle (at Michael’s, etc.) for accessories you can use with (or glue to) your sock dolls.

Sock Doll Swap – Jul 2010

A sock doll swap is an exchange of dolls made from socks.

In this 2010 Wild Art Dolls exchange, the dolls had to be made from socks and three of them had to fit inside a flat-rate Priority Mail envelope.

Three of us participated. Here are some of the dolls:

Sock dolls by Lisa Cottrell, OH
Sock dolls by Lisa Cottrell
Sock dolls by Sue Martino, NJ
Sock dolls by Sue Martino
Sock doll by Aisling D'Art
Sock doll by Aisling D’Art

My dolls were almost identical. (The fluffy orange bits at his right shoulder are ends of the yarn I used to give him a pom-pom tail.)

My doll design started with ideas I gleaned from the book, Stray Sock Sewing. (As I’m writing this, you can snag a good, used copy for under $3.)

I love making dolls from socks!

Historical notes

Of course, the classic sock doll is probably a sock monkey, invented around 1932. I think many people have happy memories of sock monkeys from childhood.

A quick survey of Amazon will show lots of different kinds of sock monkeys, including a Beanie Baby sock monkey, and books about making dolls (including sock monkeys) from socks.

Ambermoggie — doll artist interview — part two

Leather artling by Sukie, aka Ambermoggie
Leather Artling by Ambermoggie

This is the second page of a two-part interview with British dollmaker Ambermoggie.

Q. If you were stranded on a deserted island and could take just a few supplies with you, what would you need to make dolls?

A. If I were stranded on an island the items I’d need would be wool, wire, a needle and cotton and paint. I could make my own felt and the wool would also make the dolls hair. With paint I could make any colour and by thinning it down dye the fibres. I’d hate to not have a doll in progress… it doesn’t feel right.

Q. What’s your best advice for someone who’s just beginning as a dollmaker?

A. For anyone starting out I would say: Just play and let your mind lead you to your kind of doll. There are no right and wrong ways to make dolls; there are only people’s interpretation of the ideas within. I’d just go for it.

If after that you want to take classes that’s good, but don’t feel that is the only way to learn. It isn’t. I’ve never been able to take any classes in any of the arts I do but it doesn’t stop me having a go.

Q. Do you have a special way of displaying dolls that you keep, or your own collection of dolls?

A. I display my dolls that I keep on a fairy tree .It has tiny christmas lights on and the dolls. These change quite often as I tend to give most of them away.

For me the joy is in making them and then the pleasure people get from receiving them, They seem to bring something to people and that for me is the best reason to make them.

The ones that I most remember from selling were made for auctions to raise money for 9/11. People gave most generously and I received some lovely emails saying how they loved the dolls. I like the idea that my dolls are in many private collections around the world for one reason – they are loved. Not bad for someone who, up to a few years ago, was too scared to make anything.

Q. Do all of your dolls have names when you make them? If so, does the name “come to you” or do you think it up deliberately?

A. I don’t name them usually if they are going to other people; I leave that to them. I just think of them as a representation of the element they embody . I have named some of the figures that I’ve kept, from characters in books.

For example, I have one with feathers and gems who is my idea of Margaret Pye (Magpie) in the Charles de Lint Some Place to Be Flying. His work has influenced me the most. I see characters I want to make in all his books. Charles and Maryann have quite a collection of my figures and also commisioned one for a friend of theirs several years ago.

Q. Your art is always breathtakingly beautiful. Where do you plan to go with your dolls and figures in the future?

A. I look now at the first doll I made. She is sitting on my desk as we speak with her brush in hand, ready to create. The ones I make today resemble her but yet are different and that is what I’d like to continue doing: Moving ever on in different directions from this beginning.

I’m currently exploring pixie feet, faces and hands, and that is fun.

I’m also enjoying getting back to writing stories. I’ve had quite a few dolls and other items in magazines and I’d like to do more of that.

I’d also enjoy teaching some more. I did a workshop last summer at a camp we were at. There were 30 people there from around 4 years of age to 80, both male and female. It was a shock when I saw how many were waiting for the class, but we had great fun. Everyone made a doll and each one was different. It was so much fun to see how they all did.

Q. Is dollmaking an evolutionary process for you, and–if so–where do you see your dolls and figures going, in the future? Were there significant discoveries ∓ turning points for you, along the path?

A. The most significant stepping stones for me and my art were: Firstly, I could make something that reflected what I could see. Secondly, that following your heart is the most important tool in making dolls. Thirdly, that it doesn’t matter that I can’t cut a straight line or turn tiny fingers out of fabric with these stiff and clumsy fingers of mine. Finally, that I make my dolls and my art for me. That other people love them is a bonus… but not the reason to do it.

Ambermoggie – doll artist interview – part one

Aisling’s notes: Sukie–also known as Ambermoggie–has been a friend of mine for several years, and I’ve admired her dolls and figures for even longer. I was delighted when she agreed to an interview, because I know how busy she is. One of these days, I hope to visit her studio in England.

One of Ambermoggie’s Artlings

Q. Your dolls are wonderful! How would you describe what you do as a dollmaker?

A. I make elemental figures and goddess dolls primarily. However I’m always trying new ideas because it stops me getting bored.

Q. How did you get started as a dollmaker?

A. I’ve been making dolls for around 10 years, ever since my husband encouraged my “inner child” within to come out and play.

In my past, I had never been allowed to make things. So, it took me a long while to work up the courage to show the items I made to anyone.

Artling – Air, by Ambermoggie

Then, my husband purchased a computer for me to take my mind off my health problems.

While browsing the Internet, I found forums on different crafts. I had never heard of rubberstamping until this. I asked questions and became interested in the idea of papercrafts, and I started to make rubberstamped cards and gifts. From rubberstamping, I went on to mixed media collages and embroideries, followed by freeform beading.

One dark winters unday I was reading Somerset Studio and saw the call for artwork and a story. I started to write a story and part way through had to stop and go ask my husband “How will I make this doll I want to make?” Between us we figured it out and my first elemental was born along with a story. It went to the magazine–and unfortunately wasn’t printed–but that set me off on my elemental journey.

Valentine Artling, by Ambermoggie (Sukie)

Q. What do you like best about being a dollmaker?

A. My favourite aspect of making them is waiting to see what they want to be. I can never make 2 alike and I never know which element I’m making until I start.

Q. Describe the creative process, when you’re making your dolls and figures.

A. I make my framework and then the doll decides what colour it is. I like the spontaneity of this… It’s an adventure! I do get ideas for other dolls and try to journal them. I then go back to them days or even weeks later, and see what I’ve written and what suggests itself.

I am not very good at drawing so I draw word pictures of what something will look like.

I also get a lot of ideas for stories and art as I am going to sleep. I used to find it hard to sit up and write them down. However my lovely husband gave me a dictaphone for Christmas which is ideal for those sudden inspirations at bedtime.

Stefania Morgante – doll artist – interview

This is a 2005 interview with Italian doll artist Stefania Morgante. This is a very informative interview, and you may want to print it out to read offline.

Q. What kinds of dolls do you make?

A. Italian…? I don’t know; Italians tell me that I make American dolls and the Americans say that I create Italian-style dolls. I like to think that my dolls are very international.

Mostly, I like to create unusual effects with materials, especially papier-mache. For example, my Pinocchio figure isn’t really made of wood; he’s papier-mache. I’ve also developed a porcelain effect with papier-maché.

And, I love materials of all kinds. They spark my imagination. I love weldments in copper, I love essential oils and terracotta, spices, leaves, beads, stones, bells, and… anything that piques my curiosity!

Last but not least, I love my dolls to have a “lack of perfection.” You will never see symmetry in my dolls.

For example, see my cloth bears. One of my recent teddy bears, Ichnusa, won First Prize (Undressed Bears category) in the 2004 Italian Festival of Teddy Bears.

Q. How did you become a dollmaker? How long have you been making dolls and figures?

A. I have been creating dolls since I was a child, and I have been collecting them for years, too. I think that I inherited my mother’s passion for creating things. She specialized in dresses made with little pieces of fabric that no one would ever have thought to use.

As I grew up, I used to paint, create sculpture and, when I wasn’t studying or reading… Well, I followed my mother’s example and kept creating.

I went online about five years ago and discovered the international world of dollmakers. I met many people, and soon my American friends encouraged me to open my own dollmaking workshop. That has become www.gufobardo.com. Soon I will have dolls patterns, dollmaking kits, and cross stitch patterns.

Also, I hope to offer art lessons, including instruction in painting. And, I have an idea for a challenge to connect the USA and Italy! 2005 will be a very exciting year for me.

Q. Did you study art in school?

A. Yes. I studied at the Art High School in Lecce. Lecce is in the little region of Puglia, and it is best known as southern Italy’s most important Baroque city. Lecce’s craftsmen are respected worldwide for their papier-mache art, especially for religious sculptures.

Then, I attended the DAMS University in Bologna (Art, Music and Performance) where I got my degree in Shapes Theory. My thesis was based on a Sylvia Plath poem that was, in turn, inspired by a de Chirico painting.

Q. When you make dolls, do your ideas arrive all at once? Or, do you have a few ideas, and then later think of some more, and–eventually–this becomes a doll?

A. I plan a doll as I would plan a sculpture. It’s the same approach. I start with something that I saw while traveling, a note, a sketch, or perhaps a fabric in a shop. Sometimes the idea comes from a dream and I’ll sit down to work on it that same day.

At other times, I think-think-think and then–when I see a decoration or a fabric–actually start work after some days or months.

I think that a doll, like any artwork, emerges from layers of ideas, and from things already seen: from books read, vegetables of flowers in my garden, or something that I noticed on TV.

Q. What inspires you as an artist, and as a dollmaker? Do you ever run out of ideas?

A. My country inspires me. I get inspired by the remarkable artistic tradition we have in Italy. For example, this was the birthplace of the Renaissance, and Italy has always been one of the world’s great artistic centers.

The food, the music (Rossini, Verdi, Paganini and so on…), and our characteristic creative spirit inspire me: colors and shapes of our small region, our rich history, culture, and Italy’s legendary wine and food. And, I love our continuous capacity to renew arts and craft. I attended the Bologna university, Europe’s oldest continuing institution of higher learning, and possibly the world’s oldest university!

And finally, my parents are native Italians, one from the south and the other from the north, so I think I can say that I’m completely Italian. And so, my country inspires me.

I won’t make the same doll over and over, just as I don’t want every day to be the same. I love to make things–dolls, sweaters, patterns, kits, angels, witches, amulets, talismans, and thousands of others things–but each one is different!

Q. Tell us how you make each doll unique.

A. Do you need cuddles? Do you want a new atmosphere in your house? In your life? Do you want an angel to protect you? Do you want a special gift for your wife? These are some of the requests that I get as a dollmaker, and I love this!

In Christmas 2003, I was asked to make a witch doll for a girl passing through an awful period. So I wrote a “magic formula rigamarole” and I tied it to the doll’s arm. The girl has been so happy, the lady who ordered it bought a second one for herself! I think to dream is indispensable for everyone!

Q. How do you name your dolls?

A. Well… sometimes my dolls haven’t a name until they are finished. And, sometimes the name is in my mind when I start, but it doesn’t suit the doll, after all. I love the sound of some words like “Camilla,” “Desiderio”(one of my angels is called Desire), and “Coriandolo” (coriander). These words inspire figures.

For example, right now I’m creating a cross stitch pattern of a colorful cat, and I don’t know why, but it’s called “the dreams of Theo”.

And, occasionally I give dolls to my friends’ children, and they have changed the dolls’ names. For each child, the doll seems to have another name. I don’t know why, but this always delights me.

Q. If someone wants to become a professional dollmaker, what advice would you give them?

A. Consistency, perseverance, discipline, and a sense of your own artistic identity. Learn from every person you meet. Remember, communication is essential! Keep these in mind, and good fortune will result.

JJ Buch – 2005 Paper Doll Artist interview – Part 2 of 2

Q. Did you play with paper dolls as a kid? Do you have a favorite vintage paper doll that still makes you smile?

JJ Bush's doll, Vanessa, Latin dancerA. Yes, yes… the Ginghams little girls from the 70s, and Betsy McCalls from my Grandmother’s magazines. I made a paperdoll of my Grandmother in her honor, it is called “Amazing Grace”.

I was a tiny tot–not even two, they said–when I sat on her kitchen linoleum and made a paper coatdress for my doll out of the waxy paper liner from a cereal box. It was primitive, a basic rectangular shape with two carefully torn holes for the doll’s arms to go through. I know, it’s not exactly a paper doll per se, but I think it counts.

Q. What’s the most rewarding part of being in the paper art doll business?

A. The responses! Sometimes as an artist I think, “Well, I wonder if my art is as good as they told me it was?”

You know people won’t say it’s awful even if it is, so I wonder…Am I really a good artist?

The responses to my art have been overwhelming, just beautiful! I’ve made friends and they make me feel like making more art. Even if it never gets me famous or rich…even if I die a pauper, I made someone smile! I made them love me! That’s really all it is.

Q. If someone wants to pursue this as a career direction, what’s your best advice? What are the best books to read, if any?

A. First, go to eBay. Look at all the types of paperdolls there are, what sells commonly, and what is considered “rare”.

Realize that there are stupid people who won’t recognize true art but will pay ridiculous sums for things that can be easily mass-produced and resold on auction sites.

Then realize that one day you may be one of those stupid people because you’ll pay a million dollars for a tattered old stained copy of a Ginghams girls paperdoll booklet. Heh heh.

Then notice what the original artists’ works are going for; it may be exciting or depressing. I felt both.

You may notice other things selling by the same artists in other categories, such as art or books or jewelry. This is common because it’s very very rare to make enough money creating paperdolls alone, without a side business to help support it.

Most paper doll artists, serious ones, also make things to be sold at paper doll conventions, paper doll parties, and online at their websites. They have newsletters and fan-based groups to help support their promotions. They give programs or speeches at doll clubs.

Some famous paper doll artists are collectors or experts in related fields, such as regular dolls or dollhouse miniatures.

The really savvy artist will make use of all these things together to bring new viewers to their work.

Here are some important points:

  1. Make a website. Title it with the word(s) “paperdoll” in it, and submit it to the major search engines.
  2. Join several webrings to bring traffic to your website.
  3. Begin a list of contacts and send them updates on your latest works, life, everything! Let them get to know you.
  4. Also start a paper doll collecting group in your area. This helps with networking and keeps you busy!

From there it’s up to you. I wish you the best of luck!

Aisling’s note: JJ has generously shared one of her fun paper dolls, here. Right-click on that link to save it to your hard drive, and then print it at 200 pixels/inch. (216kb) To use it at a larger size, I recommend using VectorMagic.com to vectorize the image, then adjust it to the size you want.

Be sure to look for JJ’s websites for more of her paper dolls and related art. As of 2020, I don’t have a current link for her work. If you do, please leave the link in a comment, below. Thanks!

The following links were part of the original 2005 article. Most won’t work. If you have a fresh URL for JJ, let me know in comments or at my Aisling D’Art Facebook page.

JJ on Webring


$1 Download Paper Dolls by JJ Complete Catalog w/ Viewable Thumbnails http://www.angelfire.com/fang/jjspds/thumbs [Just a really old page, with no useful links.]

Owner of “Portrait Paperdolls” To join, send an email to: portraitpaperdolls-subscribe@smartgroups.com [Update: Smargroups is gone.]

Owner of “Ephemera Restoration” To Join, send an email to: ephemera-restoration-subscribe@smartgroups.com

JJ Buch – Paper Doll Artist interview – part 1 of 2

JJ Bush holding a small paper doll (older photo)In January 2005, I had the great good fortune to interview paper doll artist JJ Buch.

She’s one of my idols, because her art has a very clear “voice” and her concepts are consistently innovative and often delightfully witty.

Here’s the interview*, on two pages:

Q. How did you get started with paper dolls?

A. In 1998, after receiving the grim news that I would never bear any children of my own, I was surfing the net for distraction. I happened upon the OPDAG (Original Paper Doll Artists Guild) website and saw all the inspiring paper dolls and artists there…I said to myself, “I can do that”, and made my first official paper doll.

The doll got rave reviews from my friends so I made another, then another, and now I have over 100 sets under my wing.

Q. What inspires you? Why paper dolls… instead of some other medium?

A. Emotions and anything that draws them out…the news, counter culture issues, the black market, tragedies and also victories of science and, yes, even religion. But moreso spiritual things than religious ones.

I feel more inspired by caves and tunnels and falling down gorgeous old architecture than I do cathedrals, but gorgeous stained glass does take my breath away.

It’s only things of beauty that are already perfect, that don’t seem to stir my creative urge as do things more carnal and dark.

I do love children, I feel very protective of all children. I do not think all of my paperdolls and art are appropriate for the little ones. But I do nevertheless make dolls of all ages and wages, heh heh.

By that, I mean dolls representing all incomes and ethnicities.

Also big women and voluptuous, even figures with overflowing flesh and aged to perfection…real life and unreal expectations: both the holy and the hideous, the innocent and the ones who’ve “seen it all, kid.”

Paperdolls are low cost to make, so no boundaries there. I made the first one out of a church flyer taped to my front door, a placemat from the local IHOP, and ink pens my husband brought home from work. Snip, snip… voila!

Q. If you were stranded on a desert island and could only take the bare minimum of supplies to make paper dolls… what would you consider “essentials”?

A. Scissors; it’s very tedious to tear out the dolls by hand. I suppose one could use berry juice and a stick to draw them on dried palm leaves…

Q. How long does it take you to create one of your fabulous doll sheets?

A. Ooo, a black-and-white one-pager only takes an hour or two. But to finish it out and make it flawless, I use a computer graphics program and I scan it with a scanner. I print it out with a good quality printer, and make back-up files on a CD.

To make a custom one-page 8 1/2 x 11″ full color paperdoll plus, say, 2 outfits and the background accessories, I can do it all in a week, or a few days if the pay is good.

Q. Do you sit down and the ideas flood your creativity, or is it something where you get the basics down, and then you add a little here & there as it occurs to you, until it’s done?

A. No, I am always thinking of things and they all go into a mental kitchen where there are always things cooking up in various stages of ready to finish.

The new ideas always go on a back burner to simmer UNLESS it is something for a paid commission or a publication.

Then, it gets a front burner and I move all the other pots full of ideas back, to make room.

Money definitely gets a paperdoll moved to the front and it will get done first!

I am a starving artist but do not intend to remain that way; I have a husband and 3 fat dogs to feed, after all.

Q. What would you tell someone who wants to find their own creative “voice” in paper art dolls?

A. Hahah! Don’t go into it without a job, or someone who is willing to support you financially and emotionally because the money that does come, has to pay for materials and postage and to pay the bills… to cut back on when the water won’t come out the faucet, the electricity won’t make the lights bright, the mortgage holder is going to come take the house away, and you’re so sick of ramen noodles you could throw up.

NOW! If–after all that–you don’t care to make a living with them, and just want to enjoy making them for fun and for love? It’s beautiful…you just keep drawing them and coloring until you realize one day, “Hey! My paperdoll art is really good! I like it… No I LOVE it!” And there you go.

I really like the first 10 dolls I made, before I saw all the other artists’ work.

Your own ingenious designs are always more authentic and more… BETTER… than after you’ve been influenced too much by other opinions.

Finding your own voice, is just not listening too much to the other voices. and let me tell you I am bipolar (manic-depressive) so I know all about other voices, Ha hah!

* Aisling’s note: When I interviewed JJ via email, she replied in mostly lower-case. I wanted to leave it like that, because I generally write in lower-case, myself.

But, to make this more readable for website visitors — and with very mixed feelings about doing this — I edited it into a more traditional format.

But, be assured that JJ’s unique “voice” in emails is just as clear as it is in her art; it’s another reason why I admire her tremendously!

Alice C. W. Dennis – doll artist interview – part 2 of 3

Q.  What’s your greatest influence today?  Do you get your ideas from other dolls, other art, or something else altogether?

I read Soft Dolls & Animals, Art Doll Quarterly, and I belong to several internet doll lists. I love all of these, but things and people influence me the most.

Things?  Well, here’s an example:  Once while shopping, I went down the cleaning aisle. I stopped at the Chore-Girl display and picked up one and stood there studying the copper fibered scouring pad. I envisioned the pad unraveled and as hair on a cleaning woman wreath. She was hilarious and got plenty of laughs.

People? I am a people watcher. I love studying faces and expressions. Expressions say more than words ever can.

Q. When you make dolls, do you tend to include consistent elements such as striped legs, glittered hair, wings, etc?  Has this changed?

I think it is the expressions of my creations. That is where I got the name for my business–“What an Expression!”

When searching for a business name I asked my husband for advice. He said, “Why don’t you call it what everyone says when they come into your booth–“What an Expression!”

Needle sculpture was my only media but I have begun working with clay and papier mache’ as well. (I entered my first all-polymer clay doll in an internet challenge and won beginner level–since it was my first in clay–plus best of theme and people’s choice.)

Q. Tell me about your design process:  When you design your dolls, does the idea pop into your mind fully formed, or do you sketch it out, or what?

Oh, wow…hmmm…  Usually, I have an idea. It stays in my head until I can envision it completely. I may spend hours, days, even months, thinking about it, and getting to know it, until it becomes “real.” Then, I make it. I don’t sit down and sketch it first because I can’t sketch. Well, sometimes I have drawn a stick figure, but my mind can see it better on its own.

It is funny because it may only take a day or so to “make,” but that is not counting months of thinking.

Q. If you were in the cast of “Survivor” and could take just a few dollmaking supplies with you to a deserted island, what would they be?

Just My Size nylons, poly-fill, upholstery thread, needle-sculpture needles, scissors.

Q. What do you like best–and least–about dollmaking?

Best:  I like making faces. I love to sit and make faces all day. LOL

Least:  Making the rest of the doll. That is why I like making the wreaths.

Q. Do you collect dolls by others?

I have dolls that I have received in swaps and one from a round robin.  They mean a lot to me.