

I start each day with an art journaling collage, like I used to do “morning pages.”
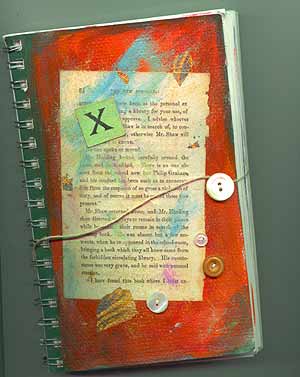
As you can see from the collage at right, I’ve been doing this – off and on – since 2002.
- I allow myself half an hour for the initial collage process.
- Then, later in the day, I may go back several times – adding more things – until I’m pleased with it.
But it all starts with the determination that there will be a collage when I’m finished, whether it’s good art or not!
The point is to express myself, perhaps revealing – to myself – what’s been behind my thoughts and actions, in recent days… or perhaps longer.
In a way, it’s a form of self-exploration.
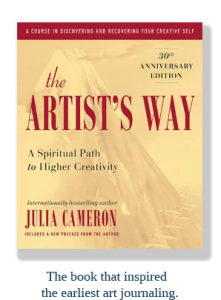 “Morning Pages” were a concept developed by Julia Cameron in her book, The Artist’s Way.
Among her many inspiring tips, she suggested writing three, handwritten journal (or diary) pages every morning.
However, many of us felt more inclined to use art journaling for that daily self-expression. In the early 2000s, I was one of them.
Art journaling page preparations
Usually, I coat each page of my art journal with gesso. Almost any inexpensive gesso is good enough.
Of course, you don’t want a gesso that’s really watery; it can make the pages buckle.
Then, I know the pages are strong enough to support my collages, even heavy ones here and there.
I’ll leave a page or two for writing, then gesso two or three pages so they’re prepared for collage art, and so on.
That forces me to include lots of art in my journal. It’s still a diary, but it’s more than that.
Gesso for art journaling
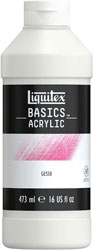 For my art journaling, I usually use an inexpensive acrylic gesso.
Gesso makes the paper stronger, so it doesn’t suck up the glue or paint so much, and it has “tooth” to grab – and hold securely – whatever I apply to it in layers.
Most art supply stores, like Michael’s carry gesso, though – with my busy schedule – I often order it online. (The good news: A bottle of gesso can last a long time.)
I buy primarily white gesso – and, for me – Liquitex Basics Acrylic Gesso has been reliable. It’s affordable, spreads easily, and protects the paper well enough.
Yes, you can buy gesso in colors, but if you start with white, you can add color to it (in small batches) with watercolors (including Dr. Ph. Martins), acrylics, even food coloring or unsweetened Kool-Aid if you like!
But I’m usually happy working with white.
Then, the collage images
I store a wide range of images in folders, kept in a heavy cardboard portfolio, to use when I want to do a collage.
I also keep a stack of magazines & newspapers on hand for my collage work.
And I go through them and grab whatever images, words, and phrases strike my fancy at that very moment.
If they connect somehow, great.
If they’re completely unrelated, that’s okay, too. I’ll still use them.
THIS IS IMPORTANT: The collage – and the elements in it – usually makes sense to me when I put it all together, in the context of my thoughts at the time.
I love layers in my work, so I’m big on using colored tissue paper.
Adhesives hold it all together.
Years ago, in my Yahoo!Groups community, Artists Journals (aka “AJ”), I recommended using Golden Gel Medium (soft/gloss). However, it often made the paper buckle.
Now, I’m using Yes! Paste. I apply it with a sponge brush or a cotton swab, depending on what I’m applying to the page in my art journal. It rarely buckles or puckers. I absolutely love this product!]
While the page dries, I’ll place a piece of waxed paper over it so I can turn the page and either write or do another collage. If it’s facing another damp-and-drying page, I’ll keep waxed paper between the pages for a week or two until the adhesive is fully cured.
Adding embellishments to your art journal
Don’t limit yourself to paper and the occasional paint or colored accent.
I highlight some of my work with different types of leafing, such as gold, copper, etc., and adhere it with the same medium or paste.
For some of my work, I think of other ways to attach stuff.
For example, on a “hurting” day, a bandaid may hold an image in place.
On other days, I may use grommets, paper clips, straight pins, safety pins, etc.
Think beyond tradition and rules!
I never fret because an item prevents the journal from fully closing, nice and flat.
Frankly, by the time I get done with lots of pages, the whole thing is so layered (and sometimes a bit buckled), it hasn’t a chance of closing flat, ever again!
Cover additions are a nice touch
Often, I sew a button to the front cover of the journal, and a piece of string (I like hemp twine) or ribbon attached with a grommet to the back cover, so I can tie the journal closed when I carry it around or shelve it.
But you may think of other ways to secure your art journal. Think of it as yet more mixed-media art, not just “What’s going to hold this journal closed, in my purse or backpack.”
Do… Don’t plan!
These art journaling collages are exciting to me.
I never know how they’ll turn out until I start putting the random bits of paper together and realize the internal message.
It’s sort of like bringing what’s deep inside me, forward.
From time to time, I’ll display my new (real) art journaling and mixed-media art pages here as I create them.
For example, you can see some of my 2008 collages at a follow-up article, How to Collage in Your Art Journal.
My best advice is to make your journal your own.
Sure, mimic others while you’re learning if you need to.
But, as soon as possible, follow your “what if…?” whims.
Experiment, and then tweak if necessary.
Soon, you’ll find your own art journaling style. Of course, it will evolve over time, as we do as individuals.
In many ways, I feel as if art journaling reveals who we really are.
That’s important as self-expression and as a legacy for the future.
Amazon and the Amazon logo are trademarks of Amazon.com, Inc, or its affiliates. As an Amazon Associate, I earn from qualifying purchases.