Memories – A Digital ATC

This card was designed to document the creative process when I’m working on digital ATCs.

I’ve written four pages–with thumbnail images of each step–to explain how I work on these cards.  It shows you how to go from initial idea to finished card.

This card, with documentation and HTML work, took about three and a half hours. I think that I spent an hour on the card itself. That’s what I’m trying to maintain as a challenge.

To read how the card was made, and why I made the choices that I did, see How to Make a Digital ATC.

Dreamcards – from an ATC swap

Art can be very revealing, whether that’s our intention or not.

These are two ATCs that I created, and what I wrote about them in 2000:

ATC - 'no hope'

Dream Card/Nightmare Card, 5 Sept 2000

These are two cards from an ATC exchange, with a theme of “Dreams and Nightmares.” The originals are 3″ x 5″.

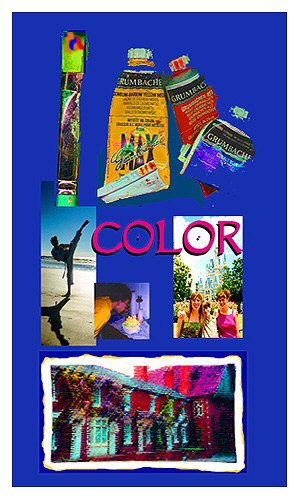
My dream card features images of my children, DisneyWorld and my paints.  There’s also a view of the houses directly across the street from the Royal Shakespeare Company’s main theatre in Stratford-upon-Avon, Warwickshire, England.

What I hope to show with this collage, is what is most important to me: Color, in all its definitions. My family, experiencing life and having fun as we travel and discover new things; the colors of our emotions, the scenery, and our memories of happy events.

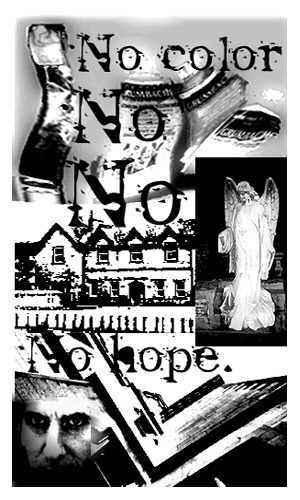
My nightmare card features stark, perhaps menacing images without color or hope.

The images include (top to bottom)

  • the same paints as on my Color card,
  • the poorhouse in Kilmallock (Co. Limerick) where my gr-great grandmother died, and
  • the view (looking up towards the sky) at a castle in Co. Galway

Over those images, I’ve added photos of:

  • a truly spooky angel at the Irish cemetery in Cambridge, Massachusetts, and also
  • a self-portrait of my husband.* (Really. He took this photo of himself and gave it to me.  He said that he thought it was a good photo.)

These are not dark or hopeless images in themselves, but I added drama by increasing contrast, so they take on new aspects.

What surprised me the most is that the Color (dream) card is as many of my recent collages have been: A bit disjointed, compartmentalized, and a little empty.

By contrast, the No Color (nightmare) card flows, the images blend nicely, and I actually prefer this as art, compared with the Color (dream) card. Technically, the No Color one is a vastly better work of art.

I think this is rather revealing, and indicates some self-work ahead of me.

(No, I do not actually think there’s “no hope” in this–or any–area of my life. Remember, this art is created from my imagination, using images that I have at hand. Yes, it means something, but please don’t take it all literally, or too seriously!)

But, this is what art is about: self-discovery.

Even when I’m dismayed by what I see, it opens the door for me to make changes and improve myself and my life.

So now I’m wondering: Why are my nightmares so much more vivid and easy to access, than my dreams? Why do they flow when the dreams do not seem to reach my consciousness without effort? Why are my images so compartmentalized?

These are, in a way, rhetorical questions. My diary will probably show what I discover.

I can tell you that, when I saw what I’d said with this art, I started taking very positive steps to make immediate changes. I didn’t get into this situation overnight, and it probably won’t be an overnight change to get things back on track. But I’m working on it, and I see progress, and that’s the important part.

[Reminder: I wrote that in 2000.  Since then, there’s been a divorce.  Both of us have remarried.  I’m living a very happy life again, and returning to the creativity that I enjoyed in the 1980s and earlier.]

* When I said “my husband” in this article about my two ATCs, it was before my 2003 divorce.  I’ve kept the photo in this art because, unless you know him very well, you probably won’t recognize him.

Resizing Your Art for Artistamps

3sun-ibQ: I want to make some artistamps by hand, not necessarily on the computer. How do I make my art the right size for stamps? Should I be creating the art in stamp size, to start with?

A: Most commercial artists work much larger than the finished, printed product will be. For example, a standard paperback book cover was often a poster-size painting.

When the image is reduced to the correct size, there will be impressive detail in it without a lot of microscopic work in the first place.

When you’re creating stamps, or any reduced-size art, there are several ways to work:

    Work to size

    Obviously, you can create the work in the size it should be when completed. This is fine for carved stamps, one-of-a-kind work, and so on. However, if you’re working off the computer, or want a lot of detail, this is the difficult way to do things.

    Work larger, then reduce at the photocopy machine

    Create the images you want, in a larger size. Try to work in a size that can at least fit on the glass of the copy machine.

    If your art fills a standard letter-size sheet of paper, and your finished stamp will be less than one inch square, you’re probably including more detail than you need to.

    Next, use the photocopier’s reducing option, until the image is the size that you want. That is, if you’re working h-u-g-e, reduce the image to the smallest size the machine permits, then reduce that copy to the size you need.

    If you’re using a color copier, this can get expensive as you use trial-and-error to achieve the correct size. Experiment with a regular (cheaper) photocopier first. Make note of the percentages you used to reduce to the ideal size.

    Once you’ve figured out what percentage of reduction looks best, switch to the color copier, enter the correct reduction percentage, and print your final work.

    Work larger, and reduce with your computer graphics program

    If you’re using your own color printer, this is one of the best choices.

    Basically, scan your work with your computer scanner, then use your graphics program to reduce the image to the finished size. Repeat the image for a full sheet.

    (Some programs call this “tiling,” others–including Adobe–use words such as “pattern.” You can learn how to do this at my article, How to make a sheet of stamps, with Adobe Photoshop.)

    Finally, print it on your printer.

    If you don’t have your own color printer, many larger copy shops (for example, some FedEx/Kinko’s shops) have computers and color printers for customers to use, for a small fee. Bring them a disk of your completed work, and print it on their printer.

    Work larger in b&w, adding color to the correct-size image

    You can avoid the color issue altogether by designing black and white artistamps. However, if you want colored artistamps and the previous methods won’t work for you, there are alternatives.

    Create the black-and-white line work in a larger format.

    Then, reduce it with a b&w photocopier, and tile with repeated copies, as necessary.

    Hand-color the image/s.

    Finally, either use those as stamps, or visit a copy shop with a color copier, and make multiple photocopies for use as stamps.

No doubt there are other ways to accomplish your goal, but these are among the most popular.

There is no point in using a magnifying glass and a three-haired paintbrush to create eensy-weensy images for the stamps. Work big and bold, and then reduce the images for the best results.

When I work larger for any purpose, I always work at least 33% bigger than the final image, for the best impression of detail in the finished product.

How to make a Sheet of Artistamps with Adobe PhotoShop

If you’re new to Adobe’s PhotoShop program, it can be overwhelming to figure out all the fabulous bells & whistles it offers. However, it’s a wonderful tool for artistamps!

When I wrote this article around 2002, I was using Adobe 5.0. The commands may vary slightly if you’re using a different version, but the concepts remain the same.

If you have an image that you’ve created with (or scanned into) Adobe, here are the steps to repeat it easily, so the image fills a page of artistamps when you print it:

1. Select the image you want to use. This means it should be surrounded by dotted lines indicating that the Adobe program has “selected” it. If you don’t know how to do this, go into Adobe’s Help menu and look up “selecting an area.”

2. Go into the Edit menu, select Define and then Define Pattern. (Some programs go directly to Define Pattern.) Your image is now saved in Adobe’s short-term memory.

3. Delete your original image, by clicking on the X on the image window, or you can just delete the layer with the image by using Layer–>Delete Layer.

4. Either enlarge that emply window/layer (if you merely deleted the layer) so the Image Size is slightly smaller than the paper you’ll be printing on –OR– (if you clicked on the X and removed the entire image) create a new image (File–>New) in that size.

I like to work with an image that’s about 7″ x 10″ for paper that’s 8.5″ x 11″.

5. Select the entire image/layer. You can do this by hitting Control-A, or by right clicking and choosing Select All.

6. Right click inside the new image/layer, select Fill and then choose Pattern. Your image, repeated to fill the new size, will appear. If you are happy with what you see, you’re ready to print.

7. If your new, repeated image isn’t tidy–and it usually isn’t–you’ll want to remove (crop) the partial images. Use your Select Area tool to surround all of the complete images. Then choose Image and Crop so the loose pieces vanish. Now you’re ready to print.

8. If you’re using nice (price-y) paper for your finished product, it’s a good idea to print a “proof” copy on plain (cheap) paper, to make certain the finished plate of stamps looks pleasing.

If positioning is key, you may want to print on tracing vellum first, lay it over the paper you’ll be using for the finished product, and see if it lines up okay.

9. After you’ve printed your stamps and are ready to close your Adobe program, save just ONE copy of the stamp image, using the Crop feature. You can save the entire repeated image if you like, but that can take up a lot of disk space if your hard drive is nearly full.

Cheatsheet version:

1. Select image area
2. Edit–>Define–>Pattern
3. Delete original image
4. Create new image in size to fit on printer paper
5. Right click to Select All
6. Right click inside area, choose Fill–>Pattern

tap-hammer-b

Real, Exotic and Foreign-looking Stamps

These are a few stamps from my own collection of inexpensive, international postage stamps. They are “real” stamps, used on mail.

I like them because they look exotic and/or old, and I gather ideas from them.

I’m providing them as inspiration. You can copy* them, tweak them with your own color and design ideas, or… well, you decide!

Want to see more cool and unusual stamps?

I recommend The Mystery Box, a philatelists’ site.

___

*No stamps at this site — “real” or artistamps — should be copied or used illegally.

Glues and Adhesives for Artistamps

Adhesive backing for artistamps

dw1-webIf you’re sending your artistamps for others to use, you probably want to make them as much like “real” postage as possible.

For example, you’ll want the recipient to be able to lick the back of the stamp so the glue becomes moist and will hold the stamp in place.

The following information was provided by members of the AML artistamp list.

These are your three most popular options for glues and adhesives, if you’re creating artistamps.

(1) Buy paper with an adhesive (water reactivated) backing.

You can get dry, gummed paper label paper from a chain store called Paper Plus. (I think this is a division of Unisource, but their demo catalogue doesn’t list any perforated papers.)

One brand in the late 1990s was Nashua Davac, Dry Gummed Label Paper, #7649, 50# offset, and it comes in 8.5″ x 11″ size, and others. (Manufactured by Nashua Label.)

Another resource might be a small quantity supplier of paper. Some of them are “green” paper companies. You can get more information at Conservatree.com.

If this sounds too complicated, you can have someone professionally print your artistamps on pre-gummed perforated paper.

I recommend Anna Banana’s Banana Productions. As you would expect, her work is very professional.  (The link to her site is broken.  If you know the best link for her products, let me know.)

WCP-NM (Olathe Poste) is another excellent online resource.

Or,

(2) Apply lickable (water reactivated) glue.

The glue stuff itself can be purchased and applied to any paper.

One kind of glue stuff is Neutral pH Adhesive, by Lineco. You’re looking for it as product number 901-1008. It’s carried by larger camera supply shops, as photographers use this to mount photos, etc.

You can also find this Neutral pH Adhesive by Lineco, at MisterArt.

Another glue stuff–that I use–is Lick & Stick. It comes in a bottle that looks like a roll-on deodorant, but it has a sponge on the top of it. I sort of paint it on the paper, and it dries. Most curling that occurs when it’s wet, flattens out as the glue dries. The glue is clear and tasteless.

You can order Lick & Stick at directly from the manufacturer, Greensneakers. They offer templates for other paper products, too.

Or,

(3) Make your own water reactivated glue.

See my article, Glue Recipes – Artistamps for a variety of homemade glues that you can mix and apply to your stamps.

Glue Recipes – Artistamps

schoolglueGlue recipes vary from great to disastrous. But, they can be a fine alternative to “lickable” adhesive-backed paper and commercially prepared glues, described in my article, Glues and adhesives for artistamps.

Climate differences can affect how well a glue recipe works. Likewise, personal taste–sometimes literally–can influence your choices.

Artistamp genius Jas kindly sent this recipe for stamp glue, as developed by Bugpost.

Get:

1/4 oz. unflavored gelatin
1 T cold water
3 T boiling water
1/2 t white corn syrup
1/2 t lemon extract

Make:
1. In small bowl sprinkle gelatin into cold water, put aside until softened
2. Pour softened gelatin into boiling water & stir until completely disolved
3. Add corn syrup & lemon extract, mix well.

Apply:
1. Brush thinly on to back of stamp sheet
2. Let dry.

Comments:
1. Double boiler is handy
2. Gum tends to react more slowly when licked than conventional gums
3. Mixture can be stored in an airtight container in the refrigerator, for a very small amount of time. You may need to reheat it if it’s too gummy and thick.

avegifNote: The lemon extract repels bugs which like to munch on starches (such as gelatin and corn syrup), but you could probably use other flavoring extracts from the baking supplies aisle of the grocery store. Artistamp collectors in tropical countries may choose to store stamps in plastic.

Also, before using another flavor, remember that many people have life-threatening allergies and react badly to anything with peanuts in them.  Since this may include almond flavoring, and perhaps others, humor your tastebuds carefully!

More recipes!

Here’s one contributed by

Arlene Shipley:

6 Tbs. white vinegar
4 packets (1oz.) unflavored gelatin
1 Tbs. mint extract. (or whatever flavor you want)

Boil vinegar in small pan. Add gelatin and stir until dissolved. Add flavoring and remove from heat. Use brush to spread on envelope flaps. Let dry. Moisten to seal. When leftover glue cools, it will set. It may be reused again and again if you take a little caution when storing it. Place it in a small HEAT PROOF container and you can shoot it with your heat gun to remelt it. Or you can place the small glass jar into a pan of water and heat it that way. Just take caution not to break your glass containers when reheating the glue.

Another one, from Linda Mulligan, described as a Girl Scout recipe:

One part white glue
one part white vinegar (you may have to play with the proportions)

Coat let dry and coat again. This taste awful so use a sponge not your tongue when wetting to seal.

Here are a couple from Rubber Rabbit:

18 T (that’s about a cup and a bit) vinegar-bring to a boil; add 1 pkg Jello in whatever flavor; stir til dissolved; let cool; keep in the refrigerator between uses. Brush on and let dry. that one is from Coffee Break Design.

I’m not too sure on this one; someone will correct me I’m sure: 1T each vinegar and white glue; drop or two of peppermint flavoring.

Those recipes were all kindly provided by members of the AML (Artistamps) list at Yahoo!Groups.

If you spot errors, missing links, or if you have yet another recipe, please let me know with the contact form, above, or leave your glue recipe as a comment.

Artistamps – Definition

aisegyptArtistamps can be described as fake postage. Some people call them faux postage, Cinderellas, postoids, or even real postage.

But at the post office, they may call them “fake.”

In other words, if you use artistamps in place of “real” postage, the post office is likely to return your mail, postage due.

Those of us who make artistamps often insist that they are real postage… just not from generally recognized countries.

That is, we often make up our own countries and/or issuing authorities. We’re not trying to pretend they’re legal postage in the US, or any other country from which we may be mailing these stamps. We create these stamps for fun, whimsy, art, and/or a statement.

tap-jeremy-bArtistamps can be printed or individually handmade. They may have perforated edges like traditional postage, or not. They may have a pretend ‘price’ designation on them, or not.

Artistamps are loosely related (or not) to the mailart movement, which in turn evolved from the Dada and perhaps Fluxus and/or Chaos movements.

Or not.

Mostly, artistamps are art, and they’re often fun, too. Some of us make up our issuing authorities.

We send our stamps–on cards, envelopes, and other items–often to people we don’t know. Those people may respond by sending us artistamps and/or mailart.

Or not. (I say that a lot, in connection with mailart.) It’s a boundariless field, and everyone participating probably has his/her own definitions for this art form.

Here’s one of my artistamps, from my imaginary country of Ballynafae. The picture actually shows the post office in Kilmallock, Co. Limerick, Ireland. The AML designation is from the Artistamp Mailing List, a Yahoo Group that sometimes organizes artistamp mailings and swaps.

1amlbally2

Crafts Fair Marketing – On-site ideas

soap75Years ago, when I worked in fashion in Los Angeles, a co-worker at the May Company told a great story about a desperate ad campaign.

He’d had just a few hours to write a newspaper ad for the ugliest argyle socks ever made.

He wrote this headline: “You’ve never seen socks like these!”

The socks sold out the first day.

Obviously, one should never underestimate the power of a good headline… and the way that curiosity will attract people.

What’s among biggest hurdles at a large art show or crafts fair? Getting people to your booth… before they’ve spent all their money at other booths.

Bring a friend or hire someone to mingle in the crowd with half-sheet flyers that have a clever headline. It could be a direct steal from the argyle headline such as, “You’ve never seen yarn like this!”

That might be enough to bring customers to your booth. Or, you might want to add an extra incentive, offering them an extra freebie. Maybe you have a free, vintage knitting pattern for them. Or you offer free gift wrapping. Or… well, anything free is a good idea.

If you know a food vendor who’ll be working at that fair, maybe you can offer your shoppers a “10% off ” coupon for a large beverage from that vendor. Though that will send shoppers away from your booth, it may be enough to get them to your booth in the first place. Then, your challenge is to sell them something before they leave.

You might also ask the food vendor to give his or her customers a coupon good for something free or discounted at your booth, as well.

Curiosity is a powerful sales tool. Adding a freebie may not be necessary, but it can help.

The game at any art fair or crafts show is to attract shoppers to your booth before they’ve spent their money elsewhere, or bought from a competitor.

Advertise at the show, as well as before it. Be creative. After all, that’s what you do best!

Planning for your future

artist-monalisaval-jThis morning, I read Seth Godin’s blog in which he posted a joke set of predictions for 2008.  (He claimed to have written them in 2002.  Obviously, he’d written them this week.)

But, as he concluded his post, he stated his point very well:

“…just think about how impossible it is for your to predict what your life is going to be like in four or six years… being ready for anything is the only rational strategy. So, why exactly are you planning on the future being just like it is now, but with better uniforms?”

THE FIVE YEAR PLAN

Many of us have accepted traditional goal-setting strategies.  They include looking ahead five years to what you can reasonably achieve, but perhaps with a slightly starry-eyed vision.

That’s where I recommend a shift to the Getting Things Done view, mixed with a little of Stephen Covey’s Seven Habits…

Think in terms of wild success.   I mean success beyond your wildest expectations.  How would that look?  How would your life be different?  What would your workday be like?

And then, plan for that.  Take the steps to integrate those changes into your life right now.

Remember what you’re doing this for.

LIVE YOUR GOALS… NOW

Is it to be a successful, well-paid artist?  Well, do you dress like one?  What about your car… is it as immaculate inside (and out) as it would be if you had a chauffeur to maintain it for you?  Do you always have nice, upscale business cards with you, to hand out to fans (or people you’d like to have as fans or clients)?

Are you doing this to be famous for future generations?  Okay, what are you doing to create a name for yourself, right now?  Do your PR strategies include getting your paintings into highly visible locations, such as your town offices, state offices, the offices of your Congressional reps, every local museum… and then work up from there?  Have you contributed (or contributed to) a very visible mural in a public space?

Are you working on your art so you can be a full-time artist?  That’s great; how much time are you dedicating to your art.  I don’t mean the commercially successful art that can be the first step into the marketplace. I mean strange, deeply expressive and authentic art that may never match the colors in anyone’s sofa, and may only make sense to you.

The fact is, no one can predict the future with certainty.  The five-year plan was fine when five-year intervals could be predicted.  Today, life moves and changes at a vastly faster pace.

Don’t plan for the forseeable future.  Plan for a wildly successful future.  That’s what’s within your reach, and perhaps sooner than you think.

Start now.  Plan with the end in mind:  Success beyond your wildest dreams.