Purple Fabric Art Jacket 1

ppljkt25I’ve always loved the color purple.  Almost every shade of purple delights me.

This is an original one-of-a-kind jacket that I created around 1992, using a Vogue designer jacket pattern. The fabrics are all 100% cottons.

On half of the front, I have hand-beaded with glass bugle and seed beads. I’ve also painted it with glitter paint.

pplbeads

On the other half of the jacket, front and back, I’ve made small dolls from crafts clothespins. Each doll is unique, and all of them are a little wild and off-balance.

ppldetail

This is a flashy jacket and — as of this writing — it’s a little 1980s in style.  However, dazzle keeps returning to fashion, so this jacket will be stylish again in the future.

Meanwhile, it’s a great and whimsical display item.

Easy Rolled Cloth Beads

Scraps of fabric can be used to create rolled beads. Here’s the simplest version.

You’ll need fabric, white glue and water, and something thin to wrap the beads around. This can be a thin dowel, toothpicks, shishkebab skewers, thin cocktail straws, or… Well, see what you have around the house. You could even use heavy gauge wire such as a coat hanger.

First, decide if you want to use fabric “as is,” or embellish it. It doesn’t have to be cotton, but cotton absorbs glue most easily.

cloth1

Dye, stain, paint, and embellish with color and perhaps glitter, if you like.

Then, cut or rip the fabric into thin strips. Remember that 100% cotton tears along straight lines. So, you can cut a small nick at the end, and then tear it from there.

Soak the fabric in a mixture of white glue and water. I’d guess that a 50/50 mix would work. This isn’t precise. You want it thick enough to stick together, but thin enough not to be gloppy.

Roll each bead around whatever you’re using at the center. The purpose of this is just to keep a hole in the middle. You’ll remove the dowel (or wire or toothpicks) when the glue is mostly dry.

(If you wait until the bead is completely dry, it may be permanently adhered to the center support. Removing the center early allows the middle dry faster.)

If you want to prevent the beads from sticking to the center support, coat the support with a non-stick lecithin kitchen spray. However, this can make it harder to roll the beads; the fabric will tend to slip as you’re rolling.

If the beads were saturated with the glue-and-water mix, the torn edges generally won’t unravel.

It’s best to roll the beads to the size that you want. After they’re made, if you want them shorter, it will be necessary to cut them to size with a saw, or the cutting blade on a rotary tool.

clothrolld1

An alternative–probably better and more colorful than rolling rectangles–is to cut the fabric into triangles.

Roll the beads so that the widest side is at the center, and the tip of the triangle is on the outside of the bead.

Ribbon Embroidery and Beading

jumpribThis shows part of the ribbon embroidery & beading on a jumper bodice started in the 1990s.

In real life, the area shown is about 7.5″ x 4″.

I was inspired by a crazy quilt that I saw many years ago, and the bright embroidery on the black velvet reminded me of fireworks. I knew that, someday, I’d want to create a similar effect with wearable art.

After I bought the fabric and cut out the bodice, my inspiration was renewed by a vividly colored garden photo that I saw on a magazine cover. (Inspiration is everywhere!)

As I’m simplifying my surroundings, I’d like to intensify what is around me, by using lots of these brilliant colors against black, white, and forest green.

The work you see here is entirely handsewn, with silk ribbon and glass beads on black pinwale corduroy. So far, there’s probably about ten or fifteen hours’ of sewing in it, mostly done in front of the television.

I know that most people will never guess the amount of work in this, but the end result will be dazzling. I think it is, already.

Baby’s Blocks Gone Wild

boxqIn 1991, I designed and made this quilted wallhanging for a challenge in Salt Lake City, Utah.

A “challenge” is kind of competition.  Usually it includes a rule that all participants must follow.  That rule is designed to make the competition more interesting… or difficult.  In many cases, the challenge element is a particular fabric, batting, or other major element.

In this challenge, I had to use a certain fabric, and it had to appear in at least 20% of the finished quilt.

The challenge fabric was the floral that appears in the Baby’s Blocks section, as well as bordering the top and bottom sections (not the actual border, which is black).

I rarely use muted, tasteful florals in my work.  I struggled to find a way to use the challenge fabric.

Weeks passed and the deadline loomed, and nothing about that fabric inspired me.

Then I realized that I could work in contrasts–meek with wild, traditional with jazzy.

The finished wall hanging is 32″x52″, and at the time I called it, “Threads of the Past, Visions of the Future.” It is pieced and appliqued, with some stenciling (the small yellow dots) as a surface treatment.

This quilt took top marks, winning an award for originality and design.

Today I call it, “Baby’s Blocks, Gone Wild” and I’m eager to do more with contemporary twists and traditional designs.

Baby Quilt – Pink and Red

cromquiltThis is a baby quilt that I made in 2003. It’s made with over a dozen fabrics, each 100% cotton.

Each square in the quilt is about 1″ x 1″.

It could be very tedious to make a quilt like this, but the top created with strip piecing.

This is a faster technique that works with strips of fabric, cut after they’re sewn together.

Cutting, sewing, and ironing the top took about six hours, total.

The technique comes from a fabulous book, Strip-Pieced Watercolor Magic: A Faster, New Approach to Creating 30 Watercolor Quilts. The book gives precise directions for selecting fabrics, and how much of each for the 30 projects in the book.

I selected the fabrics using a piece of clear red plastic.

(I bought it years ago. It was designed to help determine light and dark shades without the distraction of colors. I’ve never seen another one of these, but any sheet of clear red plastic or acetate should work fine.)

I modified the design from a pattern for a full-sized bed quilt, to create this small baby quilt for a newborn.

I use blanket-style, needle-punched quilt bats for quilts. They cost a little more, but hold up better in the laundry.

Generally, I tie baby quilts rather than quilting them. Baby quilts are laundered often and the batting starts to fall apart.

With a tied quilt, you can simply undo the yarn or embroidery floss (used to tie it), discard the quilt batting, replace it with a fresh layer, and retie the quilt.

(All of my three children loved my handmade quilts when they were little, and I learned to be practical about this.)

Rocking chair – reseating

rchairThis rocking chair is called a Lincoln rocker by some, and a Kennedy rocker by others. It’s the same design that Jack Kennedy had in the White House. He felt that it helped his back.

The restored chair is shown at right.

This particular chair came from a yard sale on Boston’s North Shore (an area by the ocean, north of Boston) and it cost $60 many years ago when my younger daughter and I found it. She could “see” me rocking in it, and so we brought it home, propped in the trunk of my car, and held in place with nylon camping rope.

rcbThe chair was well-used and well-loved for several years, until — as shown at left — the dry woven seat finally began to sag and then collapse.

I was dismayed, and knew that I wanted to do something wonderful with the chair, and make a present of it to my older daughter. It seemed naturally to belong to her, after awhile. I don’t know why, but certain things are very organic and clearly “belong” to certain people.

When we were in a bookstore in Stratford-upon-Avon (England) in 1996, I saw an inspiring book, Country Rag Crafts, which I bought and shipped back to the States.

The book included instructions for a woven footstool. As soon as I saw the color photos, I knew that was what I wanted to do with the rocking chair… with different colors, of course.

First, I wrapped fabric strips around (and around, and around) 3/8″ sisal rope (“seagrass” in the UK). As I wrapped, I secured the fabric with hot glue.

Then I wove the seat, in a fairly intricate design that gives maximum coverage with minimal bulk. The design starts at the corners and works in.

The entire project took about three days, working about three hours a day. I worked on it while watching favorite old movies.

The fabrics include glittery pieces and plush black velvets, but mostly cottons. One of the fabrics is a blue calico that I used in the first quilt that I made for my older daughter when she was born.

Some of the fabric is part of a seat covering fabric collage, which used to be on the back seat of our art car, called the “Glittermobile.”

There is also a Disney fabric woven in, with a yellow background and Mickey Mouse faces here and there.

These are the things that are a personal “signature” in fabric art, and while I know what they mean (and my family does), they’re our secret when we look at what I have woven.

The rocker is comfortable, and it’s in my older daughter’s home. I’m very pleased with the results. And I hope this chair lasts a long, long time before it needs a new seat again.

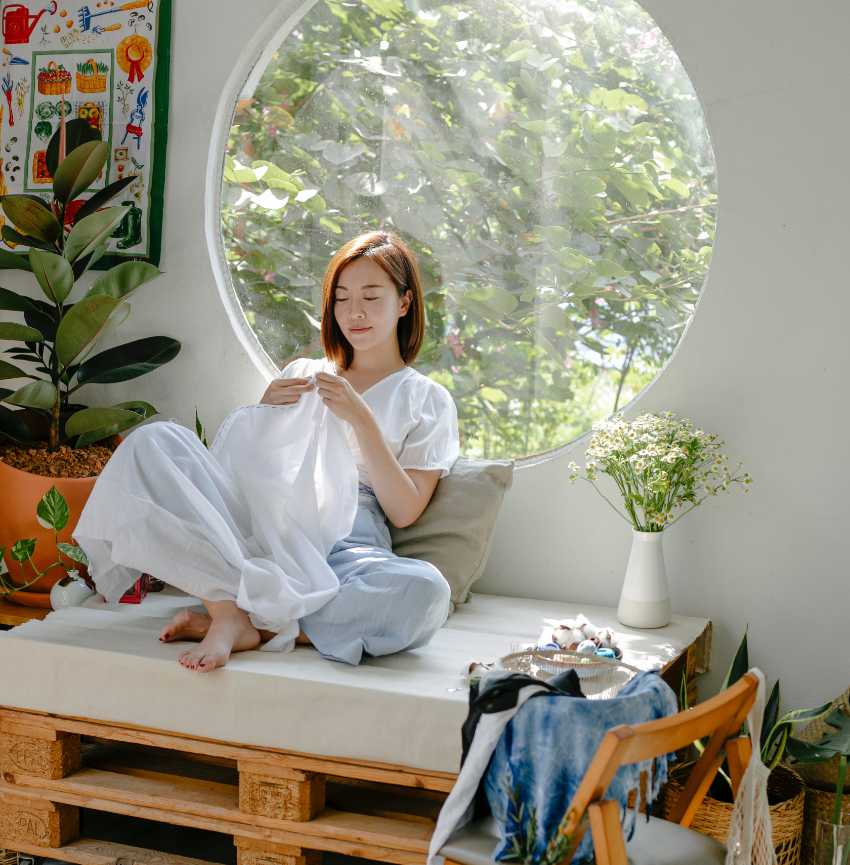
Interested in Fabric Art? Start Here.

Fabric artist at workIf you’re interested in fabric art but don’t know where to start, here are a few basics.

First, decide the kind of fabric art that you’d like to start with.

You’ll have lots to choose from. Here are a few.

Cloth dolls and figures

If you’ve always loved dolls, stuffed animals, or art figures, you may enjoy making cloth dolls and figures. You can make them entirely of fabric, or mix different materials, such as a polymer clay face, or wooden chopsticks for legs.

Cloth dolls can be as realistic or stylized as you like. You can make sewing figures or no-sew dolls. Materials can include cloth and stuffing plus needle & thread, or alternative materials.

If you’re a beginner, your doll can be two pieces of fabric sewn, fused, or glued together. If you’re already a fabric artist, the sky’s the limit in terms of materials and techniques.

Years ago, at Yahoo!Groups, I started a group called Wild Art Dolls. It was wild and it was fun.

Quilts and wallhangings

Many people start their fabric art careers by making quilts. You can start simply, sewing together squares of fabric.

Or, you can use a commercial pattern–or your own design–for a more unique statement. You can work with traditional designs, or wildly contemporary concepts.

For an overview of your options as a quiltmaker, see these two magazines: Quilters Newsletter magazine, and Quilting Arts magazine.

For mixed media art that includes fabric – a fine way to mix your other favorite techniques and materials with quilting & fabric – check Cloth, Paper, Scissors. They have LOTS of fun ideas!

I started with traditional quilts in the mid-1970s. (Yes, really. I started young!)

At first, I hand-pieced baby quilts. As I became more comfortable with quiltmaking, I made larger quilts with my sewing machine.

Next, I learned “quilt in a day” techniques using strip piecing, and modified these designs to make quilts for shops and galleries.

Finally, I started incorporating fine arts and crafts techniques and mixed media approaches to art quilts and wallhangings.

That’s what I’m working on again, now.

Cloth jewelry and accessories

Many people enjoy making fabric jewelry, such as cloth beads, bracelets and cuffs, and necklaces. These are a fine starting point for beginners.

Also, you may enjoy making fabric art accessories for your wardrobe and as gifts for others. These can include belts and sashes, purses, hats, and more.

A quick search for the topic that interest you

Wearable art – clothing

Pieced and/or embellished garments are among the most fabulous and complex fabric art projects. Belle Armoire magazine is very popular among paper and mixed media artists making the transition to wearables.

Special issues of Threads, Ornament, and Quilters Newsletter magazines also feature wearable art and related topics.

Where to start…?

My best advice is to start with whichever area seems most exciting to you. There are simple and complex approaches to every kind of fabric art.

Pick one and get started today. You’ll soon find a niche whether you’re a beginner or an experienced tailor/designer/artist.

Delve in and have fun!

Cotton v. Polyester fabrics

fabric-illus1Before rushing out to buy supplies for your fabric art projects, consider a these important points.

Many fabric artists (including me) prefer 100% cotton for most
projects. The benefits are clear:

    Cottons are durable. They don’t “pill” or develop small little fiber balls on the surface.Cottons tear on a straight line. This saves tedious cutting. Clip at the start of where you’d like to tear the fabric, and then start ripping it. 100% cottons tear straight across the fabric. The better the grade of cotton, the cleaner the line.

    Stains are easier to remove from cottons, partly because of the fiber, but also because you can safely launder cotton in very hot water. And, you can bleach white cottons; you should not use chlorine bleach on most polyester fabrics.

    Colors are richer in many cottons, compared with their polyester counterparts.

    Cotton is cooler in summer and warmer in winter, than polyester fabrics.

But, there are compelling reasons not to use 100% cotton in some cases, too:

    You must preshrink cottons, even if the bolt says that the fabric was preshrunk.Cotton wrinkles. If your wearable art is intricate and difficult to iron, this can be a problem. In fact, if you don’t like ironing or don’t have time for it, your favorite wearables may end up being worn infrequently.

    Cotton can fade. If you accidentally add bleach to a laundry load that included colors, the results can be disastrous. Likewise, if you leave a dark cotton in the sun, it will fade. Finally,
    if you work with black or very dark cottons, use detergents designed for dark fabrics, to prevent fading.

    Some image transfer processes work best on polyester blend fabrics.

In general, I use cottons unless there are compelling reasons to use polyesters.  In practical use, I’d guess that I use polyester fabrics less than 1/10 as often as I use 100% cottons.

On my fabric art shelves, I store the cottons separately from blends and polyster fabrics.   It’s important never to confuse the two.

Choose the best fabric for each project, individually.  The purpose of each project will help you decide whether to use cotton or another fabric for your art.

Faerie Grandmother Pindoll

My faerie grandmother pindoll is still among my favorites. That’s partly because the doll’s face belongs to my paternal grandmother.

I wanted to create a happy pindoll to remind me of what I liked best about that grandmother. She’d lived to age 80, but that wasn’t long enough.


faerie grandmother pindoll

(click image to see full sized)

This is the second of a series of pindolls that I created by hand.

I printed my original collages on cotton. Then I sewed, quilted, stuffed, and beaded them by hand.  (I did a lot of this work on airplanes, as I flew across the U.S. to teach my “wild art doll” workshops.)

Finally, I added the beaded antennae and a simple pinback, so she could be worn as jewelry, or attached to a curtain.

Because these were sewn, quilted, and beaded by hand, not machine, each doll was slightly different, and one-of-a-kind.

I swapped lots of these dolls, and sold some of them at conferences such as Artfest.  If you’re not sure if you have one in your collection: These dolls are three inches tall without the antennae, and about three and a half inches tall with them.

My original collages, printed on the fabric, were made with antique photos and illustrations.

This one includes the face of Mary Ann Loretta Boyle, whose family was from County Cork, Ireland.

Today, I think of her as a “faerie grandmother,” sort of a fairy godmother, but with chocolate chip cookies.

History of Paper Dolls – Part Two

Note: This is the second part of a two-part article tracing the history of paper dolls.  See The History of Paper Dolls, part one to read the first part.

20th century paper dolls – A brief history

Mary Jane Hader paper doll imageIn the 20th century, other magazines followed this trend, including Ladies’ Home Journal  (Sheila Young’s “Lettie Lane”), Pictorial Review (Grace Drayton’s “Dolly Dingle”), Good Housekeeping (Sheila Young’s “Polly Pratt”), and the famous “Kewpie Dolls” by Rose O’Neill in Woman’s Home Companion.

At right, Little MaryJane, one of the famous Hader paper dolls from Good Housekeeping magazine.

The most popular paper doll of the mid-20th century was probably Betsy McCall, created by Kay Morrissey. However, children also enjoyed paper dolls in many magazines of that era, including Jack and Jill Magazine, and Children’s Playmate.

Since 1962, Barbie paper dolls have become the most popular among American children.

Paper art dolls, and fine art paper dolls – Where to find them now

Today’s paper doll designers frequently have backgrounds in fine arts. Many of them work together as part of the Original Paper Doll Artists Guild, based in Kingfield, Maine.

Their collectible paper dolls often feature celebrities and fashions from history, and are intended for both adults and children.

Paper dolls by Aisling
One of my designs for Art Doll Quarterly, Winter 2004 issue.

Paper dolls have been emerging for several years in the paper arts community, too. My own article (and pattern) in the Winter 2004 issue of Art Doll Quarterly is just one among many places to see examples of this emerging art form.

One of my designs is at right. The dolls were printed on vintage pages, and hinged with small, brass round-head paper fasteners.  The hair was tinted wool (designed as doll hair), accented with feathers.  Each doll was hand-colored.

Sometimes called “fine art paper dolls” and also “paper art dolls,” even the name is still evolving.

Today’s paper art dolls are sometimes drawn, painted or printed on paper. However, even more of them are one-of-a-kind, and more mixed media dolls than purely paper dolls.

For example, some artists swap hinged dolls on Artist Trading Cards (ATCs), and participate in exchanges and round robins involving paper art dolls.

This is a very exciting field, mixing a nostalgic love of dolls, with fresh and vibrant creative expressions.

References

(Note: This article was written around 2005.  These links may not be current.)