If you know me in real life – and possibly even if you don’t – you probably know that I draw. And draw. And draw.
It’s something I’ve done all my life. I draw on shopping lists. I draw on church bulletins. I even draw in the margins of my Sudoku pages as I complete each puzzle.
So, when I saw an opportunity to share my drawings with others, I jumped on it.
I’m talking about coloring books… coloring books for adult, not just children.
This is kind of “how I spent my summer vacation.”
HOW THESE BOOKS STARTED
Since somewhere around the middle of July, I’ve been assembling my latest drawings and creating new ones for coloring books.
When I started out, I thought, “Sure, this looks easy.”
Boy oh boy, was I wrong. Coloring books…? Not so easy, after all.
Not if you’re a perfectionist like me, anyway.
I want every drawing to look “just so.”
I want every book to be available in right-handed and left-handed versions. (I’m still working on the left-hand editions.)
I want each book to be the perfect size for the illustrations. And so on.
I put together five coloring books before I felt like I was finally ready to publish one.
Things I learned:
If my one-year-old granddaughter likes a design well enough to grab a crayon and start coloring it… it’s a good design.
Testing some of my designs with adults: some people like big lines. Others like fine lines. Some like big coloring areas. Some like super-intricate designs. And so on. It’s best to focus on books that will make many people happy, but expect criticism. And some one-star reviews.
I’m far more finicky about how my books look than the pre-press guy assembling them for publication. Sometimes, my requests drive him crazy. (In this case, that “pre-press guy” is my husband. He does this kind of work for a living.)
But finally (cue the drumroll), I have books to talk about. Each is for a different kind of coloring enthusiast.
They are designed for adults, even though – as I’m writing this – Amazon only has a category “Coloring Books for Children.” So, you may have to search for these books by name.
My current favorite is a coloring book that fits in my purse. At 5 1/4″ x 8″, it’s just a little larger than a standard paperback book.
I had a lot of fun with this book because I’ve been drawing these kinds of pictures since my early teens.
They make me happy, and I’ve always liked coloring them myself.
I hope you’ll feel the same way.
This coloring book offers a lot of variety… simple drawings (like on the cover), mandalas, and repeating patterns.
Some can be colored quickly, while others might take a few hours (depending on the number of colors and the detail you like).
Each design is printed on just one side of the page. (I still recommend putting a sheet of paper underneath the page you’re coloring, just in case the ink seeps through.)
My next coloring book was Bold and Easy Coloring Pages. It’s a collection of coloring designs with bigger-than-average coloring spaces and bolder-than-usual lines.
I created it when my daughter & I realized my granddaughter really liked easy-to-color pages.
Then, as we talked about it, we thought of other situations where bold, easy coloring pages might be really helpful.
Like when you really want to color in the middle of the night, but don’t want to turn on a bright light.
Or for people who don’t like to wear their reading glasses while they color.
And for use in therapy settings. And so on.
So, it became a book.
It was the very first “bold and easy” coloring book ever published.
And yes, I thought that phrase was funny.
Of course, I explained that it wasn’t a trashy book, it had bold lines and it was easy to color. LOL
And that’s what I’ve been working on during Summer 2015.
Since I use a lot of vintage images in my art, I’m always interested in early photos.
Lately, I’ve been especially intrigued by “selfies” from the 19th and early 20th centuries.
However, not all of them are genuine. It may be important to watch for that, especially if you’re careful with copyright issues.
One of my favorite selfies is (supposedly) dated around 1900.
It’s shown at the right.
The largest version I can find was posted by Sabine Niedola.
Frankly, the subject’s features look a lot like my own portraits from the 1980s. I’ve tried that kind of hairstyle and – even with ultra-thick hair – it turned out the same as hers.
So, I wasn’t alone with the “pouf” issue. (Yes, I know about “rats” – long, sausage-shaped supports hidden under the hair – for better-looking versions of this style. I just wasn’t that committed to the style.)
Note: Since I posted this, my friend David Locicero pointed out authenticity issues.
This may be a hoax or a cosplay photo.
Something looks a little like an electrical outlet, on the lower right side of the photo. I’m not certain it’s an outlet, but it might be. I don’t know enough about household hardware from the early 20th century, to be sure.
My bigger question is about the matted photos on the shelves. The double-matted pictures are more consistent with modern-day presentations.
In the past, someone who could afford that kind of matting would have framed the photos under glass.
There’s also the question of the light fixture (if that’s what it is) on the ceiling in the reflection. And, the high quality of the mirror reflection.
But, whether it’s an authentic photo or not, it’s not the earliest “selfie.”
The Earliest Selfie?
One in the running for “first selfie, ever” is a self-portrait by photographer Robert Cornelius.
He’s the dashing young man in the photo on the left.
The fashions are, of course, post-Regency, but I still see a little Colin Firth / Pride and Prejudice in that photo.
Ah, if time travel were possible…! (If he came through a time portal, like in Kate and Leopold, I’m sure many women would swoon.)
According to some, that’s his own photo from around 1839. Others simply say it’s the first actual portrait photo… taken by an unknown photographer.
It’s difficult to tell. Many websites give a nod to the Top 25 Most Ancient Historical Photographs as the source of Mr. Cornelius’ picture. That site says it’s a self-portrait.
Then there’s the Russian Grand Duchess Anastasia’s self-portrait, on the right, dating to 1913 or 1914.
The Daily Mail featured the picture in a really nice article.
I’d always hoped Anastasia had survived the attack on her family. Alas, DNA evidence suggests otherwise.
Nevertheless, I’m intrigued by the white blurry image in back of her. Online, that’s sparked some discussion with no firm conclusions. Very cool.
If you enjoy old self-portraits like these, visit Google or any search engine and look for “oldest selfies” and “earliest selfies.” You’ll find plenty.
Stage fright has been part of my life for as long as I can remember.
It’s very selective.
I’m fine in front of a crowd of thousands, especially in halls where the lights are on me and I can’t see the faces of anyone past the first row or two… and even they are too dark to see clearly.
Put me in front of an audience of 20 or 30 people, where I can see every face and every micro-reaction to what I’m saying…?
Panic.
Total panic.
I have to steel myself to even think about that kind of public speaking.
That’s why, when I teach, I have a firm rule: I need access to the classroom, in solitude, for at least 30 minutes before the students arrive. (Otherwise, I’m likely to blurt all kinds of things… usually extreme and unexpected. It can be confusing if you’re not ready for the panalopy of creative ideas that rush through my mind. The words can tumble out, sometimes a little scrambled, like high schoolers rushing to class before the “late” bell rings.)
During my personal pre-class time, I give myself a “pep talk,” and use breathing techniques that would make Dr. Lamaze proud, to relax myself enough to teach. With the right mindset – or at least mental distance from “not good enough” self-talk – I can teach a great class with lots of student involvement.
(Without exception, every class I’ve taught that fell flat… it’s because I wasn’t given that 30 minutes to prepare.)
Creating art can be a similar issue for me and many other people. We may not have that visible audience, but when the initial spark of inspiration fades, the voice of the inner critic can be worse than any heckler in the classroom.
(You know that student. She’s the one who sighs loudly and repeatedly. And, at the end of the class – when it’s too late to do anything about it -she tells you how deeply you’ve disappointed her, and how you really shouldn’t be teaching. Or making art. Or both.)
Regardless of where the message comes from, we’re often striving for impossible perfection… as artists and as teachers. The slightest shortfall or flaw seems magnified on a big screen and in HD, and every metaphorical pore and blemish is the size of the Grand Canyon.
In fact, we’re often our very worst critics. We hold ourselves up to impossible standards, and we’re usually using the wrong measuring stick.
Last night, I was disgruntled. I’ve been working on a series of small (5″ x 7″) oil paintings, based on memory and photos I’ve taken.
Unfortunately, the results are – so far – uninspired. (I’ll get back to that in a minute.)
So, I took out my pen and paper, and started doodling one of my Pandorica-inspired pieces. (The Pandorica is a Dr. Who story element.)
I was so caught up in it, I let it run to the edge of the page. And then, I felt so disappointed, because that meant the piece would require an additional, larger support, just to be matted.
This morning, my husband pointed out that it’s a perfectly good work of art, as it is, and there are worse things than needing something in back of the work so it mats well.
He also reminded me that art is about the inspiration.
That gets me back to my paintings… the ones that aren’t turning out.
I said that they aren’t inspired, and I mean exactly that: I’m working on them, production-style. By definition, that’s an industrial approach. (Yes, I am reading Seth Godin’s The Icarus Deception. It’s brilliant, inspiring, and terrifying, all at the same time.)
So, I went back to my Pandorica doodles. I’m waiting for this evening’s sunset, hoping the colors will be inspiring enough to spark (and complete) some or all of the six little paintings currently on my easel.
I want to take them with me to M.I.T. next week, when we’re hearing Seth Godin speak and participating in whatever’s going on at that event. I’d like to hand out art, at random, as a random acts of kindness gesture. In other words, just for fun.
But… I feel a little stuck. And, I’ve been trying to work with a deadline more than inspiration. Bad idea.
It’s compounded by my fear of disapproval, or – worse – no reaction at all. Boredom. Kind of a “What, you think you’re an artist…?” reaction, as they drop the art in the trash. (Have I mentioned how well I can awfulize when I’m in this mode…? *chuckle and sigh*)
Okay. I’m not sure if this is more stage fright or the visual equivalent of writer’s block.
Either way, it’s putting the emphasis on the finished work and others’ opinions – even their potential opinions, if it’s work I haven’t shown anyone – instead of where it belongs, on the inspiration, and the creative expression that results.
But, what I’m describing in angst-laden terms is how we, as artists, make ourselves tiny and insignificant. And, it’s why we often stall and lose precious time in which we might be making art.
It’s a toxic, all-or-nothing approach. It’s so far from being in flow – in the creative process where we’re in touch with the sublime – we couldn’t find it with a road map, a compass, and a laser-tuned GPS.
The teaching…? I’ve become more selective. I decided not to be part of events where profits are more important than the quality of the courses offered to students. (One of my favorite events is still Dragon Con, though you may not think of that as an arts event, per se.)
The art…? That’s another matter. Recovering my willingness to be creative, out loud… that’s why I changed this website back into the blog it was in the first place, back in 1995 or 1996, when I began it.
And, it’s why I’m staring down virtual stage fright, posting last night’s Pandorica piece here, as a graphic and as an ATC you can download (and print at 300 dpi).
Click on the illustration, above and on the left, to print your own copy. Or just click on this link.
When I’m not working on art, I’m usually researching and writing books… mostly fiction, but some true-life stories, as well.
So, I was excited when I saw someone talk about journaling as a way to plot a book.
(This concept was sparked by an article – now gone – called RJ’s Guide on Creating a Story Bible. You can read a similar piece at Jane Friedman’s site, “The Story Bible: What It Is…“)
What’s a story bible? Well, it’s a notebook (or some other system) where you keep your ideas for your book:
Locations
Characters
Background information, like history (real or imagined)
Plot ideas
Plot twists
Sequel ideas, if you might make this into a book series
There’s something rich and juicy about using pen-and-paper as much as possible, when writing.
Often, by using a journal as a story bible – mixing writing & graphics – my books seem to write themselves.
Oh, I’m still writing my books in Scrivener. For me, that’s the easiest way to create Kindle books and printed manuscripts. (I also use voice recognition software, so I don’t have to type anything, if I don’t want to. That’s a time-saver and avoids carpal tunnel issues.)
But the idea of using a journal – written and visual (art journaling) – plan a short story or novel… I really like this.
Let me know if you try it, and any tips you have for fellow artsy writers. Leave a comment – or question – below.
This year, we chose some real, alternative Christmas tree options.
We had two trees in our living room. (I’ve always preferred to have more than one tree for the holiday season.)
One “tree” was actually a bunch of small branches, arranged in a large glass jar, so they looked like a small Christmas tree. I’d picked up those branches at a nearby Christmas tree lot, where they had a stack of extra, odd-shaped branches in a pile to go to the trash.
We decorated that arrangement with all the normal Christmas-y things, including a lot of small, sparkly, multicolored ball-type ornaments. The size suited the small scale of the tree design.
To visitors, it looked like a normal, small (2 – 3 foot tall) Christmas tree. We liked re-purposing discarded branches to create it. It felt very “green,” on several levels.
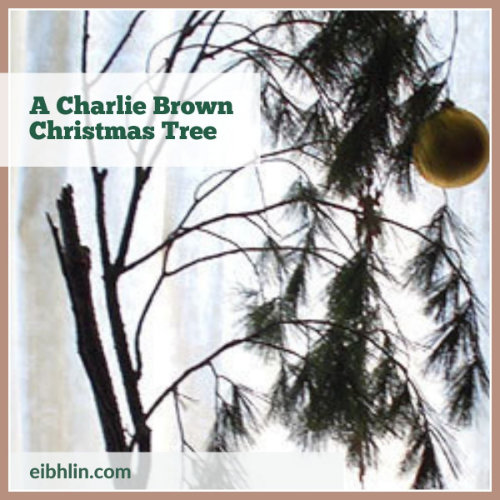
Our “Charlie Brown” Tree
Our other tree involved some serendipity.
I was out for a walk, and noticed a wonderful, large branch by the side of the road. It was about four feet tall, and I think it had been pruned from someone’s pine tree.
I brought it home and found a really large, gold, globe-type ornament to hang on it.
(It drooped, naturally. It’s the way the branch had curved on the original tree… it’s not sagging or anything.)
The effect was almost exactly like the little tree in the Charlie Brown Christmas Special.
I propped it against the wall, in a shallow bowl of water. It lost absolutely no needles during the holidays, and it’s still pretty soft & flexible, now.
This afternoon, I’m taking this little tree and our jar of branches to the nearby woods, so the branches return to nature.
These were among my favorite Christmas trees ever, and no trees were killed (or money spent) to enjoy them in our home.
I think this is the beginning of a tradition in our home, and it just sort of happened this year, because I wanted a couple of small trees that fit the size of our apartment.
Yes, this site is resuming its original purpose, as an online diary. After all, that’s where this all started, back around 1995 before the word “blog” was even in use.
On previous viewings, I just couldn’t seem to find a single, illuminated, happy childhood memory. I could look at times when I was generally happy. I could recall incidents in which I started out happy, but they ended Very Badly. (Like the time I went out with my little notebook, deciding to be a poet. And, lost in thought, a few blocks from home, I was attacked by a dog. Seriously.)
But… a single, early, happy memory…? Nope. I kept coming up with nothing. It was kind of depressing.
After that, I watched Simon Sinek’s TED talk. That added even more clarity to the process.
That’s when I took out a lined, yellow pad of paper. It’s what I like to journal on, when I just need to write and vent, and write some more.
I started writing down every happy childhood memory I could think of. And, along the way, I remembered my grandfather showing me how striking one tuning fork could make another one hum. It was a moment of awe, mystery, and delight.
I remember sitting at the back row of the movie theatre with my mother, watching Fantasia for the third or fifth or eighth time, and getting caught up in the fantasy and magic of it. (Mum was sketching ideas for her upcoming Fantasyland board game design.)
I uncovered several more, happy memories, and I found myself writing:
“Wonderful, magical things are everywhere, if you just look for them… and believe.”
Then I wrote:
“Magic and delight as a path, not a destination.”
Wow. That was absolutely illuminating.
I thought about magic — Disney magic, that is — and how it influenced my childhood and my adult life. I thought about faith: the belief and trust in things unseen. I thought about optimism and happiness, and how important that is.
And, I realized that I was pretty far off-course.
Mr. Sinek talks about one “why”… one thing that connects everything that gives your life meaning… everything you do, and love. Mine is about creativity, personal magic & delight, and miracles and beauty.
When I look at what I enjoy most, and what I want to share with others, it all comes down to that. Everything else is just noise. It takes me off my path.
I made a list of the things that can restore that happy, wonder-full vision of life… visual cues, music, books and movies, and even fragrances, that remind me of childlike delight and fantasy.
Along the way, I found myself getting a little sniffly. It’s like I found something that’s been lost (and badly missed), for years.
In a 35-minute video, John Cleese – who, as part of Monty Python, has been one of the 20th century’s most innovative, creative people – spoke about minutes about creativity.
Unfortunately, the video vanished, online. Looking for it again in late 2020, all I could find were “removed for copyright infringement” notices.
Meh. (I’m tempted to rant about copyright hoarding at the expense of creatives, but I’ll skip that… for now.)
This may be a clip from it:
I’m glad I’d taken notes. Cleese made some very good points. Sure, he’s been a little silly, excessively political, and downright pompous at times. However, I like it when he says things like:
Creativity is not a talent. It is not a talent. It is a way of operating.
…It’s not an ability that you either have or you do not have… it’s an ability to play.”
“To be creative we need five conditions,” Cleese says. “Space, Time, Time, Confidence and Humour.” Yep, “Time” comes twice.
In other words, Cleese stressed the importance of time… not just productive time, but time that’s necessary to get that open space in your mind.
To someone else, it might look like you’re doing nothing, or nothing of importance.
However, it’s one of the most essential parts of being creative, and allows you to cast off the limiting and distracting thoughts that stand between you and that necessary, open space.
If you find that 35-minute video online, let me know. It was a gem.
I’m about to swing wildly off-topic here. Blame it on my addiction to old newspapers and magazines. I cruise through them for cool images for collage, and — the next thing I know — I’m suddenly learning about handmade lace, pea soup recipes, or raising chickens.
When I was a kid, I was convinced I’d grow up, buy a farm, have six wonderful children, and live a very domestic life.
That’s not quite the way things worked out.
However, I find myself saving newspaper clippings. Lately, they’ve been about gardening and self-sufficient living. We’re going to need a house for this, of course. The hens wouldn’t be happy in my apartment, and the balcony is a little small for birds too large for a birdcage.
Still, I read the article at right, and it makes sense to me. We’re throwing food down the disposal (or into the trash or the compost heap) that could feed hens that would produce eggs… nice healthy eggs that could be a major part of our daily diet.
In my opinion, there’s a lot of logic missing in daily life. What began as convenience in the early 1950s (or earlier) has wandered down a weird path. Food my grandmother grew in her backyard, and tasted fresh and delicious, is now shipped to us over thousands of miles. It costs a ridiculous amount to buy, it’s not as fresh or delicious, and it comes packaged in plastic that contributes to the landfill, big time.
Worse, the cost of shipping food cross-country is climbing due to soaring gas prices, and those plastic containers – which originate as petroleum products – are going to be more expensive, too.
*blink*
Yes, eat your veggies, but – more importantly – grow your own veggies.
And, as I re-read this 1917 newspaper clipping, maybe hens are worth considering.
Journaling is included in this TED talk about the “happy secret” approach to living a more fun, productive, rewarding life.
It starts with how you feel, and how positive you are. Your emotional level — how happy you are — determines how happy your life events are.
Click the Play arrow to watch it. The video is about 12 minutes long, and very worthwhile.
If you’re in a hurry (though I hope you’re not), the screenshot below shows you the point to fast-forward to. Start at about the 11 minute marker. (The graphic, below, is a screenshot… click on the video above, to watch it.)
All of those suggestions can help.
Of course, “meditation” will mean different things to different people.
They may include things like:
Prayer
Conscious meditation
Admiring art in a museum, gallery or studio, or even
The simple act of “being there”… being in the moment.
I believe the more of these elements you can include in your life, the happier you’ll feel.
Journaling each day — making notes (words, images, a recording, etc.) about one happy event of that day — can make a big difference in your happiness.
The studies were based on a 21-day practice of… well, whichever of those choices seem most appealing to you.
Sometimes, people will become happier the first day. Others will need to develop the habit, and — somewhere around day 21 — the person will pause and realize that she (or he) is feeling happier.
Colors seem brighter.
There seem to be more opportunities, more fun, and more whimsy in daily life.
Serendipity is in your favor, and life is better.
Maybe you can journal your way to happiness. It’s worth trying.
Last year, I began making sock dolls. I was inspired by the book Stray Sock Sewing.
Here’s how I made my sock dolls for the Wild Art Dolls swap in July 2010.
Sock Doll Supplies
You will need one sock, some batting or stuffing, Fray-Check, and your basic sewing supplies. (Needle, thread, scissors, and a thimble if you use one.) You’ll also want something for eyes, nose, and other embellishments. At the very least, that will be embroidery thread, yarn, or a contrasting color of regular thread.
Sock Doll Directions
First, I started with a large, children’s sock. I’d already washed it in the laundry so, if it was going to shrink, it had already done so. (If the sock dolly needs a bath later, we don’t have to worry about him or her shrinking, puckering, or losing color.)
You should do the same.
Then, stretch it out so the heel is exactly centered, horizontally. Then, the finished doll won’t look too off-center.
Next, you’ll cut off the toe part of the sock. You’ll be removing somewhere between 1/2 and 1/3 of the sock above the heel. That will vary with the size of the sock and your plans for the doll.
If you remove a smaller amount, the doll will have longer ears and shorter arms. If you remove more, there will be shorter ears and longer arms.
Remember: If something goes terribly wrong, you still have another sock. You can use that to supplement the pieces you cut from this sock, or you can start all over again.
The next step is to cut the cuff of the sock, perpendicular to the cuff. What you’re doing is cutting the seam area for the legs. For shorter legs, leave more uncut. For long legs, cut closer to the heel.
Above all — unless you have an octopus kind of doll in mind — don’t cut all the way up to the heel.
The next step is to cut a notch where the ears will extend. Once again, the deeper the cut, the longer the ears. Avoid cutting all the way down to the heel, unless you want a really deranged-looking doll with a strange, short face.
Finally, you’re going to use the toe part that you cut off at the beginning. Lay it flat and snip in into two equal parts. These will be the arms.
Now, it’s time to seal the edges of the sock so they don’t unravel as you’re working. You’ll use a product called Fray-Check for that. You can find it in many sewing supply stores, crafts stores like Michael’s, or order it from Amazon.com.
If you’re making a lot of sock dolls (like for holiday gifts), pick up a couple of bottles of Fray-Check. You will go through it pretty quickly. (Plus that, it can dry out in the bottle, after a few months.)
Apply a moderate amount of Fray Check to every raw edge on the doll. Be especially generous where there are angles, indicated by the blue arrows. Those points will get the most stress as the doll is being finished.
Let the Fray-Check dry completely. This can take an hour or two. Don’t sew while the fabric is damp, or it can stretch and bubble.
Next, sew the top of the head. That’s where you cut the rectangle out, and it’s on the right side of the sock in the photo above.
Sometimes I sew along the wrong side of the fabric, and then turn the doll right-side out. At other times, I sew the whole thing from the outside, using an overcast-type stitch.
Then, turn the doll right-side out, so you can start stuffing it.
Next, Add Stuffing to Your Sock Dolls
When adding stuffing to your cloth doll, it should be packed firm.
Don’t over-stretch the sewn edges as you do this, but make sure your cloth doll won’t look all saggy after its been hugged a lot.
For sock dolls, you’ll probably start from the bottom, or wherever the open seams are.
When you’re stuffing the ears, it’s a good idea to make them fairly solid. I use a chopstick or a stuffing tool for this purpose.
If the ears are really long, you may want to insert a wire after the ears are stuffed. You can use a pipe cleaner or any firm but flexible wire for this. Then, you can bend the ears in zany angles.
Sewing the Legs
Now, you’re ready to sew the legs, stuff them, and then sew the edges of the feet.
Sew the leg seams, but not the feet. Stuff the legs. (A chopstick, smooth end of a pencil, or stuffing tool is ideal.)
Finally, when the doll is how you want it to look, stitch along the bottom edges of the feet.
Add Embellishments to Your Sock Doll
At this point, I like to add the beads or buttons for eyes, and a nose. I usually use embroidery floss for the nose.
The doll is beginning to have character. I think that’s important, before attaching the arms. Arms can make a remarkable difference in the attitude of the doll.
Add the Arms
For the arms, you’ll sew the seams on the toe pieces you cut at the beginning.
Sew just the longest side of each one and stuff it. Depending on how hard it is to hold the shoulder part together, you may want to baste it closed after the arms are fully stuffed.
If they’re only loosely stuffed, you can skip the basting step and attach the arms directly to the doll.
Add More Embellishments, Maybe
After that, you can add wings, hair, a pom-pom tail, or any other embellishments you like.
More Examples
Here are a couple of other sock dolls I’ve made. They were propped up in Rubbermaid sandwich containers, so you can see them better. That also gives you an idea of the scale of them.
Here’s the same doll in profile. He has a yarn pom-pom tail.
Another doll, shown below, is made from an adult’s pink sock. The top of the head looks like the doll is wearing a cap. I made the cap from a second, different pink sock. I let the lower edges roll up, like the brim of a knit cap.
I also embroidered a heart on her, and gave her faerie wings.
Once you get used to making these dolls, you’ll find ways to mix n’ match pieces from different socks for different effects.
I can usually make one doll in an evening (about three or four hours), while I’m watching TV or talking with my family.
Sock Doll Tips
Use children’s socks for the best colors and patterns. For larger, colorful socks, I find good patterns & prices at places like TJ Maxx, especially in their sale sections. Want tiny socks for the dolls or for ears, arms, or a tail? Check the discount section of Michael’s Arts & Crafts. Some of their Mary Engelbreit-type socks can be wonderful for sock dolls!
Use Fray-Checkby Dritz. Amazon carries it, or find it at Michael’s, JoAnn Fabric, etc. I seal all edges before I sew them. (Usually, it takes a couple of hours for the Fray-Check to dry thoroughly. If you sew the edges while the Fray-Check is damp, the fabric can stretch too much.)
If your doll might get soiled easily, use any waterproofing spray on stain-resisting spray, after you complete the sewing but before you add any beads or buttons.
If you’re making a doll that you’ll turn inside-out, after sewing, always try to make the final seam (the one you’ll sew on the outside) where the doll sits down. That way, the seam isn’t so noticeable.
If your doll should sit and not fall over easily, make a small bean bag that will fit inside the “rear end” of the doll. Fill that bean bag with something heavy. I use anything like poly-pellets, or well-rinsed gravel intended for fish tanks, or even unscented kitty litter. (The latter, being clay, can deteriorate and turn to messy dust if handled too often.)
If your dolls are small enough, check the dollhouse furnishings aisle (at Michael’s, etc.) for accessories you can use with (or glue to) your sock dolls.
Manage Cookie Consent
We use cookies to optimize our website and our service.
Functional
Always active
The technical storage or access is strictly necessary for the legitimate purpose of enabling the use of a specific service explicitly requested by the subscriber or user, or for the sole purpose of carrying out the transmission of a communication over an electronic communications network.
Preferences
The technical storage or access is necessary for the legitimate purpose of storing preferences that are not requested by the subscriber or user.
Statistics
The technical storage or access that is used exclusively for statistical purposes.The technical storage or access that is used exclusively for anonymous statistical purposes. Without a subpoena, voluntary compliance on the part of your Internet Service Provider, or additional records from a third party, information stored or retrieved for this purpose alone cannot usually be used to identify you.
Marketing
The technical storage or access is required to create user profiles to send advertising, or to track the user on a website or across several websites for similar marketing purposes.