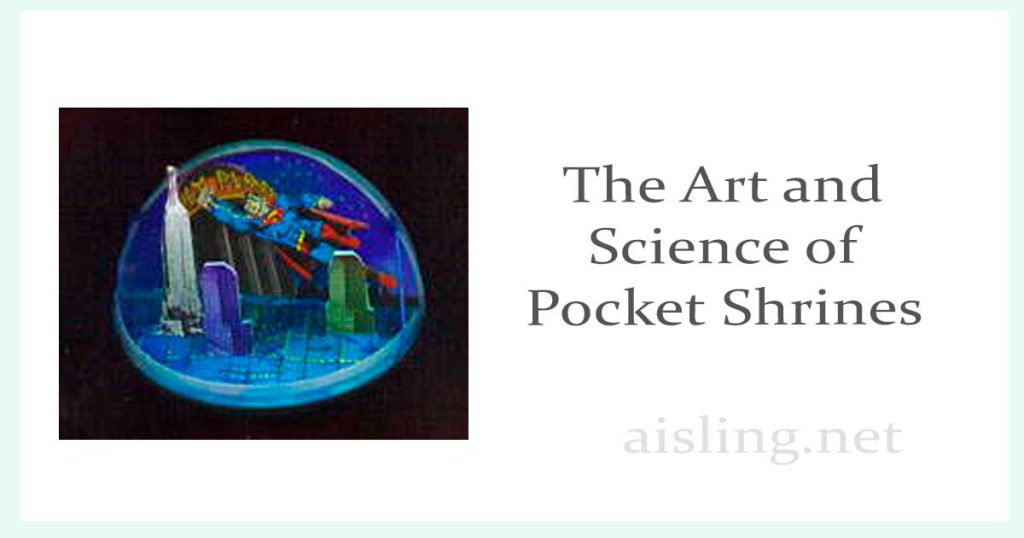
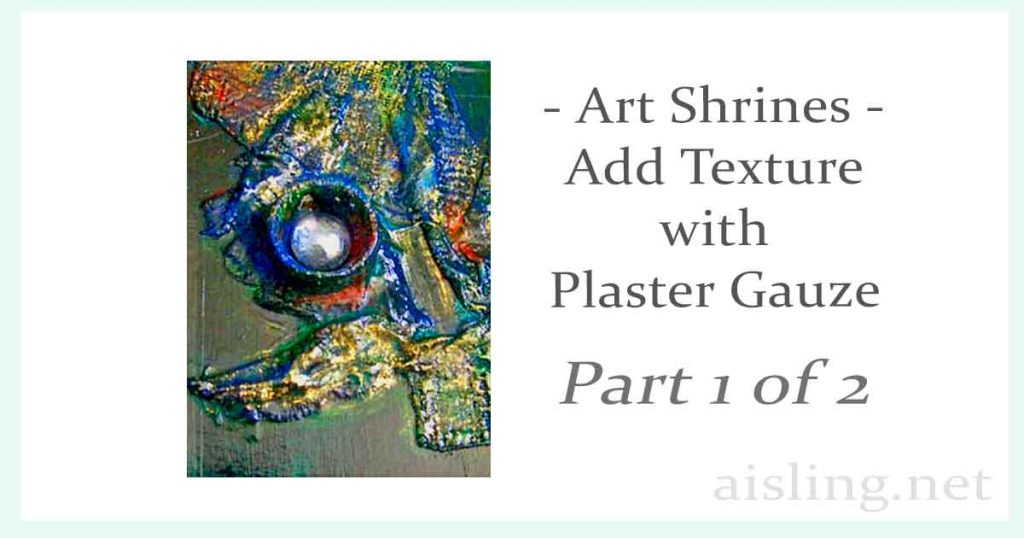
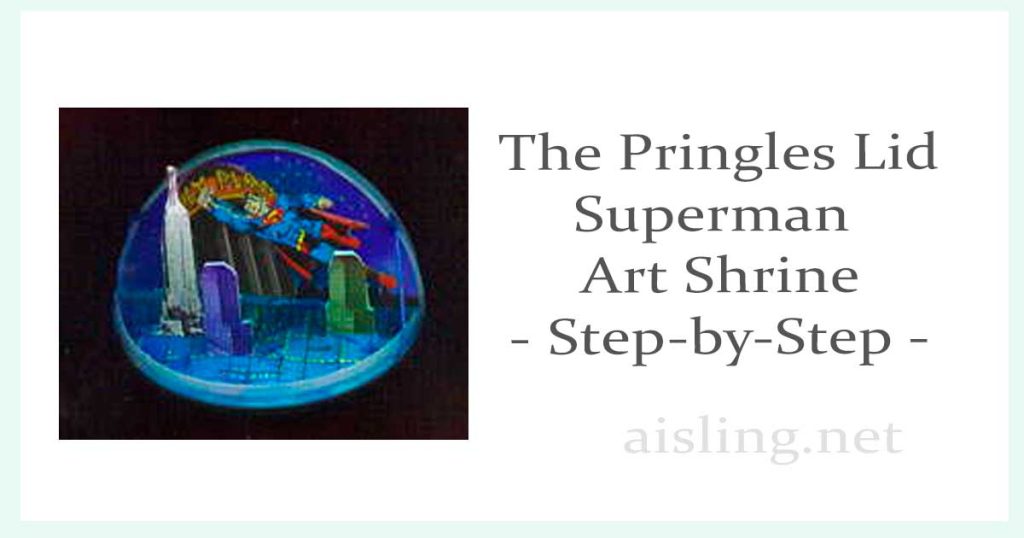
How to Organize Images for Your Mixed Media Collages

Are you art journaling with mixed media and ephemera?

Do you struggle to collect and organize collage photos, papers and ephemera?

Here’s the system that works well for me. It might help you, too.

Art journaling – and mixed-media collages – can require lots of images. And, to remain “in flow” as you’re creating a new journal entry (or embellishing an older one), organization can be vital.

Here are some tips to keep the clutter under control.

Step One: Sort collage elements by into groups

Start by deciding how you think about your collages.

  • Are you primarily color-focused?
  • Or, do you choose images by themes, such as Nature, Anime, Steampunk, Skies, and so on?

For me, all of my art – including my collages and art journaling pages – is often about color.

So, I organize my loose images into the major color groups (red, blue, green, etc.) and then expand (lime green, turquoise, etc.) as my collection of saved images becomes too large for anything simpler.

Usually, I store them in individual manila folders, based on the main color in the image.

Then, when I want something blue, I open my “blue” folder and I’ll see my primarily blue magazine images, but also blue tissue paper, maybe some bits of blue ribbons or fabrics that I intend to use in collage, and so on.

However, I’ve also started folders that say things like “skies” and “green plants.”

Think about how (and what) you look for elements and ephemera to add to your collages as you work on them.

Also look at your existing collages. Your categories might be “faces” or even more specifically, “women’s smiling faces,” etc. Or, “nature,” “dark-looking castles,” “cute cottages,” “kissing,” “fast cars,” “vintage images,” or whatever.

Create categories that work for you and your creative process.

Step Two: Keep those folders tidy.

Having a bunch of folders, no matter how well they’re filled with juicy, colorful images, is the just the first step.

Then, they need to be accessible.

For me, that means a standard file box with hanging files.

All the blue-related folders (turquoise, sky blue, navy) go into one hanging file. All the photos of forests, from travel magazines and National Geographic, go in another hanging file, along with a folder that’s gardens and another that’s houseplants. And maybe honeybees and butterflies.

Optional Addition: Bins.

As I work on a collage and tear off pieces, I’m often left with shreds and shards of paper that are too good to throw out.

When that happens, I put them into small bins. In my case, I’m recycling plastic sandwich meat containers from Target. (My family’s favorite ham comes in those containers.)

I have one for blues and greens. One for glittery ephemera. One for ribbons, feathers, and so on.

You get the idea, I’m sure.

When I’m just NOT finding the collage element I need, I open those bins and usually find the perfect element.

Either that, or – looking at those bits – I have an “ah-HA!” moment, and know where to look for the element I need. Usually, that’s a magazine or travel brochure from my stack of unread future collage resources.

Why to Stay Organized

If you’re like me, you create your best art when you’re “in flow.” Anything that interrupts can affect the journal page or collage that I’m working on, and not in a good way.

So, the more I can create systems that work intuitively for me, and keep everything organized, the happier I am as an artist.

Find (or create) systems that work for you and keep you organized.

I know that can be a challenge for artists, but it’s also essential for us to create our very best work.


Composition Book Artists Journals


Mead composition bookA composition book art journal is any journal that’s kept in a composition book. Those are generally school-type, saddle-sewn (along the crease) notebooks with cardboard covers… similar to exam/test booklets, but a little more permanent.

Composition books are inexpensive, so many people like them especially for informal journaling. It feels less intimidating to use a journal that doesn’t cost much, and is familiar from our years in school.

They’re so affordable, you can buy several. Put one in your car, one in the baby bag, one by your bed, and so on. Then, you’re ready to create a journal page when you have some free time. The journals are so inexpensive, you can rip completed pages out and bind them into your more formal artist’s journal.

(“Binding” the loose page can be as easy as taping it into your other journal. Or, you can glue it, sew it, staple it, etc.)

Composition books have lots of lined pages in them… as many as 100. They come in a variety of sizes, but the traditional ones are about 8″ x 10″ or so. The traditional ones often have a b&w cover that looks sort of marbelized.

You can also find composition books with red covers, plain manila covers, green covers, and so on. You may want to choose one with a color that reminds you of your childhood. (But, the color may not matter if you’re going to cover it with art anyway.)

Also, it’s easy to embellish the cardboard covers. I’d still use something (such as fusible interfacing) on the back so that threads don’t pull through, but you can sew through the cardboard with a crewel needle. Then, you can embroider on it, add beads & buttons, etc., in addition to other embellishments.

(For more about sewing on your journal pages and covers, see Sewing on Journal Pages.)

Sewing Onto Your Journal Pages

You can sew embellishments onto your paper journal pages.

You can use any page in a book like fabric (to sew on, for example) by using iron-on interfacing on the back side of the page.

Yes, just iron it on, the same as you would iron interfacing onto fabric. It won’t always stick 100%, but it will work well enough that you can sew through it.

(If you try to embroider or sew beads onto regular pages in a book, the thread tends to pull right through the paper, if the thread is tugged.)

You can do the same thing with your journal cover. A strong crewel embroidery needle will usually sew through cardboard… but you’ll probably need a thimble to push the needle through.

artists journals cover - treated as fabricYou can then embroider with embroidery floss, yarn, thin ribbon, etc. You can add buttons, beads, and so on, too.

At left, you can see one of my journal covers that I’ve embellished with sewn-on buttons. (Click on the image to see it larger.) The biggest button is part of the journal closure. When it’s not in use, a string of hemp (secured to the back cover) is wrapped around the button on the front cover to hold the journal closed.

After you’ve finished your sewing (or other embellishment), you can glue a page or fabric over the ironed-on interfacing, so your stitches are concealed. If I’m doing a lot of this in a book, I’ll buy a second copy of the same book, so the “backing” page is what it would have been, if I hadn’t covered the original with interfacing.

You’ll find iron-on interfacing at any fabric shop. It’s usually kept in a bin or on shelving next to where they cut fabric yardage for you.

You can also iron on Stitch Witchery or another fusible adhesive, and that gives you the option of sticking something wonderful on the other side… interfacing isn’t all that interesting.

For example, you could fuse an actual piece of fabric to the paper page.

Then again, after I sew beads onto the page, I like to cover the interfacing side with more paper… maybe a collage.

You can sew onto your journal pages, or turn them into fabric. It’s easy!

Foam Brush Notes

PaintbrushesPaintbrushes are important for many artists.  I have lots of them for all purposes.

I use bristle-style brushes for my oil and acrylic painting. Also, I’ll use soft, hair-type brushes when I’m painting with watercolors.

However, for me, one-inch foam brushes are most useful for art journaling.

How I use foam brushes

When I’m creating collages, especially torn-paper collages when I’m art journaling, I apply Yes!Paste with a foam brush. That’s my favorite adhesive for magazine images, tissue paper, and so on.

If I’m using gel medium to seal my art journaling pages, I’ll apply that with a foam brush, too.

I’ll use a similar brush to add glittery paint and to apply gold leaf, too.

Also, I use foam brushes to apply cheap, vivid, cadmium red paint (acrylic) as an underpainting when I’m working on an art shrine (that I’ll also paint) or a fine art painting.

I generally get at least three to five uses from each foam brush.  I wash them thoroughly and promptly after using them.

Some foam brushes are better than others

I used to buy my foam brushes at Michael’s. Recently, to get the best price, I had to buy a package of assorted foam brushes.

That was a mistake. Some of the brush sizes were useless for my work. In addition, the quality wasn’t great.

Now I buy brands that I trust, like US Art Supply’s 1-inch brushes. And – for now – I order through Amazon. It’s convenient. If a product is disappointing, it’s easy to return it, but so far, these brushes have been fine and the price is very good.

Note: If you use the kind with wooden handles, the wood can be recycled in a variety of projects.  (For some of my cloth dolls, that handle is the perfect size to reinforce the doll’s neck, as the wooden dowel will extend from the head through the neck and then into the torso.)

Artists’ Journal RR #2b – Debbie O’s pages

The following two journal pages are glorious examples of work by Debbie O. of our Yahoo Group, ArtistsJournals.

They’re wonderful mixed media journal pages with fabric elements, and they’re full of personal insights and juicy imagery.

These continue the journey of Round Robin #2b (a larger blank journal) as it traveled across the U.S. and then to foreign lands.

Alley Hauldren’s Journey to Winchester, TN

After arriving in Tennessee from Arkansas, it was time to continue Alley’s journey.

During the final phase of Alley’s adventures, she reached Winchester, Tennessee.  That part of her trip inspired the next two pages in this round robin artists’ journal.

This transformed this journal into a true mixed-media artists’ journal, as Alley included actual cotton from Falls Mills.

These are her pages, larger:

Alley Hauldren’s Third Journal Pages

After Arkansas, Alley and her husband were on their way to Tennessee.  The map in this collage shows the route that she and her husband took as they headed toward Memphis.

Paper ephemera illustrates their journey.

Here are her journal pages, larger:

Click here to see the last two pages of Alley’s section in this round robin journal.  They cover the conclusion of her trip as she drove from Dallas (TX) to Winchester (TN).