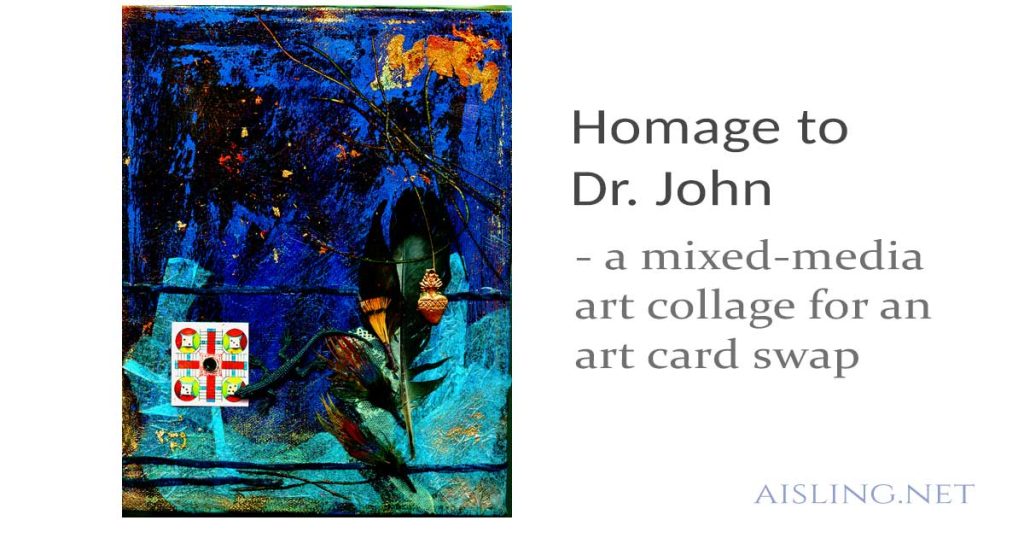
There are as many ways to create, modify & embellish a single-sheet zine as there are artists.
How to Create a Single-Sheet Zine
Here’s a very simple way to create one:
1. Take any white sheet of paper. Pull one out of your desktop printer, or rip one out of a notebook. (Think of the lines as pinstripes!)
2. Fold the paper in half. Most people fold it so it becomes a four-page zine, with each page being 8.5″ tall and 5.5″ wide, but anything’s possible. (Here’s a sample you can download and print: Free Zine #1.)
3. Write and draw (and create other art) on each page, until it’s full. (Alternative: Create your zine, digitally, and then print it.)
4. Flatten the sheet so you can photocopy (or scan) it.
5. Print copies, two-sided (back to back), and fold them. (Optional: Embellish by hand.)
Next, Share Your Zines!
Mail copies of your zines, sell them (at your site or Etsy, for example) or give them to others, sharing your ideas and artwork!
(If you live in a city, especially one with a student neighborhood, go hand some zines out and watch people blink in amazement. They’re used to advertising flyers, etc., not actual gifts of art & inspiration.)
If you want to make and share zines, this is a great start, and one of the simplest ways to make your own zines.
Single-sheet zines can be easy or complex. In my earlier article, Single-sheet Zine Design – Basics, I showed one of the simpler ways to create a zine.
What most people do…
From what I’ve seen, the majority of people who swap or sell zines take a bunch of letter-sized printed pages (8 1/2″ x 11″) and fold them in half. Each sheet of paper is four pages of the zine.
Here’s how a single-sheet zine might look:
See? It’s just one sheet of paper. This can be really easy!
You can print a free zine – a variation of the single-page zine concept – at Free Zine #1. (Warning: I wrote that around 2002, and included several New Age topics that were popular/trendy at the time.)
Of course, that’s just the beginning…
Zine sizes can vary.
An average zine is five to 15 sheets of paper, meaning 20 to 60 pages. Those are the ones you’ll see at art- and zine-related shops, where you can purchase zines.
However, most zines are at the small end of that figure. Many of them are just a sheet or two of paper, printed (and sometimes cut) and folded/stapled to make a zine.
Once you’ve made a few classic, single-sheet zines, you may want to try something more complex.
The Classic, 16-Page Zine from a Single, Legal-Sized Sheet of Paper
If you’re a purist or on a strict budget, you may love this: It’s a 16-page zine created with one sheet of legal-sized paper, period.
I don’t count the cover as a “page” when I number my zine pages, so my own version of this is 12 pages plus an outside cover & inside covers. Here’s how it fits on the paper:
Cut on the solid lines and fold on the dotted lines.
Staple in the center. One staple is usually enough.
One stamp on the envelope is enough to mail one of these zines. (You can tuck them in with bill payments, notes to friends, birthday and holiday greeting cards, and so on.)
You can also scan your zine, uncut, and put it online so others can print their own copy, cut & assemble it. Easy!
Zines Know No Limits!
There are many other ways to make zines. Look at books about making handmade books, for the best inspiration.
The concept is the same, but zines are usually smaller & more informal, that’s all.
If you want to create a zine that’s a work of art, that’s fine.
If you want to get wild & crazy with design, have fun with it!
Remember that a zine can be one piece of paper, b&w, printed on both sides, and folded in half. That’s a four-page zine. I have several in my collection, and I think some of the simpler ones are better than a few larger ones I’ve seen.
So, put your art & soul into your zine, and don’t worry about the size or technical stuff. I love almost every zine I see; size and expertise often have nothing to do with how enthusiastic I am about a zine.
What to Do with Zines
If you’ve wanted to create a zine for fun, just do it!
Give them to friends.
Sell them (at your website or Etsy, for example).
You can approach local artsy stores, gaming stores, etc., to consign (or outright sell) your zines.
Hand them out on the street, at school, at work, to friends, neighbors, and relatives.
Join a zine swap or launch your own, on- or offline. They can be tremendous, and you’ll receive fabulous zines that you might never see if you hadn’t swapped.
Suggested: Any everyday pencil, if you’re planning simple line drawings. I like an HB (lead firmness) pencil, or a standard 2B school-type pencil. If you’re going to do shaded sketches entirely in pencil, it’s good to use a set of pencils. Amazon Basics’ set is pretty good and includes erasers and sharpeners.
My favorite pen for drawing lines is Sakura’s Pigma Micron, with an 08 tip. It’s waterproof, so I can use watercolors or felt coloring pens over it, almost immediately.
An eraser, if you’re sketching with a pencil.
Suggested: I carry both a kneaded rubber eraser and a standard drafting-style eraser. (Both are in the Amazon Basics set.)
Something to add color, like watercolors (and water, and a brush), or colored pens or pencils.
Suggested: I’d use a temporary tape, like blue painter’s tape in a narrow width. Then I’d use glue or something more permanent once I returned home. (Then I can decide the best position, angle, or page for whatever the ephemera is.)
Snacks, in case you get hungry.
Suggested: Carry both a protein-rich snack (like a protein bar for sustained energy) and something sugary (for a quick, late-in-the-day burst of energy).
Optional: A camera (you can use your phone), in case you want to add printed photos to your journal, later.
In general, I suggest keeping your art supplies simple and as light (and perhaps small) as possible.
The most essential item will be your sketchpad or journal. Be sure you can lean on it and sketch without other support.
More Sketchcrawl Supplies Ideas
Can’t find the perfect watercolor set? Here are some ideas for making your own mini-watercolor palette:
What a Sketchcrawl Journal Looks Like
Your sketchcrawl journal (or sketches) will look like whatever YOU decide.
There are no rules.
Would you like to see an example?
In July 2009, I took part in a sketchcrawl around Boston’s Freedom Trail. (You can see some of those sketches and photos at Sketchcrawl Notes – July 2009.)
Sketchcrawls are great practice for creating travel journals, too. The materials & techniques are the same.
See if you enjoy it!
Get Started Now
You can go on your first sketchcrawl right now.
You could try a sketchcrawl somewhere near your home, even in your backyard.
Then, try a few more sketchcrawls, on your own or with friends.
It’s okay to organize your own sketchcrawls. This has always been a very fun, informal way to create art as you explore cool and interesting locations.
Online, you may find sketchcrawl announcements, too.*
You can use those same sketchcrawl supplies — carried in your purse or backpack — when you travel. Whether it’s a daytrip, a road trip, a holiday, or a vacation, sketching can provide you with wonderful keepsakes when you get home.
(Traveling on a plane? remember some airlines’ four-ounce rule on liquids… no big containers of gel medium, glue, or tubes of paint.)
For me, sketching – with pencil, pen, markers, or watercolors – is a relaxing way to enjoy the scenery, wherever I am. Whether it’s a local scene or a trip abroad, art journaling helps me notice — and appreciate — more of what’s around me.
*Note: The sketchcrawl (dot com) site is one place you’ll find sketchcrawls announced.
I’m not sure it can be trademarked (or copyrighted) since the term has been in use for decades, or perhaps longer. Not unless it’s connected with a very specific project, and only for that particular use. (For example, “ghost hunters” couldn’t be trademarked, but it could be licensed, just for the TV series.)
So, I’m reluctant to recommend that sketchcrawl website.
When a quotation sparks my creativity or makes me smile, it’s like the person is at my side saying, “You can do this… you really ARE an artist… we ALL are!”
So, as I’m taking a course in online videos, I created this video with some of my favorite quotations as well as some photos that seem to highlight what they mean to me. (Maybe it’s not perfect, but it is my attempt to put a little more inspiration into the world… and isn’t that what art is all about?)
The photographs
The following photographers’ pictures appear in this video.
“The voice our our original self is often muffled, overwhelmed, even strangled by the voices of other people’s expectations.” — Julia Cameron
“There is only one of you in all time, this expression is unique. And if you block it, it will never exist through any other medium and it will be lost.” — Martha Graham
“I don’t think you have to do anything to make your life into a work of art — it is one. What you have to do is observe it, be aware of the weirdness, beauty and artistry that occurs every day.” — Anne Maybe
“What you do instead of your work is your real work.” — Roger Ebert
“When you are doing what is right, it all starts to click and fits into place. It is not that you don’t have challenges, but you have the tools to meet the challenges.” — from ‘Manifesting Your Heart’s Desire’ by Fengler & Varnum
“Taste is the enemy of creativeness.” — Pablo Picasso
“The function of the overwhelming majority of your artwork is simply to teach you how to make the small fraction of your artwork that soars.” — David Bayles & Ted Orland, in ‘Art and Fear’
“As long as there’s something original going on, that’s all that really matters.” — Jeff Beck
“The greater the artist, the greater the doubt; perfect confidence is granted to the less talented as a consolation prize.” — Robert Hughes
“Go confidently in the direction of your dreams! Live the life you’ve imagined. As you simplify your life, the laws of the universe will be simpler.” — Henry David Thoreau
“Don’t ask what the world needs. As what makes you come alive, and go do it. Because what the world needs is people who have come alive.” — Howard Thurman
Music (sound track)
The music in this video is ‘Back to Back’ by Father Rock.
Torn-paper collages are among my favorite ways to illustrate an artist’s journal.
I’ve been creating them for over 20 years now, and I never seem to get tired of them. In fact, two walls in our living room are a mini-museum of my favorite torn-paper collages. (People who visit us can be overwhelmed. It’s like they just want to stand and gawk at the art, undisturbed, for at least 20 – 30 minutes.)
Here’s how to create your own.
Steps to create a torn-paper collage
1. Gather Collage supplies.
All you really need are some pictures, something to use as glue, and something to support your collage, like a piece of paper.
More details:
For pictures, words & phrases
– Magazines, newspapers, printed materials, junk mail
I especially like fashion, travel and nature magazines for photos. “W” magazine is great for huge, almost surreal images, as well as great words & phrases. “Town & Country” magazine offers a nice mix of fashion, travel, home & garden photos, as well as yummy ads.
If I’m going to sell the finished work, I’m careful about using magazines such as National Geographic. Though their pictures are gorgeous, they have a reputation for being difficult about copyright issues.
Here’s one guideline for using otherwise-copyrighted images: Some Questions About Fair Use. They give a good example of “transformative” artwork… and that’s the kind of collage I create.
For words and phrases, I like health, fitness, religious and New Age magazines, as well as junk mail. That includes the envelopes, which are often better than whatever’s enclosed in it.
I find free magazines at public libraries and sometimes at laundromats (ask if they’re ready to get rid of some of them).
Adhesives and glues for collage art
Previously, I was using Golden Gel Medium (Soft Gel – gloss) with a sponge brush. (That’s what was in my video. I no longer recommend that as an adhesive. It makes the paper buckle and bulge unnecessarily.)
Click to see Yes Paste at Amazon.com
Now, I use YES! Paste. For my work, it’s absolutely perfect, with minimal buckling and puckering, and the ability to reposition the image… for at least a few minutes.
Even better, a jar seems to last forever.
When I use a sponge brush, I rinse it out completely as soon as I’m finished with it. I can usually use the same sponge brush for a week before it starts to fall apart.
When I’m applying the adhesive, I use an old phone book or junk mail underneath my work.
Support for your collage
Anything can support your collage. I generally use a regular spiral-bound sketchbook for my daily collages. However, for this one (“Uncompromised’), I used a file folder. I’m not sure why; it seemed like the right choice.
You could use poster board, canvas, wood, or almost any surface that will accept glue.
(Some dishes or tiles work well with collages, but others don’t. Test different materials and adhesives to see what works for you.)
Collage embellishments
In the past – around 2000 – I used a lot of gold leaf and glitter, but that was a personal preference. Almost anything that you can glue to a surface can be used as an embellishment.
2. Select images and words or phrases.
Go quickly through your materials, and – without much thought – choose images, words & phrases that appeal to you. Tear out the entire page and set it aside.
Tip: If you like more than one element on a page, separate them. Otherwise, it’s easy to forget that you were going to use more than one item from a single page.
I often select a word or phrase early in this process. In this case, I chose “Uncompromised” quickly. The word “promise” is in red in it, and I realized (light bulb realization) that when I compromise, I’m breaking a promise to myself or to others. Even if it’s just small and unspoken, it’s still a betrayal (big or little) of an ideal that I held or aspired to.
That’s a concept worth examining, as I work on daily priorities.
Remember that you can use a word or phrase from a sentence. I chose “you deserve” from a laxative ad!
When you feel pleased with your collection of pages, or when you have a stack of about ten pages, pause and begin working with them.
3. Tear the images in the approximate size, and then to the exact size.
If a page is really large, it can be more difficult to tear out the precise element that I want. So, I tear the page around the general area of the element, and then tear more exactly.
When I’m making the final tear, I try to tear it all in one go, not inching along, a little at a time. A smooth tear usually looks nicer, unless you have a specific reason for a very jagged edge.
Also, when you tear the magazine page, there will be a white edge in one direction of the tear. (The yellow arrow points to it.) I like to work with either all white-edged images, or keep all of my images without white edges.
4. Apply adhesive to the back of the image.
This is going to be a little messy… or even a lot messy. Revel in it!
I use a sponge brush. Some people use their fingers or a regular brush.
I keep a damp rag or paper towel next to me, to clean glue off my fingers as I work. (I also wash my brushes thoroughly, as soon as I’ve completed my work.)
Work with something underneath the image, so you can cover the back of the image with adhesive.
If the adhesive is too thick, it can be lumpy underneath the image. If the adhesive is applied in a really thin layer, it can dry too quickly. However, as long as some of it sticks to the collage, that can be enough.
If it turns out lumpy, you can use an iron (there are special irons made for this, too) — with some sort of release paper between the collage and the iron, so the iron doesn’t get all gooey from the melting medium — and the heat softens & reactivates the adhesive.
So, even dried adhesive can be reactivated and it’ll suddenly adhere the entire image to whatever’s underneath it.
I only do this when the collage is nearly completed – before I apply any glitter or gold leaf – if there’s clearly a problem where part of the collage didn’t adhere correctly.
Keep in mind that your lower layers (and at least some of their edges) will be covered by later additions to the collage. So, how they look may not matter very much.
5. Place the image where you want it to be, in your collage.
Try to place it exactly where you want it to be, or at least fairly close. If you lift, stretch, or drag a piece of magazine paper, it can stretch and look a little odd in your final work.
If your collage element seems to bubble, it’s okay to pat it flat, but don’t try to smooth it. (I learned that from collage artist Claudine Hellmuth.)
If you brush it or rub it with your fingers to smooth it, it’ll stretch the paper and the finished result might be disappointing.
Bubbled paper seems to shrink back to shape was the adhesive dries, or at least some papers will do that. So, if you’re going to put something over the bubbled piece, let the bubbled part dry, first. It might flatten out on its own.
6. Keep working. Build up more layers. Tear more images as you work, if you need more images.
I usually tear out the first three or four images that I’m going to work with, and then start building the collage.
When I’m happy with them, or if I decide to add another image that I haven’t torn out yet, I pause and tear out what I’ll need next.
If I have a massive pile of torn paper – good stuff and paper that I may (or may not) use – it can become confusing.
7. Continue to build your collage.
Remember that the first layers are the background. As you add layers, they’ll be on top. (It’s amazingly easy to forget this, sometimes.)
The focal point (or points) of your collage should probably be on top. The leading areas tend to attract the attention of the viewer.
However, it’s okay to tuck little surprises in the lower layers, for the viewer to “discover” as he or she explores the collage.
Also, don’t despair if your collage looks messy. Some will be more messy than others. It’s okay.
Here’s a close-up of one area on this morning’s collage.
… Here’s what you need to know if you make a “mistake.”
1. Milky areas will probably dry clear.
2. If the paper looks translucent in some areas (like right above the letter T in the photo above), they’ll probably turn opaque when the adhesive dries.
3. Anything that looks weird when the collage is nearly finished, can be covered with embellishments (glitter, gold leaf, threads, pieces of mica, paint, etc.) or you can cover it with another image or phrase.
It’s okay to change your mind.
For this collage, I’d selected a great image of a model looking in one direction. However, I discovered an even better photo on the back of it: Mulawi children in colorful, traditional clothing.
So, allow for serendipity as you work.
8. Keep building your collage until you’re happy with it.
It’s okay to take your time. It’s also okay to rush through this in a flurry of creativity.
You can start the collage, walk away from it, and finish it later in the day, or the next day, or the next week!
Tip: When you think to yourself, “I think this is nearly finished,” it’s probably finished. Stop! Take a break, and then take a fresh look at it.
It’s better to stop too early than take the work too far.
9. Consider adding embellishments.
I love embellishments, but you don’t have to add any at all. Every artist has his or her own style.
Tissue paper (it may remain translucent if you use gel medium over and underneath that layer).
Thread, glued on or stitched on.
Beads, mica, sand, pieces of glass.
Paint, oil pastels, stencils, rubber stamp art.
You can even embed something that plays a tune or says something (like in greeting cards) in your collage, for people to press.
The possibilities are unlimited.
10. (Optional) Finish with a coat of gel medium or other sealer.
After the collage is fully dry, you can seal it with a thin coat of gel medium. Well, maybe. It might make the paper buckle.
And really, it’s not necessary. I mean, yes, it will give the collage a uniform level of gloss (or a uniformly matte finish, if you used a matte gel medium).
It might also protect the collage from dust and damage, if you want to leave it “as is” instead of displaying it under glass.
Tip: If you’re using this in an artist’s journal – such as a spiral-bound sketchpad – place a piece of wax paper between the collage and the facing page. That will prevent the pages from sticking together.
My finished collage
Though I could probably explain all of the elements, it’s true that “a picture is worth a thousand words.”
Basically, this is about re-evaluating compromises… things that I decided were okay, short-term, as a step to a more important goal. For me, it’s easy for those to become long-term issues.
For me, the image of the happy children in colorful clothing is important. It’s how joyous and self-expressive we all can be.
And yes, we all deserve to live deliciously, savoring every moment!
Here’s the YouTube video in which I narrate how I make torn-paper collages. It’s only four minutes, so it’s a bit of a whirlwind. And remember: I’m now using Yes! Paste, not gel medium.
Artist’s journals are illustrated diaries and journals on any theme.
An artist’s journal – or art journal – can be a record of your daily thoughts, a travel journal, an exercise or diet diary, a dream journal, a place where you jot down your goals or to-do lists, or… well, almost any record that you’d like to keep in a book or notebook.
They become “artist’s journals” when you add any kind of art, illustration or embellishment to the pages.
On this page:
This is a travel journal page I created after visiting “The Nubble” lighthouse in York, Maine (USA). It’s a mixed media work, combining sketches, photos, beach glass, shells, and driftwood from that journey. The original is part of a 9″ x 12″ spiral-bound sketchbook.
This is a collage to honor the music of Dr. John (aka Mac Rebbenack). It’s art I created for the Homage to Music card deck exchange hosted by Red Dog Scott.
Dr. John is among my favorite musicians, since I first heard his music around 1970. On an early album, Gumbo, he described his sound as “a combination of Dixieland, Rock & Roll, and Funk.” Add a little Mardi Gras and gris-gris, and you’ll get the idea.
Not everyone understands his music; I do, and it inspires much of my art.
This collage was over a month in preparation. Here’s how I made it.
The first step: gesso and paint the canvas
I started with a stretched canvas that I’d primed with gesso, and then painted metallic gold (spray paint).
Then, I began layering Burnt Sienna, Cobalt Blue, French Ultramarine Blue, and finally a black that I mixed using French Ultramarine and Burnt Umber.
Because I use oil paints for their depth of color, each layer had to dry for at least ten days.
(In workshops, I use acrylics because the layers dry in minutes, not weeks.)
Then, I sanded it down for added texture
After the layers were dry, I began sanding them down for texture. Beneath the canvas, I place a wooden block just inside the stretcher bars, so the canvas was evenly supported.
I sanded down different amounts in different areas.
Next, I “painted on” a piece of antique lace. Over that, I glued three strips of teal chenille yarn.
For small pieces, I use the Golden Medium as glue; for larger pieces, I use hot glue.
Then, I added feathers. Some were gathered at the beach, others were purchased.
Sealing the canvas was next
Next, I coated the entire canvas with more Golden Medium, and waited for it to dry until tacky. At that point, I began applying Gildenglitz. For the larger areas, I increased the adhesion with pieces of double-sided tape.
Embellishments and ephemera took it to the next level
Almost finished, I glued on a dollhouse Parcheesi board, a plastic lizard, and a heart milagros that I had sprayed gold and highlighted with Dr. Martin’s calligraphy ink, in copper.
And finally, gold leaf highlights
The final step—when everything else had fully dried—was to add highlights with Rub N Buf gold leaf, in antique gold.
When I teach related workshops, I encourage students to work with rich & deep colors, gold leaf or glitter, and found objects.
Sometimes, found objects — natural ones like leaves and feathers, or bit of metal found by the roadside and in parking lots — can take this kind of collage to the magpie level, too. I love the whimsy of that.
This tribute to Dr. John remains one of my favorite collages.
[This was for a March 2010 artzine. Obviously, submissions are no longer accepted.] After considering various topics for my first/continuing zine issue, I’ve decided to make it about sketchcrawls. (If you’re not sure what a “sketchcrawl” is, visit Sketchcrawl.com or see my examples at this website.)
So, I’m looking for articles and sketch samples — in b&w, or color images that also look good in b&w — for this zine. Every contributor selected for this issue will receive a free copy of the zine, in the mail.
Your article can…
Describe a sketchcrawl you’ve been on, with sample sketches.
Share art tips for a successful sketchcrawl (or travel journal), such as how to deal with wet media.
Offer ideas to make a full-day sketchcrawl fun, such as ways to avoid blisters or tiredness, what snacks to bring, and how to cope with crowds.
Articles should be a single 8.5″ x 11″ page, unless there’s a really good reason to make it longer. (Two pages are the max… ask me, first.) If it’s easier to make your page 8″ x 10″, that’s okay, too.
The articles should be sent to me in PDF format.
The best way to do this is to write the article in DOC format, in Microsoft Word or in Open Office, or something like that.
Please use 1″ margins on all four sides of each page. Use a standard font that came with your computer. (If you’re not sure what’s “standard,” use this list: Common fonts…) The font size should be between 10 and 14 pt, though the headline can be up to 18 pt.
Scans of your artwork should be at 300 dpi, but no less than 150 dpi, and they should be part of the PDF, not separate.
Be sure to include your name and your website URL (or Flickr account URL) on the page, so people can find you and your art, online.
Then, save it (or “print” it) as a PDF.
The first sketchcrawl of 2010 is February 27th… now you have another good reason to get out and sketch on that day!
My current plan is to publish this zine in March 2010. February has sort of flown past me, as my mom – also an artist – was hospitalized. Of course, that’s upset me, and has affected my schedule.
This is the second page of a two-part interview with British dollmaker Ambermoggie.
Q. If you were stranded on a deserted island and could take just a few supplies with you, what would you need to make dolls?
A. If I were stranded on an island the items I’d need would be wool, wire, a needle and cotton and paint. I could make my own felt and the wool would also make the dolls hair. With paint I could make any colour and by thinning it down dye the fibres. I’d hate to not have a doll in progress… it doesn’t feel right.
Q. What’s your best advice for someone who’s just beginning as a dollmaker?
A. For anyone starting out I would say: Just play and let your mind lead you to your kind of doll. There are no right and wrong ways to make dolls; there are only people’s interpretation of the ideas within. I’d just go for it.
If after that you want to take classes that’s good, but don’t feel that is the only way to learn. It isn’t. I’ve never been able to take any classes in any of the arts I do but it doesn’t stop me having a go.
Q. Do you have a special way of displaying dolls that you keep, or your own collection of dolls?
A. I display my dolls that I keep on a fairy tree .It has tiny christmas lights on and the dolls. These change quite often as I tend to give most of them away.
For me the joy is in making them and then the pleasure people get from receiving them, They seem to bring something to people and that for me is the best reason to make them.
The ones that I most remember from selling were made for auctions to raise money for 9/11. People gave most generously and I received some lovely emails saying how they loved the dolls. I like the idea that my dolls are in many private collections around the world for one reason – they are loved. Not bad for someone who, up to a few years ago, was too scared to make anything.
Q. Do all of your dolls have names when you make them? If so, does the name “come to you” or do you think it up deliberately?
A. I don’t name them usually if they are going to other people; I leave that to them. I just think of them as a representation of the element they embody . I have named some of the figures that I’ve kept, from characters in books.
For example, I have one with feathers and gems who is my idea of Margaret Pye (Magpie) in the Charles de Lint Some Place to Be Flying. His work has influenced me the most. I see characters I want to make in all his books. Charles and Maryann have quite a collection of my figures and also commisioned one for a friend of theirs several years ago.
Q. Your art is always breathtakingly beautiful. Where do you plan to go with your dolls and figures in the future?
A. I look now at the first doll I made. She is sitting on my desk as we speak with her brush in hand, ready to create. The ones I make today resemble her but yet are different and that is what I’d like to continue doing: Moving ever on in different directions from this beginning.
I’m currently exploring pixie feet, faces and hands, and that is fun.
I’m also enjoying getting back to writing stories. I’ve had quite a few dolls and other items in magazines and I’d like to do more of that.
I’d also enjoy teaching some more. I did a workshop last summer at a camp we were at. There were 30 people there from around 4 years of age to 80, both male and female. It was a shock when I saw how many were waiting for the class, but we had great fun. Everyone made a doll and each one was different. It was so much fun to see how they all did.
Q. Is dollmaking an evolutionary process for you, and–if so–where do you see your dolls and figures going, in the future? Were there significant discoveries ∓ turning points for you, along the path?
A. The most significant stepping stones for me and my art were: Firstly, I could make something that reflected what I could see. Secondly, that following your heart is the most important tool in making dolls. Thirdly, that it doesn’t matter that I can’t cut a straight line or turn tiny fingers out of fabric with these stiff and clumsy fingers of mine. Finally, that I make my dolls and my art for me. That other people love them is a bonus… but not the reason to do it.
Aisling’s notes: Sukie–also known as Ambermoggie–has been a friend of mine for several years, and I’ve admired her dolls and figures for even longer. I was delighted when she agreed to an interview, because I know how busy she is. One of these days, I hope to visit her studio in England.
One of Ambermoggie’s Artlings
Q. Your dolls are wonderful! How would you describe what you do as a dollmaker?
A. I make elemental figures and goddess dolls primarily. However I’m always trying new ideas because it stops me getting bored.
Q. How did you get started as a dollmaker?
A. I’ve been making dolls for around 10 years, ever since my husband encouraged my “inner child” within to come out and play.
In my past, I had never been allowed to make things. So, it took me a long while to work up the courage to show the items I made to anyone.
Artling – Air, by Ambermoggie
Then, my husband purchased a computer for me to take my mind off my health problems.
While browsing the Internet, I found forums on different crafts. I had never heard of rubberstamping until this. I asked questions and became interested in the idea of papercrafts, and I started to make rubberstamped cards and gifts. From rubberstamping, I went on to mixed media collages and embroideries, followed by freeform beading.
One dark winters unday I was reading Somerset Studio and saw the call for artwork and a story. I started to write a story and part way through had to stop and go ask my husband “How will I make this doll I want to make?” Between us we figured it out and my first elemental was born along with a story. It went to the magazine–and unfortunately wasn’t printed–but that set me off on my elemental journey.
Valentine Artling, by Ambermoggie (Sukie)
Q. What do you like best about being a dollmaker?
A. My favourite aspect of making them is waiting to see what they want to be. I can never make 2 alike and I never know which element I’m making until I start.
Q. Describe the creative process, when you’re making your dolls and figures.
A. I make my framework and then the doll decides what colour it is. I like the spontaneity of this… It’s an adventure! I do get ideas for other dolls and try to journal them. I then go back to them days or even weeks later, and see what I’ve written and what suggests itself.
I am not very good at drawing so I draw word pictures of what something will look like.
I also get a lot of ideas for stories and art as I am going to sleep. I used to find it hard to sit up and write them down. However my lovely husband gave me a dictaphone for Christmas which is ideal for those sudden inspirations at bedtime.
Manage Cookie Consent
We use cookies to optimize our website and our service.
Functional
Always active
The technical storage or access is strictly necessary for the legitimate purpose of enabling the use of a specific service explicitly requested by the subscriber or user, or for the sole purpose of carrying out the transmission of a communication over an electronic communications network.
Preferences
The technical storage or access is necessary for the legitimate purpose of storing preferences that are not requested by the subscriber or user.
Statistics
The technical storage or access that is used exclusively for statistical purposes.The technical storage or access that is used exclusively for anonymous statistical purposes. Without a subpoena, voluntary compliance on the part of your Internet Service Provider, or additional records from a third party, information stored or retrieved for this purpose alone cannot usually be used to identify you.
Marketing
The technical storage or access is required to create user profiles to send advertising, or to track the user on a website or across several websites for similar marketing purposes.