How to Make a Simple, Single-Sheet Zine

Single sheet zines - step oneThere are as many ways to create, modify & embellish a single-sheet zine as there are artists.

How to Create a Single-Sheet Zine

Here’s a very simple way to create one:

1. Take any white sheet of paper.  Pull one out of your desktop printer, or rip one out of a notebook.  (Think of the lines as pinstripes!)

2. Fold the paper in half.  Most people fold it so it becomes a four-page zine, with each page being 8.5″ tall and 5.5″ wide, but anything’s possible. (Here’s a sample you can download and print: Free Zine #1.)

Single sheet zines - how to make them
3. Write and draw (and create other art) on each page, until it’s full.  (Alternative: Create your zine, digitally, and then print it.)

Single sheet zines - the layout and design4. Flatten the sheet so you can photocopy (or scan) it.

5. Print copies, two-sided (back to back), and fold them.  (Optional: Embellish by hand.)

Next, Share Your Zines!

Mail copies of your zines, sell them (at your site or Etsy, for example) or give them to others, sharing your ideas and artwork!

Single sheet zines - print and share
(If you live in a city, especially one with a student neighborhood, go hand some zines out and watch people blink in amazement.  They’re used to advertising flyers, etc., not actual gifts of art & inspiration.)

If you want to make and share zines, this is a great start, and one of the simplest ways to make your own zines.

Want to see a more complex zine? Print (free) the 24-Hour Zine Thing zine.

Single-Sheet Zine Layout – Expanded

Single-sheet zines can be easy or complex.  In my earlier article, Single-sheet Zine Design – Basics, I showed one of the simpler ways to create a zine.

Now, let’s talk about a more complex approach… that still uses a single sheet of paper.

But first, a little history:

In 1977, I published my first zine. It was one piece of paper, photocopied, folded, and sent out with someone’s name & address written on the outside, with a stamp.

In time, I graduated to two or three sheets of paper, and I started embellishing my zines with rubber stamps and glitter. Each one was hand-decorated.

Then, I began experimenting with artistamps (faux postage that I created for my imaginary country) and other forms of mailart.

Since then, I’ve tried nearly every possible zine format, from paper to fabric to zines-on-CDs to… well, lots of stuff.

So, if you have a question about zines, I can probably answer it or point you in the direction of someone else who can.

From what I’ve seen, the majority of people who swap or sell zines take a bunch of letter-sized printed pages (8 1/2″ x 11″) and fold them in half. Each sheet of paper is four pages of the zine.

Here’s how a single-sheet zine would look:

Single sheet zines - the layout and design

See? This can be really easy!

You can print a free zine — a variation of the single-page zine — at Free Zine #1.  (Warning: I wrote that around 2002, and included several topics that were popular/trendy at the time.  If the mention of Feng Shui offends you, skip that link.)

Zine sizes can vary.

An average zine (major oxymoron!) is five to 15 sheets of paper, meaning 20 to 60 pages. Those are the ones you’ll see at art- and zine-related shops, where you can purchase zines.

However, most zines are at the small end of that figure.  Many of them are just a sheet or two of paper, printed (and sometimes cut) and folded/stapled to make a zine.

Once you’ve made a few classic, single-sheet zines, you may want to try something more complex.

The Classic, 16-Page Zine from a Single, Legal-Sized Sheet of Paper

If you’re a purist or on a strict budget, you may love this: It’s a 16-page zine created with one sheet of legal-sized paper, period.

I don’t count the cover as a “page” when I number my zine pages, so my own version of this is 12 pages plus an outside cover & inside covers. Here’s how it fits on the paper:

16-page zine

Cut on the solid lines and fold on the dotted lines.

Staple in the center. One staple is usually enough.

One stamp on the envelope is enough to mail one of these zines.  (You can tuck them in with bill payments, notes to friends, birthday and holiday greeting cards, and so on.)

You can also scan your zine, uncut, and put it online so others can print their own copy, cut & assemble it. Easy!

This zine won’t hold much info unless you write small enough for a magnifying glass, or you find clever ways to expand the available space, such as adding fold-out pages & stuff.

However, this 16-pages-from-one-sheet-of-legal-paper is generally regarded as the classic zine, if we’re talking all kinds of zines, including poetry, fanzines, perzines (personal zines), and so on.

Zines Know No Limits!

There are many other ways to make zines. Look at books about making handmade books, for the best inspiration.

The concept is the same, but zines are usually smaller & more informal, that’s all.

If you want to create a zine that’s a work of art, that’s fine.

If you want to get wild & crazy with design, have fun with it!

Remember that a zine can be one piece of paper, b&w, printed on both sides, and folded in half. That’s a four-page zine.  I have several in my collection, and I think some of the simpler ones are better than a few larger ones I’ve seen.

So, put your art & soul into your zine, and don’t worry about the size or technical stuff.  I love almost every zine I see; size and expertise often have nothing to do with how enthusiastic I am about a zine.

What to Do with Zines

If you’ve wanted to create a zine for fun, just do it!

Give them to friends.  Sell them (at your website or Etsy, for example).  Hand them out on the street or at school.

Or, you can join a zine swap or launch your own, on- or offline.  They can be tremendous.

In addition, if you swap, you’ll receive fabulous zines that you might never see if you hadn’t swapped.

You can approach local artsy stores, gaming stores, etc., to consign (or outright sell) your zines

To learn more about zines (and download some freebies) at this website, see my articles with the Zines tag.

Zine-related links (at other people’s websites – they open in a new window)

  • Zines101.pdf – Some basics and suggestions, not just about art zines.
  • Wikipedia: Zines – So much information, it’ll make your eyes glaze over or your pulse race… or both.
  • Zine Resources – from Underground Press.  Useful & worth bookmarking or sharing.

Sketchcrawls Explained

A sketchcrawl is a full-day of sketching or drawing in a journal, or on some other art materials such as paper, canvas, etc.

It’s usually part of a stroll, alone or with a group, looking at scenery at or near a specific destination.

Sketchcrawl Supplies

It’s best to use whatever sketching supplies you’re most comfortable with. They should be light and portable.

Be sure you can use then while standing, with no other support to lean against.

Here’s what I carry with me:

A small notebook or sketchpad as a journal.

Suggested: US Art Supply’s 5.5″ x 8.5″ set of sketchbooks. The covers provide good support for sketching while standing up

A pen or pencil, for drawing lines.

Suggested: Any everyday pencil, if you’re planning simple line drawings. I like an HB (lead firmness) pencil, or a standard 2B school-type pencil. If you’re going to do shaded sketches entirely in pencil, it’s good to use a set of pencils. Amazon Basics’ set is pretty good and includes erasers and sharpeners.

My favorite pen for drawing lines is Sakura’s Pigma Micron, with an 08 tip. It’s waterproof, so I can use watercolors or felt coloring pens over it, almost immediately.

An eraser, if you’re sketching with a pencil.

Suggested: I carry both a kneaded rubber eraser and a standard drafting-style eraser. (Both are in the Amazon Basics set.)

Something to add color, like watercolors (and water, and a brush), or colored pens or pencils.

Suggested: The Sakura Koi set of watercolors is very good. If you’re going to use colored pencils, Sargent makes a good, portable set. But, you may want to try something unusual, like a Petallush pencil. (Note: I haven’t tried them for sketchcrawls, yet.

Tape, to fasten ephemera in your art journal.

Suggested: I’d use a temporary tape, like blue painter’s tape in a narrow width. Then I’d use glue or something more permanent once I returned home. (Then I can decide the best position, angle, or page for whatever the ephemera is.)

Snacks, in case you get hungry.

Suggested: Carry both a protein-rich snack (like a protein bar for sustained energy) and something sugary (for a quick, late-in-the-day burst of energy).

Optional: A camera (you can use your phone), in case you want to add printed photos to your journal, later.

In general, I suggest keeping your art supplies simple and as light (and perhaps small) as possible.

The most essential item will be your sketchpad or journal. Be sure you can lean on it and sketch without other support.

More Sketchcrawl Supplies Ideas

Can’t find the perfect watercolor set? Here are some ideas for making your own mini-watercolor palette:

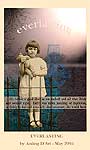
What a Sketchcrawl Journal Looks Like

Sketchcrawl supplies and examplesYour sketchcrawl journal (or sketches) will look like whatever YOU decide.

There are no rules.

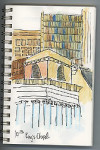
Would you like to see an example?

In July 2009, I took part in a sketchcrawl around Boston’s Freedom Trail. (You can see some of those sketches and photos at Sketchcrawl Notes – July 2009.)

Sketchcrawls are great practice for creating travel journals, too. The materials & techniques are the same.

See if you enjoy it!

Get Started Now

You can go on your first sketchcrawl right now.

You could try a sketchcrawl somewhere near your home, even in your backyard.

Then, try a few more sketchcrawls, on your own or with friends.

It’s okay to organize your own sketchcrawls. This has always been a very fun, informal way to create art as you explore cool and interesting locations.

Online, you may find sketchcrawl announcements, too.*

You can follow me at Facebook (as “Aisling Creates”) for my sketchcrawl plans, and other artsy news.

Sketchcrawls – Not Just for Walking Tours

You can use those same sketchcrawl supplies — carried in your purse or backpack — when you travel.  Whether it’s a daytrip, a road trip, a holiday, or a vacation, sketching can provide you with wonderful keepsakes when you get home.

(Traveling on a plane? remember some airlines’ four-ounce rule on liquids… no big containers of gel medium, glue, or tubes of paint.)

For me, sketching – with pencil, pen, markers, or watercolors – is a relaxing way to enjoy the scenery, wherever I am. Whether it’s a local scene or a trip abroad, art journaling helps me notice — and appreciate — more of what’s around me.


*Note: The sketchcrawl (dot com) site is one place you’ll find sketchcrawls announced.

However, that site’s owner claims that the term “sketchcrawl” is trademarked. Umm… no. Checking the trademark registry regularly, I still don’t see sketchcrawl registered as a trademark.

I’m not sure it can be trademarked (or copyrighted) since the term has been in use for decades, or perhaps longer. Not unless it’s connected with a very specific project, and only for that particular use. (For example, “ghost hunters” couldn’t be trademarked, but it could be licensed, just for the TV series.)

So, I’m reluctant to recommend that sketchcrawl website.

Zine update – Sketchcrawl theme

[This was for a March 2010 artzine. Obviously, submissions are no longer accepted.] After considering various topics for my first/continuing zine issue, I’ve decided to make it about sketchcrawls.  (If you’re not sure what a “sketchcrawl” is, visit Sketchcrawl.com or see my examples at this website.)

So, I’m looking for articles and sketch samples — in b&w, or color images that also look good in b&w — for this zine.  Every contributor selected for this issue will receive a free copy of the zine, in the mail.

Your article can…

  • Describe a sketchcrawl you’ve been on, with sample sketches.
  • Share art tips for a successful sketchcrawl (or travel journal), such as how to deal with wet media.
  • Offer ideas to make a full-day sketchcrawl fun, such as ways to avoid blisters or tiredness, what snacks to bring, and how to cope with crowds.

Articles should be a single 8.5″ x 11″ page, unless there’s a really good reason to make it longer.  (Two pages are the max… ask me, first.)  If it’s easier to make your page 8″ x 10″, that’s okay, too.

The articles should be sent to me in PDF format.

The best way to do this is to write the article in DOC format, in Microsoft Word or in Open Office, or something like that.

Please use 1″ margins on all four sides of each page.  Use a standard font that came with your computer.  (If you’re not sure what’s “standard,” use this list:  Common fonts…)  The font size should be between 10 and 14 pt, though the headline can be up to 18 pt.

Scans of your artwork should be at 300 dpi, but no less than 150 dpi, and they should be part of the PDF, not separate.

Be sure to include your name and your website URL (or Flickr account URL) on the page, so people can find you and your art, online.

Then, save it (or “print” it) as a PDF.

The first sketchcrawl of 2010 is February 27th… now you have another good reason to get out and sketch on that day!

My current plan is to publish this zine in March 2010.  February has sort of flown past me, as my mom –  also an artist – was hospitalized. Of course, that’s upset me, and has affected my schedule.

The Return of the Zine

schoolglueThis is from my archives, when I sent “creative somethings” (including zines) to my subscribers.

Recently, I’ve been thinking of restarting this project, perhaps through Patreon. If that sounds interesting to you, let me know.


The zines are returning in 2010.

They’ll be in three versions:

1. Paper copies (“old school” b&w) for previous subscribers.

2. B&w digital copies – free or very inexpensive downloads

3. Digital copies in color – downloads available for a fee to cover bandwidth

The first/new issue

If you’d like to be included in the first zine — the theme is sketchcrawls, so anything related to that is fine — see that page for details.

This first issue will be 8.5″ x 11″ pages… letter size.

Stay tuned for news about the issues that will follow.

What’s ahead

In the future, I may be interested in half-sheet articles (8.5″ x 5.5″) with color illustrations that will also look okay in b&w.   I need graphics at 150 dpi or better.  (If you have no idea what that means, just send me a photo.  Most digital cameras take pictures large enough to print well.)

For later issues, I’ll be especially interested in:

– Journal pages
– Gluebook pages
– Sketchcrawl examples
– Dolls/figures: cloth and assemblage
– Shrines & mini-shrines
– ATCs and ACEOs  (artist’s trading cards – including art cards editions & originals)
– Fabric art (quilts, wearables, etc.)

I’m planning to focus on paper & fiber arts, and perhaps some fine art (watercolors & oil painting) and dimensional work… but mostly paper & fiber arts.

I’m interested in art-related topics, too, particularly about being organized as an artist.

In addition, since this is primarily intended as an “old school” style of zine, I’m interested in anything with a vintage or antique theme related to arts & crafts.  Funky fun or serious re-enactors’ stuff… I’m very interested.

Keep it “office safe”

All art and text should be “office safe” (that is, if your boss catches you looking at the zine online, during a break, he/she won’t sputter and raise an eyebrow).

Avoid religious & political controversy, too.  (Yes, I’m passionate about both, but I want this zine to encourage creativity, not turn people off because they shift into left-brain mode over some statement-as-art.)

Please don’t think your work “isn’t good enough.”  Generally, I prefer art (visual, written, photos, music) that is raw and unpolished.  When it gets too polished, it’s a yawn for me.  So, send it anyway.

You’ll receive a free paper (b&w) copy of the zine with your work in it, and the digital downloads, free, as well.

Past subscribers

If you’re a past subscriber to my zines or “creative somethings”, please update your address at this form. [Link]

Important: That request is ONLY for people who were paid subscribers in the past.  This is NOT a freebie.

In late February 2010, I’ll be sending out postcards to previous subscribers, to confirm your postal (snail mail) address.

Magpie logic

I’ve been completely redesigning my office/studio this week.

The room is a normal bedroom size, about 12′ x 12′, and it serves two important purposes:  I write in this room, and I create art here.

Writing

The writing requires lots & lots of reference books within easy reach.  I write on a variety of topics — mostly related to art, travel, history and/or paranormal themes — and I’m well-known for my exhaustive research using obscure (but fascinating) references.

Writers need to promote themselves and their books.  So, I have stacks of PR materials, including a dozen different styles of business cards, each tailored to a particular audience. I need to access them easily when I get a call from an event or a reporter.

Art

My art is all over the place, sometimes literally.

080401-3treesbush-illus-dsI paint with oils and acrylics.  My canvases can be 36″ x 48″ or larger, and as tiny as 3″ x 3″. It’s easy to lose the little canvases and difficult to store the huge ones.  They end up in boxes, behind doors, in closets, under beds, etc.

I also create fabric art, especially dolls and wearable art, plus quilts.  My paper arts require considerable space, including my basic collage supplies (lots & lots of magazines) and embellishments.

Then there are the one-off assemblages that occur to me at odd moments, which — completed or in gestation — take up space.

Placing all of my writing supplies and all of my art supplies in the center of my studio floor… well, it’s been exhilarating and enlightening.

Magpie syndrome

magpie-black-billedI often think of myself as a magpie, in a way.

Sometimes, I see things that spark a project idea.

More often, that project idea is how I explain to myself why I need to own whatever-it-is. It’s how I justify the acquisition.

This is important: If I stay locked into that project idea and don’t explore other options, that collected object becomes clutter.  Two years later, I have only the vaguest memory of the painting, collage, shrine or doll that I intended to make.  The energy is lost, at least partly in regret.

Don’t let the guilt obliterate the energy of the object, or how it resonates — no matter how quietly — with your creative impulses.

That’s what I’m learning as I open boxes and rediscover half-finished projects and objects that never realized their greatness in completed art.

yorkh1-day1sdsw
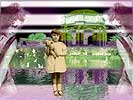
At least half a dozen paintings were in limbo, waiting for the technique I’m currently developing in my work.  (The photo at right is an example.  It’s barely started, but I love the glow of the houses facing the sunlight.)

Until I hauled those paintings out of the closet last night, I had no idea those paintings were such wonderful starts. With a fresh eye, I can see what works — and what doesn’t — and the energy is surging off the canvas as I admire it.

(I thought they were just bad paintings that I’d paint over, eventually. But, every time I looked at them, I wanted to cry because I could see the sparks of brilliance in them.  I couldn’t bear to paint over them, and now I’m glad that I didn’t.)

Yarn intended as doll hair now sings to me as embellishment wall hanging.

Books that I purchased are falling open to illustrations and phrases that almost glow with inspiration.

This is a very cool experience.

Though I realize this can be an excuse to accumulate clutter, I think it’s vital to avoid the extremes of collecting or purging, compulsively.

I’m also mindful that — from a bigger perspective — if you’re supposed to create a particular work of art, the supplies will probably show up, almost on their own.

However, as I sit here surrounded by art supplies, books and projects, I’m astonished at how precisely my “magpie collection” is fitting into place.  It’s as if I always knew that this day would happen.

It’s a concept worth considering.

My paintings: Three Trees (Bush Park, Houston, TX)
York Harbor View (York Harbor, ME) – in progress
Photo credit: Magpie – Juha Soininen, Finland


Zine Layouts

I published my first zine in 1977. It was one piece of paper, printed on one or two sides, folded, stamped, and sent out with someone’s name & address written on the outside.

In time, I graduated to two or three sheets of paper, and I started rubber stamping & glittering my zines. Yes, each one was hand-decorated.

Since then, I’ve explored nearly every possible variation on the zine theme: Color and b&w; on 8 1/2″ x 17″ paper, and on a single 8 1/2″ x 11″ sheet, folded in half; and so on.

From what I’ve seen, the majority of people who create homegrown zines use letter-sized printed pages (8 1/2″ x 11″) and fold them in half. Each sheet of paper is four pages of the zine.

An average zine (and believe me, that’s an oxymoron!) is five to 15 sheets of paper, meaning 20 to 60 pages.

In swaps, most zines are at the small end of that figure.

In fact, plenty of them are just a sheet or two of paper.  They’re printed or photocopied (and sometimes cut).  Then they’re folded, and usually stapled to make a zine.

The classic zine design is funky. If you’re a purist, you’ll love this. If you’re on a budget, you’ll also love this: It’s a 16-page zine created with one sheet of legal-sized paper, period.

I don’t count the cover as a “page” when I number my zine pages, so my own version of this is 12 pages plus an outside cover & inside covers. Here’s how it fits on the paper:

sketch of a 12-page zine created from one sheet of paper

Cut on the solid lines and fold on the dotted lines.

Staple in the center. One staple is usually enough.

One stamp on the envelope is enough to mail one of these zines. You can tuck them in with your bill payments, with your notes to friends, with your swaps, with your orders to catalogues, and so on!

You can also scan your zine, uncut, and put it online so others can print their own copy, cut & assemble it. Easy!

But, it won’t hold much info unless you write small enough for a magnifying glass, or you find clever ways to expand the available space, such as adding fold-out pages & stuff.

That said, the 16-pages-from-one-sheet-of-legal-paper is regarded as a classic zine, if we’re talking about all kinds of zines, including poetry, fanzines, and so on.

Oh, sure, there are other ways to make zines. Look at books about making handmade books, for the best inspiration.

The concept is the same, but zines are usually smaller & more informal, that’s all.

If you want to create a zine that’s a work of art, that’s fine. If you want to get wild & crazy with design, that’s fine too.

However, keep in mind that a zine can be one piece of paper, b&w, printed on both sides, and folded in half. And that’s a four-page zine.

Some of these single-page zines are still in my collection.  By contrast, I haven’t kept some larger zines, though they were lovely to look at and filled with wonderful sentiments.

So, put your art & soul into your zine, and don’t worry about the size or technical stuff.

I love almost every zine I see.  Size, expertise, and visual quality often have nothing to do with how enthusiastic I am about a zine!

What I’m saying is: If you’ve wanted to create a zine for fun, or just to see what it’s like to make one, just do it!

The bonus is, if you swap your zines with others, you’ll receive fabulous zines in return, which you might never see if you hadn’t swapped.

Zine Basics

For years, I was the list moderator for the botmzines group/list at Yahoo!Groups, I decided to throw together some pages about zines.

For starters, the “botmzines” name came from the group that inspired it, the Book Of The Month list… BOTM. So, although botmzines swaps aren’t on any specific calendar, the group started with that name and so it remains.

With that bit of trivia out of the way, let’s discuss zines!

Schedules

First of all, if you want something that is published on time, and is proofread, has high-quality graphics and writing, and generally sticks to the theme it had when you subscribed to it… subscribe to a magazine. You know, like Time, or Newsweek.

Zines are published on whim. Oh, sure, some people manage to write right-brained zines on a left-brained schedule. My hat is off to them. I have no idea how they manage it.

For fun, not profit

Zines are labors of love. We don’t make money on them, or if we manage to show a profit on one issue, we go crazy writing & re-writing the next issue, including color pages or something, and–bingo–we’re back in the red again. In other words, zines are not a way to make a living. Or even pick up some extra spending money. For most of us, zines cost money to produce but we love ’em anyway.

Zines are fun in a way that can’t be put into words. If you’re driven to create them, you’ll get a sense of satisfaction (and some angst) when you complete one and it’s in the mail to others.

Receiving a zine can be… well, I hate to say ‘better than chocolate’ because that’s such a cliche, and very personal.

That said, when a zine is cool, there aren’t enough superlatives for it. When a zine is weird, it’s truly out there… and usually fascinating, as well.

It’s often a love/hate thing.

There are almost NO generalities that can be made about zines, so let me tell you about my own eccentricities:

They make me crazy, but I love them anyway. And I love having zines to swap so I can get others’ zines.

My zines are published at odd times, vaguely quarterly. They bear a variety of names, also whim-based. They may be half-pages (printed on 8 1/2″ x 11″ paper, folded in half), or bigger, or even smaller. Some have cardstock covers, but most are all on the same kind of paper (and color) that came out of the photocopy machine.

Most of my zines are b&w. Most of them are loosely related to art, especially paper arts. Most are a mix of printed text, scribbled-in notes, and my own graphics.

Generally, after six months or so, I lose track of when people’s subscriptions started, so I close down new orders for awhile, and send out more than the subscription’s worth of copies (meaning that early subscribers can end up with two or more times the number of issues that they ordered). And then I start up again.

(Yes, that’s embarrassing. It’s also not unusual among people who create art zines.)

Generally, I make zines when I receive someone else’s zine and my batteries get recharged.

Why people create zines

From the classic guide to zine-making, Zine Scene: The Do It Yourself Guide to Zines, by Francesca Lia Block & Hillary Carlip:

“Tell your story… your obsessions, your fears, your dreams, in words and pics, because it is powerful, because it kicks, to express and connect, even if it’s not always pretty, cool, or slick.”

Also from Hillary Carlip, “Sometimes paper is the only thing that will listen to you.”

Worried about how it will look? Here’s another quote from Zine Scene:

“Who knows what Baroque pearls and sizzling diamonds of content lie buried in the impossibly small print, or floppity-sloppity-scrawly handwriting of a rough-to-read zine?”

In other words, say whatever you want to, and don’t worry about how it looks.

Or… go crazy with how it looks and forget about saying anything overtly pithy.

Either one works–or both!

Recommended reading, online

There’s so much good zine info online, I’m not sure why I even create webpages about them. Seriously. The same people who compulsively make zines, keep rolling along with enthusiasm and tell you all about them, online.

My favorite resources & inspirations, offline

  • Others’ zines. Plain & simple. Get your hands on as many as you can. The easiest way is to swap! You can swap through the botmzines list at Yahoo!Groups, linked above.
  • The Garage, Issue No. 2, published by Diane Moline. As far as I know, Diane makes her zines in very small numbers, and only for swaps. I’m thrilled to own two copies of The Garage.
  • Dog Eared Magazine, Issue Five, about Zines. For more info, see dogearedmagazine.com
  • Zine Scene: The Do It Yourself Guide to Zines, a book by Francesca Lia Block and Hillary Carlip. It’s considered a classic. When I checked in mid-2006, it had been out of print for awhile.  If you see a copy, old or new, snag it if you’re serious about zines.

ATC Tutorial 4 – Memories – Finishing the ATC

Continued from ATC Tutorial 3 – Memories – Giving it meaning

The card was very nearly finished. I liked the colors and the general design of the image, but it needed just a little… something else. I didn’t know what, yet.

This is the part of the process that can take forever, since it’s trial and error. There’s a feeling that you’re almost there, and it’s only working with a set time limit that prevents the card from becoming a two-week continuing project.

everlasting ATC I remembered an ATC that I made earlier, with a photo of a little girl and her teddy bear.

Suddenly, the new card was about a frail and elderly woman, remembering her days as a “flapper”.  She was remembering her childhood near San Francisco when she and her father would go to the pond by the Palace of Fine Arts, to feed the birds.

I still had the layers from my earlier card, so it was easy to copy the layer with the little girl and position her on this new ATC.

I liked the effect immediately.

final image for ATC

Before flattening the layers, I selected that band of natural color where the water meets the land, and I increased the saturation.

Then, I chose the inverse selection and lightened it, reducing contrast as well.

Finally, I flattened the layers and reduced the image size to fit on a 3″ x 5″ ATC.

I added the border and text, using the P22-Monet font. I deliberately overlapped the text and the image a little, because I wanted it to look like the lady had written this on the card herself.

Here is the completed card:


right-click on the card to save it to your hard drive

You can print this card at 150 dpi to create you own copy of this 3″ x 5″ ATC. (It’s okay to adjust the size to fit the more popular 2.5″ x 3.5″ format.)

ATC Tutorial 3 – Memories – Giving it meaning

Continued from ATC Tutorial 2 – Memories – Adding More Layers

At this point, the card was pretty… but it had no real theme or meaning to it. And, while “pretty” art can stand on its own merits, I rarely choose to make art without another layer of meaning. So, I started examining the card for clues.

I increased the contrast and lightened the background layer. I knew that something needed to go in front of it, and by reducing the “obviousness” of the background, it helped me to focus.

I was still drawing a blank.

So, I went to my copy of Photoshop Secrets of the Pros: 20 Top Artists and Designers Face Off for ideas. (If it’s selling for under $10 at Amazon and you enjoy this kind of art, get a copy. Otherwise, see if your public library owns it. If they don’t, tell them to buy a copy.)

I was inspired by the work of John Henry Donovan, of 5pieces.com.

another step in the ATC process - inverting color I tried inverting color (Image–>Adjust) in strips with five-pixel feathering. However, once the stripes were dark, I needed to duplicate the layer with the Paris-Draped figure, to make it more opaque.

I wasn’t too sure that I liked the effect. In fact, it was pretty much ick. And, having set a three-hour deadline–trying to mimic my one-hour ATCs but allow for this documentation–I needed to finish the card quickly.

I deleted the extra layer of Paris-Draped so that the figures were transparent again. And, I desaturated the layer. But, as I was using the Hue/Saturation screen for this, I accidentally altered the background hues… and liked the effect. ATC starting to look good

I started selecting rectangular areas of the background, and changing the hue of each of them and then switched them back again.

Finally, I worked with the area nearest the middle and altered it back to its original, natural colors.

Then, I chose Select–>Inverse and tweaked the remaining background image and adjusted it until I was happy with it.

Finally, the Paris-Draped layer had to be adjusted as well, both contrast and hue.

Now, I was getting a theme. The Paris-Draped figure was clearly from the past, and the single band of natural/real coloring in the image was like a faded memory… only part of it was accurate and the rest was a little surreal.

Conclusion: ATC Tutorial 4 – Memories – Finishing the ATC